Getting started
Covering the basics from authentication to minting your first NFT.
What we cover in this guide
In this guide, we will explain how to authenticate to our API service, as well as create your first NFT. We will walk you through several endpoints to help you get started. We will cover the following topics:
Prerequisites
- You need a Venly business account, if you don't have one, click here to register in our Developer Portal, or follow our step-by-step guide, Getting Started with Venly.
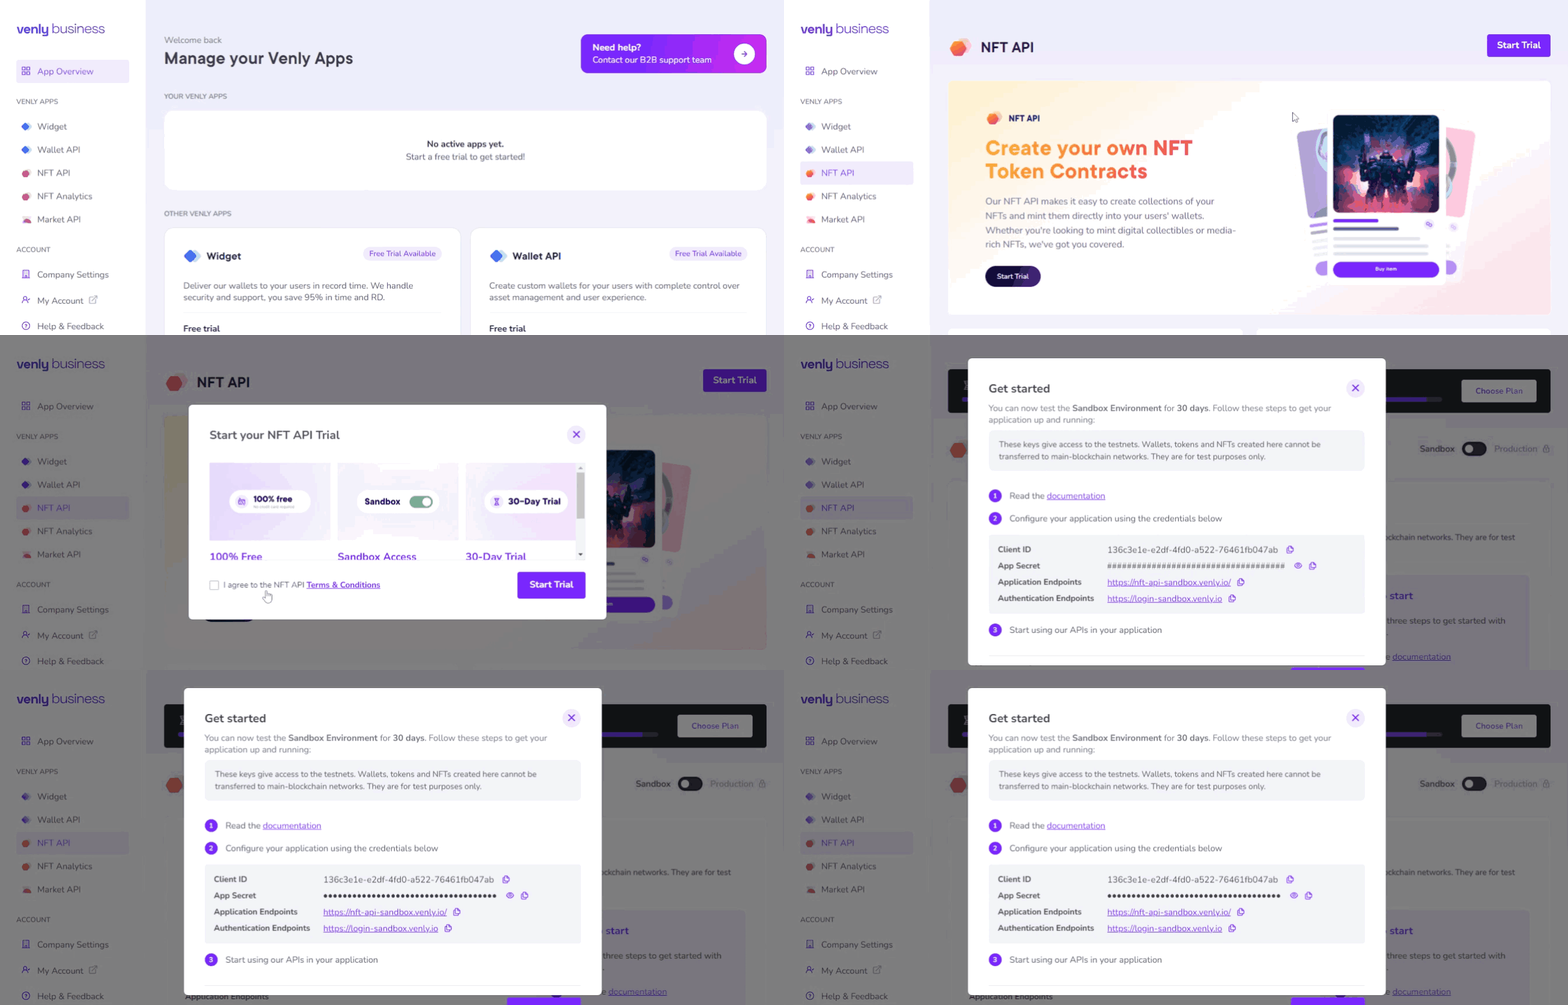
- You need an active trial or paid subscription of the NFT-API. You can start a 30-day free trial for the NFT-API as shown below.
- You need your Client ID and Client Secret which can be obtained from the Portal as shown below.

Starting a trial subscription and obtaining a Client ID and Client Secret
All the API calls for this guide run on a sandbox environment. You can test and experiment with API calls without causing any harm to the actual blockchain or data.
There are several ways to run API calls, but for this guide, we will be using Swagger or Postman to execute the different endpoints.
1. Authenticating
In order to obtain a bearer token and authorize all API calls, you will need your Client ID and Client Secret. These credentials are necessary for authentication purposes.
Click here to learn how to retrieve a bearer token and authenticate API calls.
- Click here to open Swagger for the NFT API
- Click on the Authorize button
- Enter your
Client IDandClient Secret - Click the Authorize button on the bottom
Congratulations 🎉, you have authenticated successfully, and now you can run API calls.
Please note that the base path for all NFT API endpoints is https://nft-api-sandbox.venly.io
2. Creating a Contract
Let's start by defining your first contract. This contract will represent a collection for the NFTs. We will create a contract on the Polygon (MATIC) testnet chain.
As the API calls are running in a sandbox environment, the contract will be created on a testnet chain. In this example.
Request Endpoint: reference
POST /api/minter/contractsRequest Body:
| Parameter | Description | Type | Required |
|---|---|---|---|
name | The name of your NFT collection/contract | String | ✅ |
description | The description of your NFT collection/contract | String | ✅ |
image | The image URL for your NFT collection/contract that will be displayed | String | ✅ |
chain | This is the blockchain on which you want to create the contract on | String | ✅ |
externalUrl | This can be any link such as a link to your website, landing page, etc. | String | ✅ |
{
  "name": "My first collection",
  "description": "Sample description",
  "image": "https://pbs.twimg.com/profile_images/1669300450649157635/4xg-wsbK_400x400.jpg",
  "chain": "MATIC",
  "externalUrl": "www.venly.io"
}
Response Body:
Save the
idfrom the response body. This is the contract ID.
{
  "name": "My first collection",
  "description": "Sample description",
  "confirmed": false,
  "id": 53492,
  "secretType": "MATIC",
  "symbol": "MYFICO",
  "externalUrl": "www.venly.io",
  "image": "https://pbs.twimg.com/profile_images/1669300450649157635/4xg-wsbK_400x400.jpg",
  "media": [],
  "transactionHash": "0x5baa0794fc31584b04514b8d40d9e016594d335eb5dae2555ad3ca68cf620e18",
  "storage": {
    "type": "cloud",
    "location": "https://metadata-staging.arkane.network/metadata/contracts/53492"
  },
  "external_link": "www.venly.io"
}
3. Creating Token-type
Next, we will create a token-type which serves as a template for minting NFTs. This means you just have to define the NFT template once with parameters like its name, image, attributes, etc, and then you can mint multiple NFTs directly to your end-users wallets.
Defining token types helps structure the information such as attributes and animationUrls.
Request Endpoint: reference
POST /api/minter/contracts/{contractId}/token-typesRequest Body:
| Parameter | Param Type | Description | Type | Required |
|---|---|---|---|---|
{contractId} | Path | This is the contract ID, which can be found in the response body of the create contract endpoint. | String | ✅ |
name | Body | The name of the token-type | String | ✅ |
description | Body | The description of the token-type | String | ✅ |
image | Body | The image URL for the token-type that will be displayed | String | ✅ |
{
    "name": "My first NFT",
    "description": "Venly",
    "image": "https://storage-qa.venly.io/applications/1f64ded9-2a05-4824-b682-661023359357/StickFigureHi.png"
}
Response Body:
Save the
idfrom the response body. This is the token type ID.
{
  "id": 1,
  "confirmed": false,
  "name": "My first NFT",
  "description": "Venly",
  "fungible": false,
  "burnable": false,
  "image": "https://storage-qa.venly.io/applications/1f64ded9-2a05-4824-b682-661023359357/StickFigureHi.png",
  "imageThumbnail": "https://storage-qa.venly.io/applications/1f64ded9-2a05-4824-b682-661023359357/StickFigureHi.png",
  "imagePreview": "https://storage-qa.venly.io/applications/1f64ded9-2a05-4824-b682-661023359357/StickFigureHi.png",
  "currentSupply": 0,
  "animationUrls": [],
  "attributes": [],
  "transactionHash": "0x60bc12e2a99bb18b05b62099f395b41f25f33136a04ff4cb811a92ebce59c366",
  "storage": {
    "type": "cloud",
    "location": "https://metadata-staging.arkane.network/metadata/contracts/53492/tokens/{id}"
  }
}
4. Minting an NFT
Request Endpoint: reference
POST /api/minter/contracts/{contractId}/types/{typeId}/tokensRequest Body:
| Parameter | Param Type | Description | Type | Required |
|---|---|---|---|---|
{contractId} | Path | This is the contract ID, which can be found in the response body of the create contract endpoint. | String | ✅ |
{typeId} | Path | This is the token type ID, which can be found in the response body of the create token-type endpoint. | String | ✅ |
destinations | Body | This object includes details of the wallet address and amount of NFTs to be minted | Array of Objects | ✅ |
address | Body | The wallet address where you want to mint and send the NFT | String | ✅ |
amount | Body | The number of NFTs you want to mint | String | ✅ |
Make sure the destinations.
address(wallet address) has the same chain as the contract. In this case, it should be a Polygon wallet(MATIC).
{
  "destinations": [
    {
      "address": "0xe396E30554F97088FA6f9297339c3bDc575ba306",
      "amount": 1
    }
  ]
}
Response Body:
[
  {
    "transactionHash": "0xeb02408b363e029eabf51de8458c7f09e2a691f6da6df25af6df2d6b0515b9d0",
    "metadata": {
      "name": "My first NFT",
      "description": "Venly",
      "image": "https://storage-qa.venly.io/applications/1f64ded9-2a05-4824-b682-661023359357/StickFigureHi.png",
      "imagePreview": "https://storage-qa.venly.io/applications/1f64ded9-2a05-4824-b682-661023359357/StickFigureHi.png",
      "imageThumbnail": "https://storage-qa.venly.io/applications/1f64ded9-2a05-4824-b682-661023359357/StickFigureHi.png",
      "backgroundColor": "#ADD8E6",
      "background_color": "#ADD8E6",
      "externalUrl": "www.venly.io",
      "external_url": "www.venly.io",
      "animationUrls": [],
      "attributes": [
        {
          "type": "property",
          "name": "Charisma",
          "value": "9",
          "maxValue": "10",
          "traitType": "Charisma",
          "trait_type": "Charisma"
        },
        {
          "type": "system",
          "name": "tokenTypeId",
          "value": "8",
          "traitType": "Token Type ID",
          "trait_type": "Token Type ID"
        },
        {
          "type": "property",
          "name": "maxSupply",
          "value": "10",
          "traitType": "Max Supply",
          "trait_type": "Max Supply"
        }
      ],
      "contract": {
        "address": "0x5377f7af963ae7edec6a3fa2b349ef60fa3a28d8",
        "name": "My first collection",
        "symbol": "VENZ",
        "image": "https://pbs.twimg.com/profile_images/1669300450649157635/4xg-wsbK_400x400.jpg",
        "imageUrl": "https://pbs.twimg.com/profile_images/1669300450649157635/4xg-wsbK_400x400.jpg",
        "image_url": "https://pbs.twimg.com/profile_images/1669300450649157635/4xg-wsbK_400x400.jpg",
        "description": "Sample description",
        "externalLink": "www.venly.io",
        "external_link": "www.venly.io",
        "externalUrl": "www.venly.io",
        "external_url": "www.venly.io",
        "media": [],
        "type": "ERC_1155"
      },
      "fungible": false
    },
    "destinations": [
      "0x7312750DF4d2057b758a61C7017729c6Ec9bB3E9"
    ],
    "tokenIds": [
      9
    ],
    "mintedTokens": [
      {
        "destination": "0x7312750DF4d2057b758a61C7017729c6Ec9bB3E9",
        "tokenId": 9,
        "txHash": "0xeb02408b363e029eabf51de8458c7f09e2a691f6da6df25af6df2d6b0515b9d0"
      }
    ]
  }
]
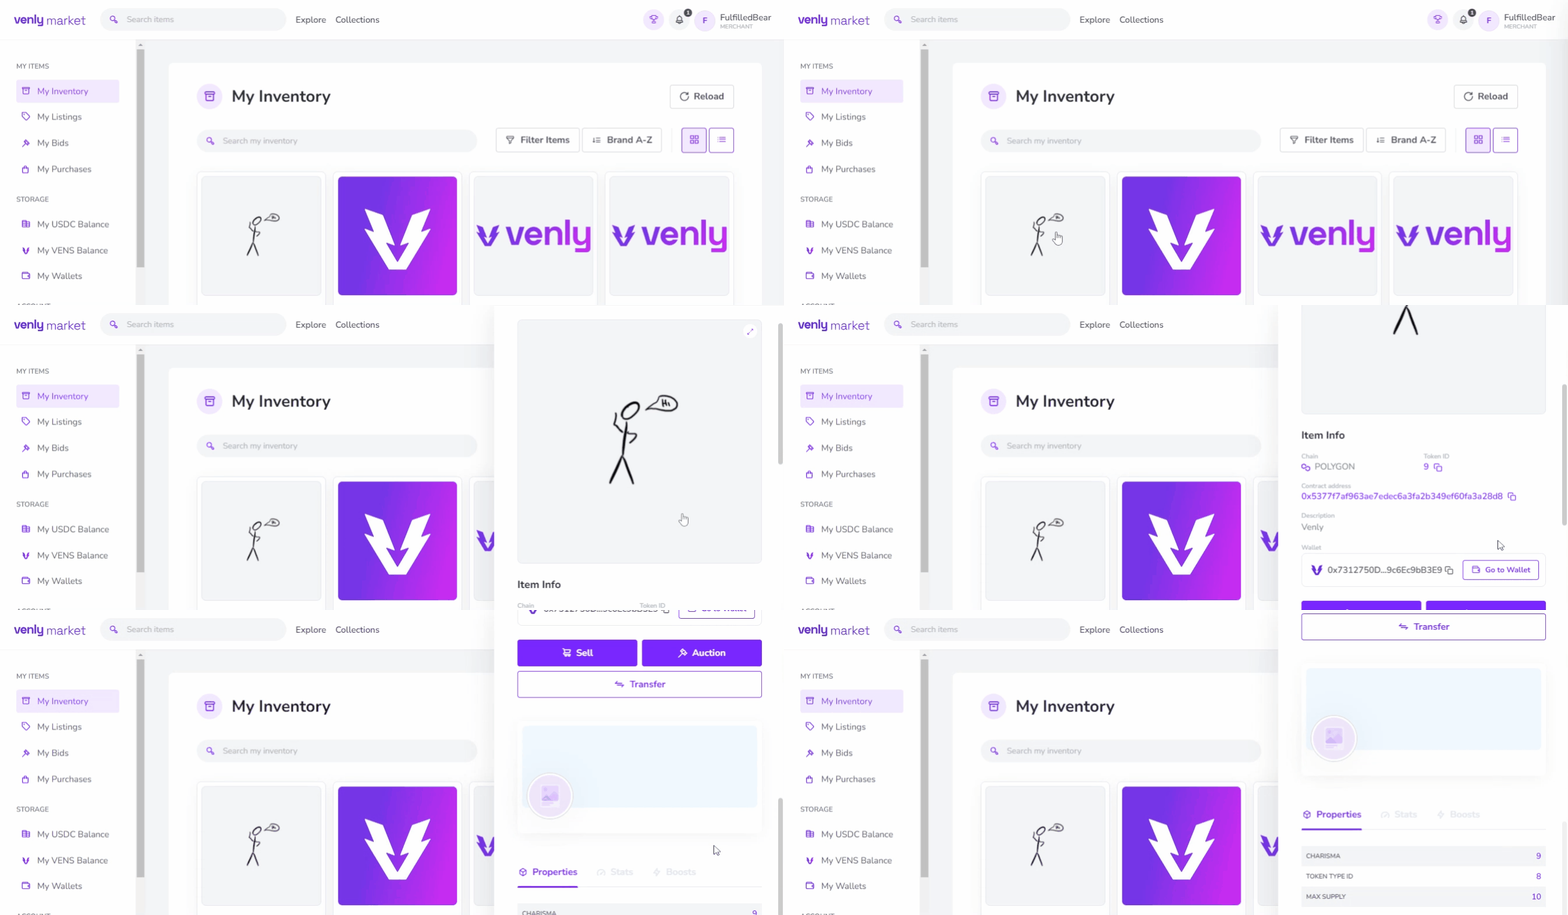
Minted NFT Preview

Minted NFT Preview on Venly Market
Updated about 1 month ago