
Getting started with Unity
A quick start guide to get you up and running
The Venly Unity Package is built on top of the Venly Core API and exposes all the Core functionality usable from within your Unity Scripts. The package also contains additional helpers, engine-specific extensions, and features.
Installation
The Venly Unity Package is conveniently distributed via a Git URL, allowing for effortless importation through Unity's Package Manager. Once imported, leverage Venly's SDK Manager to ensure your package stays current and up-to-date with ease.
Package Git URL: <https://github.com/Venly/Unity-SDK.git?path=Packages/com.venly.sdk>
Installing The Package
- Go to Window/Package Manager
- Click on the "+" sign in the top left corner of the Package Manager window
- Select "Add package from git URL"
- Insert the Git URL (<https://github.com/Venly/Unity-SDK.git?path=Packages/com.venly.sdk>) and click "Add"
- You should have access to the SDK Manager (
Window/Venly/SDK Manager) once the Package Installation is done
Configuration
Some settings need to be configured before you'll be able to use the SDK functionalities. The required configurations can be made via the Settings panel of the SDK Manager (Window/Venly/SDK Manager).
The settings are stored as a Scriptable Object inside your project directory. Default path: '
Assets/Resources/VenlySettings.asset'
Make sure this file resides inside a '
Resources' folder if you are planning to move it to another location inside your project.
Client Credentials
In order to make use of Venly's services within the Unity Editor, a Client ID and Client Secret is required. Client Credentials can be obtains by signing up in the Venly Portal, where each service has a 30-day free trial period. For more information on how to sign up in our Portal we suggest to read Getting Started with Venly.
Client Credentials are ONLY accessible within the Unity Editor. All traces and links to these credentials are removed for Runtime Builds.
These credentials are used for the following purposes,
- Developer Mode (Dev Mode), a direct API interaction without needing a dedicated Backend Provider
- Venly SDK Manager, use the credentials to interact with the Venly Services from within the Unity Editor.
Once you have your Client ID and Client Secret you can enter them in the corresponding fields for the Venly Unity SDK Manager and press Save.
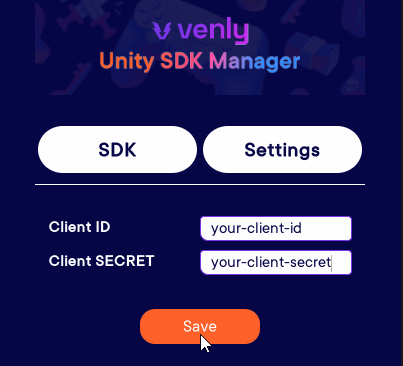
Entering your Client credentials in the Unity SDK Manager
General Settings
If your credentials are validated, you'll have access to the general settings of the SDK Manager. This panel shows some general information and gives you some options to configure. The default settings should be fine for the first test run!
Double-check that your default settings are set to
- Environment = '
Staging' (Testing Environment)- Backend Provider = '
Dev Mode' (No backend required)
Initialisation
After correctly configuring the SDK you should now have access to the Editor Tools like the Contract Manager.
In order to use the API functions inside your script, you have to Initialize the runtime Venly SDK Components. Make sure this happens before using any of the API-related functions.
void Start()
{
    VenlyUnity.Initialize(); //Initializes the API (based on SDK Manager settings)
}
Your first call
At this point there will be no data linked to your account, so let's start by creating a new Wallet!
The function we need is part of the Server API, but because we are currently running in Developer Mode, we can safely call this from within the Unity Editor.
Hello Wallet!
n order to create a new wallet, we have to define some parameters. Most API functions have a dedicated parameter object (Vy...Dto) that exposes the possible parameters.
Make sure to initialize the API (Should only happen once)
// Make sure to initialize the API (Should only happen once)
VenlyUnity.Initialize();
Define the CreateWalletRequest
// Define the CreateWalletRequest
var createParams = new VyCreateWalletRequest()
    {
        Chain = eVyChain.Matic,
        Description = "My First Wallet", //A simple description
        Identifier = "demo_0", //Can be used to filter wallets
        Pincode = "1234", //Needed to perform certain actions on the wallet (e.g. transfer)
        WalletType = eVyWalletType.WhiteLabel //WhiteLabel is fine in most cases
    };
Calling the API (VenlyAPI > Wallet > CreateWallet)
// Calling the API (VenlyAPI>Wallet>CreateWallet)
VenlyAPI.Wallet.CreateWallet(createParams)
    .OnComplete(result =>
    {
        if (result.Success)
        {
            var walletData = result.Data;
            Debug.Log($"You created your first wallet! (id={walletData.Id})");
        }
        else
        {
            //Hmmm, something went wrong
            Debug.LogException(result.Exception);
        }
    });
Add this code to a script and attach it to a GameObject inside your scene. After running the game you should see the output as in the below screenshot, or an exception with more information in case something went wrong.

Successfully creating your first wallet
Congratulations, you just made your first call with the Venly API! 🎉
Full Code Snippet (Create Wallet Snippet)
void Start()
{
    //Initialize API (should only be done once)
    VenlyUnity.Initialize();

    // Define the CreateWalletRequest
    var createParams = new VyCreateWalletRequest()
        {
            Chain = eVyChain.Matic,
            Description = "My First Wallet", //A simple description
            Identifier = "demo_0", //Can be used to filter wallets
            Pincode = "1234", //Needed to perform certain actions on the wallet (e.g. transfer)
            WalletType = eVyWalletType.WhiteLabel //WhiteLabel is fine in most cases
        };

    // Calling the API (VenlyAPI>Wallet>CreateWallet)
    VenlyAPI.Wallet.CreateWallet(createParams)
        .OnComplete(result =>
        {
            if (result.Success)
            {
                var walletData = result.Data;
                Debug.Log($"You created your first wallet! (id={walletData.Id})");
            }
            else
            {
                //Hmmm, something went wrong
                Debug.LogException(result.Exception);
            }
        });
}
API Function Calling Conventions
All the API functions are Async, and there are multiple ways to call them and retrieve the data. So make sure to have a look at the Async Operations page!
// Alternative Calling Convention (async/await)
var walletData = await VenlyAPI.Wallet.CreateWallet(createParams).AwaitResult();
Schedule a demo with our team to explore tailored solutions or dive in and start building right away on our portal.
Updated 9 months ago