
Getting started with Unreal Engine
A quick start guide to get you up and running
The Venly Unreal Engine Plugin exposes Venly's all Core functionality (Wallet and NFT) usable from within your Blueprint or C++ projects.
Installation
The plugin (including source code) is hosted on GitHub and can be added to your project by copying the relevant directories. The plugin will be compiled the first time you open the project after adding the plugin. (Note, this can take some time).
Venly UE Plugin: https://github.com/Venly/UnrealEngine-SDK
The GitHub repository contains multiple projects,
-
VenlySDK_UE : Venly Plugin only, contains a small demo (API Explorer) showcasing basic usage and functionality. This project is meant to be used with the DevMode Backend Provider option.
- ./Plugins/Venly
-
VenlySDK_UE_Beamable : Project with dependency on Beamable's UE Plugin (BeamableCore), and our VenlyBeamable plugin. The VenlyBeamable plugin acts as a bridge between Venly and Beamable, and therefore depends on both plugins. The demo (API Explorer) is adapted to incorporate a standard login flow using Beamable's Identity Service. This project is meant to be used with the Beamable Backend Provider option.
- ./Plugins/Venly (Symbolic Link -> VenlySDK_UE/Plugins)
- ./Plugins/VenlyBeamable
- ./Plugins/BeamableCore
- ./MicroservicesApp/ (Beamable Microservice Project)
-
VenlySDK_UE_PlayFab : Project with dependency on PlayFab's UE Plugin, and our VenlyPlayFab plugin. The VenlyPlayFab plugin acts as a bridge between Venly and PlayFab, and therefore depends on both plugins. The demo (API Explorer) is adapted to incorporate a standard login flow using PlayFab's Identity Service. This project is meant to be used with the PlayFab Backend Provider option.
- ./Plugins/Venly (Symbolic Link -> VenlySDK_UE/Plugins)
- ./Plugins/VenlyPlayFab
- _Plugins/PlayFab
Installing the plugin to your project
- Pull the source from our GitHub repository
- Copy the Venly Plugin Directory [VenlySDK_UE/Plugins/Venly] to your project's plugin directory
- Restart Unreal Engine
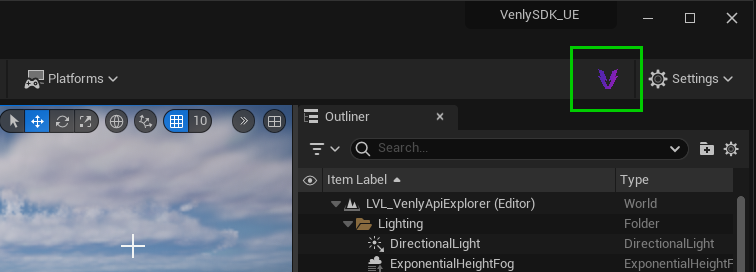
- After installation, a Venly button should be visible on the right-hand side of your main toolbar
Installing the Plugin to your Project
No additional steps are required for Blueprint-Only projects, in the case of a Code Project, some extra dependencies must be added.
Setting up dependencies for Code Projects
//[YourProject].Build.cs
PrivateDependencyModuleNames.Add("Venly");

//[YourProject].Target.cs
ExtraModuleNames.Add("Venly");

//[YourProject]Editor.Target.cs (if present)
ExtraModuleNames.Add("Venly");
ExtraModuleNames.Add("VenlyBlueprints");
ExtraModuleNames.Add("VenlyEditor");It is highly recommended to Refresh your Code Project after adding these dependencies!
Configuration
Some settings need to be configured before you'll be able to use the SDK functionalities. The required configurations can be made via the SDK Manager.
The SDK Manager can be accessed by clicking the Venly Toolbar button.
Client Credentials
To make use of Venly's services within the Unreal Editor (DevMode), a Client ID and Client Secret are required. Client Credentials can be obtained by signing up using our Venly Portal, where each service has a 30-day free trial period. For more information on how to sign up in our Portal, we suggest reading Getting Started with Venly.
Client Credentials are ONLY accessible within the Unreal Editor. All traces and links to these credentials are removed for Runtime Builds.
These credentials are used when operating in Developer Mode (DevMode) - this mode does not require setting up a backend and allows you to immediately start using and experimenting with the functionalities.
Once you have your Client ID and Client Secret you can enter them in the corresponding field for the Venly Unreal SDK Manager, and press Save.
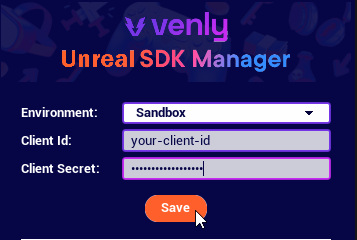
Entering your Client credentials in the Unreal SDK Manager
If your credentials are validated, you'll have access to the general settings of the SDK Manager. This panel shows some general information and gives you some options to configure.
Double-check that your default settings are set to:
- Environment =
Staging(Testing Environment)- Provider = Is set to
Dev Mode, so we can perform a first test run!
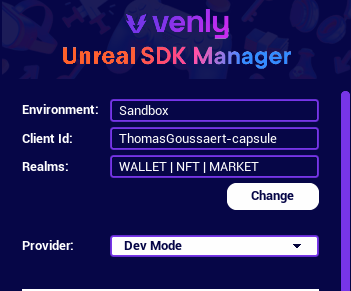
Setting the Provider to Dev Mode
Your First Call
At this point there will be no data linked to your account, so let's start by creating a new Wallet!
Depending on your project and personal preference, all the API functions can be executed via Blueprints or C++. Both methods are covered in this document.
Using Blueprints
Create a new Blueprint Actor (BP_CreateWalletActor) and add the nodes shown below to the BeginPlay execution pin. (An example of BP_CreateWalletActor can be found in the VenlySDK_UE project)
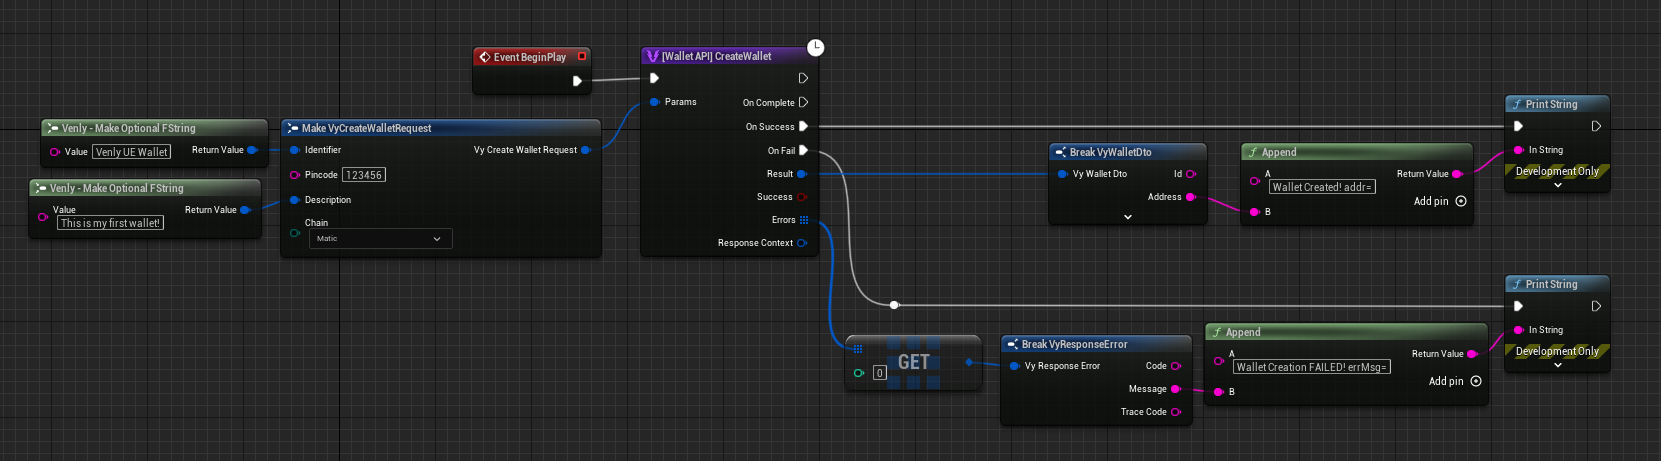
Creating a new Blueprint
Make sure to add your actor to the scene, and press play!
If all goes well, you should be able to see the 'Wallet Created!' message appear on the screen.
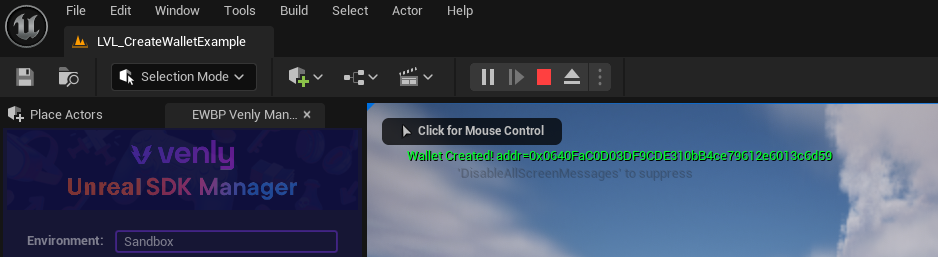
Adding Actors and Pressing Play
If something goes wrong (for example, not filling in thepincode field for the request), an error is presented with more context about the issue.
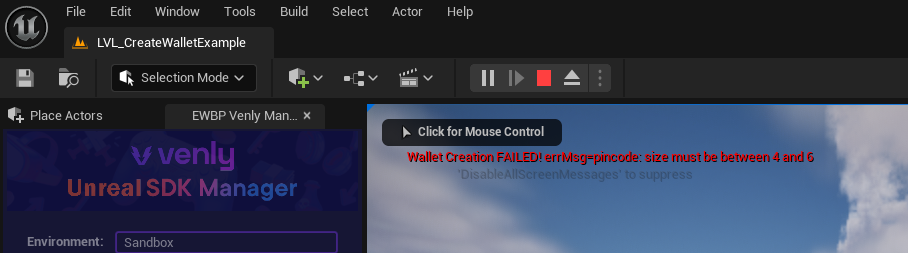
Error message for wallet creation
Using C++
Make sure that the Venly plugin is added to your ExtraModules list inside [YourProject].target.cs! See 'Setting up dependencies for Code Projects'
Create a new C++ Actor Class (CPP_CreateWalletActor) and add the following code to the class. (An example of the CPP_CreateWalletActor can be found in the VenlySDK_UE project)
// Header (CPP_CreateWalletActor.h) remains unchanged
// CPP_CreateWalletActor.cpp
#include "CPP_CreateWalletActor.h"
#include "Autogen/VyWalletAPI.h" //Wallet API
//#include "Autogen/VyNftAPI.h" //NFT API

//...

// Called when the game starts or when spawned
void ACPP_CreateWalletActor::BeginPlay()
{
	Super::BeginPlay();

	//The Request
	FVyCreateWalletRequest request{};
	request.Chain = EVyChain::MATIC;
	request.Pincode = TEXT("123456");
	request.Identifier = FVyOptString{ TEXT("Venly UE Wallet") };
	request.Description = FVyOptString{ TEXT("This is my first wallet!") };

	//Handler
	FVyOnCreateWalletComplete handler{};
	handler.BindLambda([](FVyCreateWalletResponse response)
		{
			if (response.Success) //Success!
			{
				auto msg = TEXT("[CPP] Wallet Created! addr=") + response.Result.Address;
				GEngine->AddOnScreenDebugMessage(INDEX_NONE, 10.f, FColor(0, 255, 0), msg);
			}
			else //Fail!
			{
				auto errMsg = response.Errors[0].Message;
				auto msg = TEXT("[CPP] Wallet Creation Failed! errMsg=") + errMsg;
				GEngine->AddOnScreenDebugMessage(INDEX_NONE, 10.f, FColor(255, 0, 0), msg);
			}
		});

	//Invoke!
	UVyWalletAPI::Get()->CreateWallet(request, handler);
}

//...Do not forget to include the corresponding header files!
WALLET API >
#include "Autogen/VyWalletAPI.h"NFT API >
#include "Autogen/VyNftAPI.h"
Compile your code, and add an instance of the CPP_CreateWalletActor to the scene. Press Play!
Similar to the Blueprint approach, if the operation succeeds, a success message is shown including the address of the new wallet.
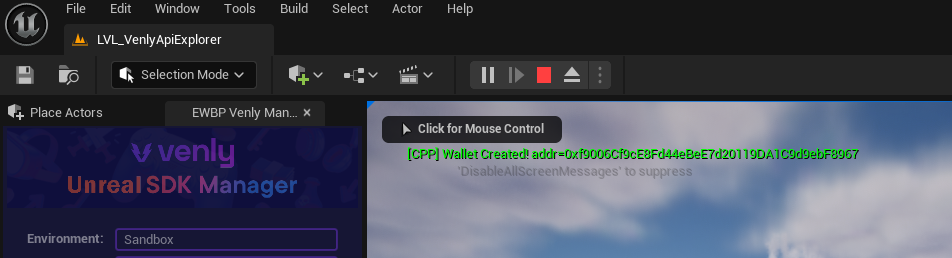
Wallet created successfully
In case of failure (not providing a value for thepincode field for example) results in an error message.

Wallet creation failed
The flow for other functions is the same as the one shown above for creating a new wallet. Have fun playing around with other functions!

Schedule a demo with our team to explore tailored solutions or dive in and start building right away on our portal.
Updated 9 months ago