
Getting started
Covering the basics from authentication to creating your first wallet
What we cover in this guide
In this guide, we will explain how to access your testnet assets, which you receive when you sign up with Venly, create your first user and wallet, and perform a crypto transaction. We will also walk you through several endpoints to help you get started with the Wallet API.
- How to authenticate
- How to access testnet assets
- How to create a user
- How to create a user's signing method
- How to create a wallet
- Transfer funds from one wallet to another
- Check transaction status
Wallet API Tutorial Video
Prerequisites
- You need a Venly business account. If you don't have one, register in our Developer Portal or follow our step-by-step guide, Getting Started with Venly .
- You need your Client ID and Client Secret, which can be obtained from the Portal as shown below.

Access Credentials - Developer Portal
- All the API calls for this guide run on a sandbox environment. You can test and experiment with API calls without causing any harm to the actual blockchain or data.* There are several ways to run API calls, but for this guide, you can use the API-Reference or Postman to execute the different endpoints.
1. Authenticating
You will need your access credentials (Client ID and Client Secret) to obtain a bearer token and authorize all API calls. These credentials are necessary for authentication purposes.
- Learn how to retrieve a bearer token and authenticate API calls.* Please note that the base path for all Wallet API endpoints in this guide specifically is
https://api-wallet-sandbox.venly.io, which is the sandbox environment.
2. Accessing Testnet Assets
As soon as you sign up for a trial subscription with the Wallet-API, a MATIC testnet wallet is created automatically for you which includes the following testnet assets:
- 1 MATIC Token
- 100 Venly Test Tokens (ERC20)
- 1 NFT
These assets are automatically added to your wallet, and linked to a user (Initial Test User) for you to start testing and playing around with the API endpoints.
123456 is the default PIN for your user that is used to access your wallet. More on this later in the guide.
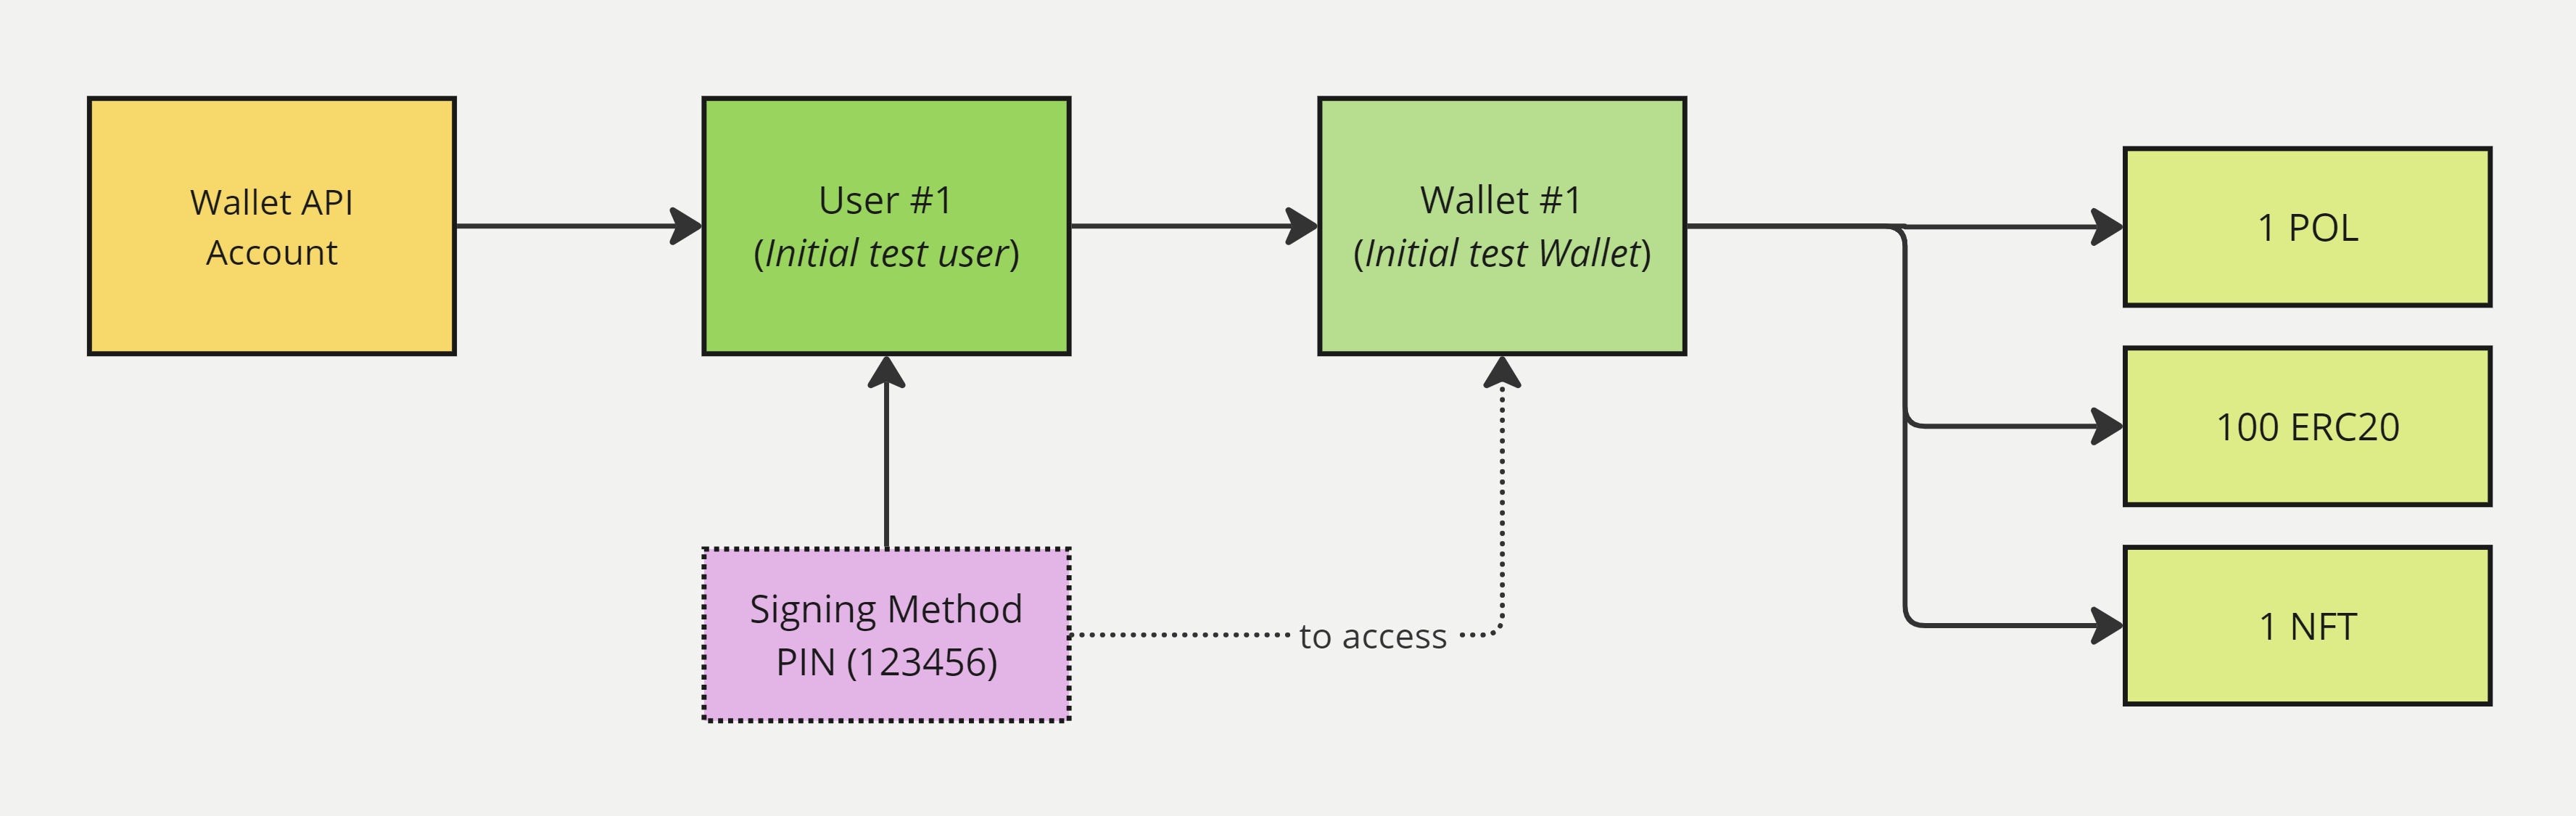
Testnet Assets
2.1. Retrieve your userId and signingMethodId
userId and signingMethodIdIn this first API call, we will retrieve all users. A user can have multiple wallets linked to them. As explained at the start, the MATIC wallet, which is created automatically with the assets is also linked to a user. When you call this endpoint it will only return one user (let's call this User #1 or First User).
- Firstly, we want to retrieve the
userId, which is the unique ID of your user. - Secondly, we want to retrieve the
signingMethodId, which is used to access the wallets linked to the user.
Read more about User Management and Signing Methods.
Call the following endpoint to retrieve all users:
Request Endpoint: reference
GET /api/users| Parameter | Param Type | Description | Data Type | Value |
|---|---|---|---|---|
includeSigningMethods | Query | Flag that indicates to show the signing method details of the users or not. | Boolean | true |
Response Body:
Save the following params for later use:
result.idwhich is theuserIdresult.signingMethods.idwhich is thesigningMethodId
{
    "success": true,
    "result": [
        {
            "id": "8fa1ac9e-618c-43a2-8241-eb75bbb8a021",
            "reference": "Initial test user",
            "createdAt": "2024-04-05T07:11:42.14671",
            "signingMethods": [
                {
                    "id": "c992826c-6311-4896-9c74-8a5f1644f9c7",
                    "type": "PIN",
                    "incorrectAttempts": 0,
                    "remainingAttempts": 10,
                    "lastUsedSuccess": "2024-04-05T07:11:42.646531",
                    "hasMasterSecret": true
                }
            ]
        }
    ]
}
2.2. Retrieve your walletId and wallet address
walletId and wallet addressNext, we will retrieve all wallets linked to a specific user. When you call this endpoint it will only return one wallet, which is your MATIC wallet.
Call the following endpoint to retrieve all wallets:
Request Endpoint: reference
GET /api/wallets| Parameter | Param Type | Description | Data Type |
|---|---|---|---|
userId | Query | Filter wallets by user ID. Add your userId which you got from the previous endpoint. | String |
Response Body
The response body shows the
balanceparam as 1, indicating you have one MATIC token.
Save the following params for later use:
result.idwhich is thewalletIdresult.addresswhich is the walletaddress
{
    "success": true,
    "result": [
        {
            "id": "71116253-e401-4b6c-9b3b-d23d93b5c663",
            "address": "0xc8a14eEe713887B4ad2E53DA45a52332b982FBa6",
            "walletType": "API_WALLET",
            "secretType": "MATIC",
            "createdAt": "2024-04-05T07:11:43.438044",
            "archived": false,
            "description": "Initial test Wallet",
            "primary": false,
            "hasCustomPin": false,
            "userId": "8fa1ac9e-618c-43a2-8241-eb75bbb8a021",
            "custodial": false,
            "balance": {
                "available": true,
                "secretType": "MATIC",
                "balance": 1,
                "gasBalance": 1,
                "symbol": "MATIC",
                "gasSymbol": "MATIC",
                "rawBalance": "1000000000000000000",
                "rawGasBalance": "1000000000000000000",
                "decimals": 18
            }
        }
    ]
}
2.3. Retreive ERC20 token balance
Next, we will call the following endpoint to receive the ERC20 token balance of your wallet:
Request Endpoint: reference
GET /api/wallets/{walletId}/balance/tokens| Parameter | Param Type | Description | Data Type | Mandatory |
|---|---|---|---|---|
{walletId} | Path | The ID of your wallet, which you got from the previous endpoint. | String | ✅ |
Request Example
GET /api/wallets/c4c97f87-8e00-4f3a-8647-2f24ac9b73cb/balance/tokensResponse Body
The response body shows the
balanceparam as 100, indicating you have 100 ERC20 tokens.
{
    "success": true,
    "result": [
        {
            "tokenAddress": "0x681941526dcf9f263c37af2050e68b6a71989924",
            "rawBalance": "100000000000000000000",
            "balance": 100,
            "decimals": 18,
            "symbol": "VTT",
            "type": "ERC20",
            "transferable": true,
            "name": "Venly Test Token",
            "possibleSpam": false
        }
    ]
}
2.4. Retrieve NFTs
Next, we will call the following endpoint to get NFTs in your wallet:
Request Endpoint: reference
GET /api/wallets/{walletId}/nonfungibles| Parameter | Param Type | Description | Data Type | Mandatory |
|---|---|---|---|---|
{walletId} | Path | The ID of the wallet, which you got from the previous endpoint. | String | ✅ |
Response Body
The response body will show your NFT.
{
    "success": true,
    "result": [
        {
            "id": "1",
            "name": "Venly Pioneer's Pass",
            "description": "This Dummy NFT symbolizes forging new paths in the digital wilderness and serves as a badge of honor for developers who are pioneering groundbreaking technologies and applications in blockchain. Ready to use while exploring the Venly Platform.",
            "url": "https://venly.io",
            "imageUrl": "https://cdn.simplehash.com/assets/48ba4f08142c55680eb9c9e03b484ef8798e9601604f92d4d4dc198873d4d33c.png",
            "imagePreviewUrl": "https://lh3.googleusercontent.com/CKlfDioHpKdphp6Zu69HMTVF5LAaI2bivII_eTa-XUESK3VVekqvGeTaK4zDxmF3QaGHh99lNi1nxwwKpVMaadJe3B6G8GwehV_2",
            "imageThumbnailUrl": "https://lh3.googleusercontent.com/CKlfDioHpKdphp6Zu69HMTVF5LAaI2bivII_eTa-XUESK3VVekqvGeTaK4zDxmF3QaGHh99lNi1nxwwKpVMaadJe3B6G8GwehV_2=s250",
            "animationUrls": [],
            "fungible": true,
            "contract": {
                "name": "Venly Pioneer's Pass",
                "description": "This Dummy NFT symbolizes forging new paths in the digital wilderness and serves as a badge of honor for developers who are pioneering groundbreaking technologies and applications in blockchain. Ready to use while exploring the Venly Platform.",
                "address": "0x3ccae80c81ea3c778321b9af9f213fa5facb40e8",
                "symbol": "VPP",
                "media": [
                    {
                        "type": "image",
                        "value": "https://lh3.googleusercontent.com/tKfAo5vzldUZUC357aGDsSzaKLMfjMaddTo5vd24WJ6G1-7iA_sQz5zQcHIHhv9lN--1bKK5f3MHuVC17fKCCxUA1EkjTH7W-g"
                    }
                ],
                "type": "ERC_1155",
                "verified": false,
                "premium": false,
                "isNsfw": false,
                "categories": [],
                "url": "https://venly.io",
                "imageUrl": "https://lh3.googleusercontent.com/tKfAo5vzldUZUC357aGDsSzaKLMfjMaddTo5vd24WJ6G1-7iA_sQz5zQcHIHhv9lN--1bKK5f3MHuVC17fKCCxUA1EkjTH7W-g"
            },
            "attributes": [
                {
                    "type": "property",
                    "name": "Brand",
                    "value": "Venly"
                },
                {
                    "type": "property",
                    "name": "Year",
                    "value": "2024"
                },
                {
                    "type": "property",
                    "name": "Destination",
                    "value": "Devportal"
                },
                {
                    "type": "property",
                    "name": "Gem",
                    "value": "Purple crystal"
                },
                {
                    "type": "property",
                    "name": "Token Type ID",
                    "value": "1"
                }
            ],
            "balance": 1,
            "finalBalance": 1,
            "transferFees": false
        }
    ]
}
- Now that you have accesed your user, wallet, and it's funds, the next part will talk about the basics of how you can actually create users, signing methods, and wallets from scratch.* Keep in mind that after completing Steps 3-5, you will have:
- Two users
- Two wallets
3. Creating a User
The next thing you need to do is create a second user. Each user created can represent one of your end-users.
Read more about User Management.
Use the following endpoint to create a user:
Request Endpoint: reference
POST /api/users| Parameter | Param Type | Description | Data Type | Mandatory |
|---|---|---|---|---|
reference | Body | A free-form text to specify a reference for the user you create. It can help group specific users. | String | ❌ |
Request Body:
{
  "reference": "Second Test User"
}
Response Body:
result.id: This is the User ID, of your second user.
{
    "success": true,
    "result": {
        "id": "6a5a9020-e969-4d9a-ae4b-fcd91a75769d",
        "reference": "Second Test User",
        "createdAt": "2023-12-06T12:11:12.702586449"
    }
}
4. Creating a signing method for your user
Next, we're going to create a PIN signing method for the user we just created. There are other signing methods as well, but the very first one should be PIN. Signing methods allow your users to access and interact with their wallets and perform transactions. Each user can access their wallets using their own signing method.
Read more about Signing Methods.
Use the following endpoint to create a signing method for your user.
Request Endpoint: reference
POST /api/users/USERID/signing-methods| Parameter | Param Type | Description | Data Type | Mandatory |
|---|---|---|---|---|
USERID | Path | The ID of the user for whom to create the signing method for | String | ✅ |
type | Body | The type of signing method to create for this user. Allowed values: PIN, BIOMETRIC, EMERGENCY_CODE | String | ✅ |
value | Body | The value of the signing method. For PIN, the value should be 6 digits. For EMERGENCY_CODE, the value should be 25 characters, or you can leave it blank to autogenerate the code with the correct entropy. | String | ❌ |
Request Body:
{
  "type": "PIN",
  "value": "123456"
}
Response Body:
result.id: This is the Signing Method ID, of your second user.* Each user has a unique signing method ID
{
    "success": true,
    "result": {
        "id": "bf1200ce-d117-4a06-a029-6d99080c6358",
        "type": "PIN",
        "incorrectAttempts": 0,
        "remainingAttempts": 10,
        "hasMasterSecret": true
    }
}
5. Creating a Wallet
The next step is creating a wallet for your user. We will include the userId in the request body, and this way the wallet will be created and linked to the specific user. The user can then access the wallet with their signing method.
Since you are currently using the API calls in a sandbox environment, the wallets will be created on a testnet chain. In this example, we will create the wallet on the Polygon (MATIC) Blockchain.
Explore testnet chains further.
Use the following endpoint to create a wallet for your second user:
Request Endpoint: reference
POST /api/wallets| Parameter | Param Type | Value | Description | Example Value |
|---|---|---|---|---|
Signing-Method | Header | id:value | id: This is the ID of the user's signing methodvalue: This is the value of the user's signing method | c992826c-6311-4896-9c74-8a5f1644f9c7:123456 |
| Parameter | Description | Type | Required |
|---|---|---|---|
secretType | Specifies the blockchain on which you wish to create your wallet | String | ✅ |
userId | The ID of the user you want to link to this wallet. | String | ❌ |
pincode (deprecated) | Serves as the password to access your wallet. Please remember it and keep it secure to ensure the protection of your wallet and its contents. | String | ❌ |
Request Body:
{
  "secretType": "MATIC",
  "userId": "ddf04a49-9c38-4326-acc7-02529ba05a78"
}
Response Body:
Save the following parameters from the response body. They will be used later in the guide.
| Parameter | Description |
|---|---|
result.id | This ID is utilized to uniquely identify the wallet. |
result.address | This is the public wallet address. You can provide this address to others to receive payments or initiate transfers to this wallet. |
result.secretType | This is the blockchain name on which your wallet is created. |
{
    "success": true,
    "result": {
        "id": "19590dc9-28af-417b-bc66-549e726bf91f",
        "address": "0xa1f04C769155195D83c7f16bC6B9540139C80b2A",
        "walletType": "API_WALLET",
        "secretType": "MATIC",
        "createdAt": "2023-12-07T10:21:25.114751052",
        "archived": false,
        "description": "Wise Iguana",
        "primary": false,
        "hasCustomPin": false,
        "userId": "ddf04a49-9c38-4326-acc7-02529ba05a78",
        "custodial": false,
        "balance": {
            "available": true,
            "secretType": "MATIC",
            "balance": 0,
            "gasBalance": 0,
            "symbol": "MATIC",
            "gasSymbol": "MATIC",
            "rawBalance": "0",
            "rawGasBalance": "0",
            "decimals": 18
        }
    }
}You have successfully created a wallet 🎉.
- The first wallet with testnet assets is linked to the first user (Initial test user), and the second wallet that you created is linked to the second user (Second Test User).
- The PIN code of the first user (123456) will be used to access the first wallet with testnet assets.
- The PIN code of your second user will be used to access the second wallet, which is empty.
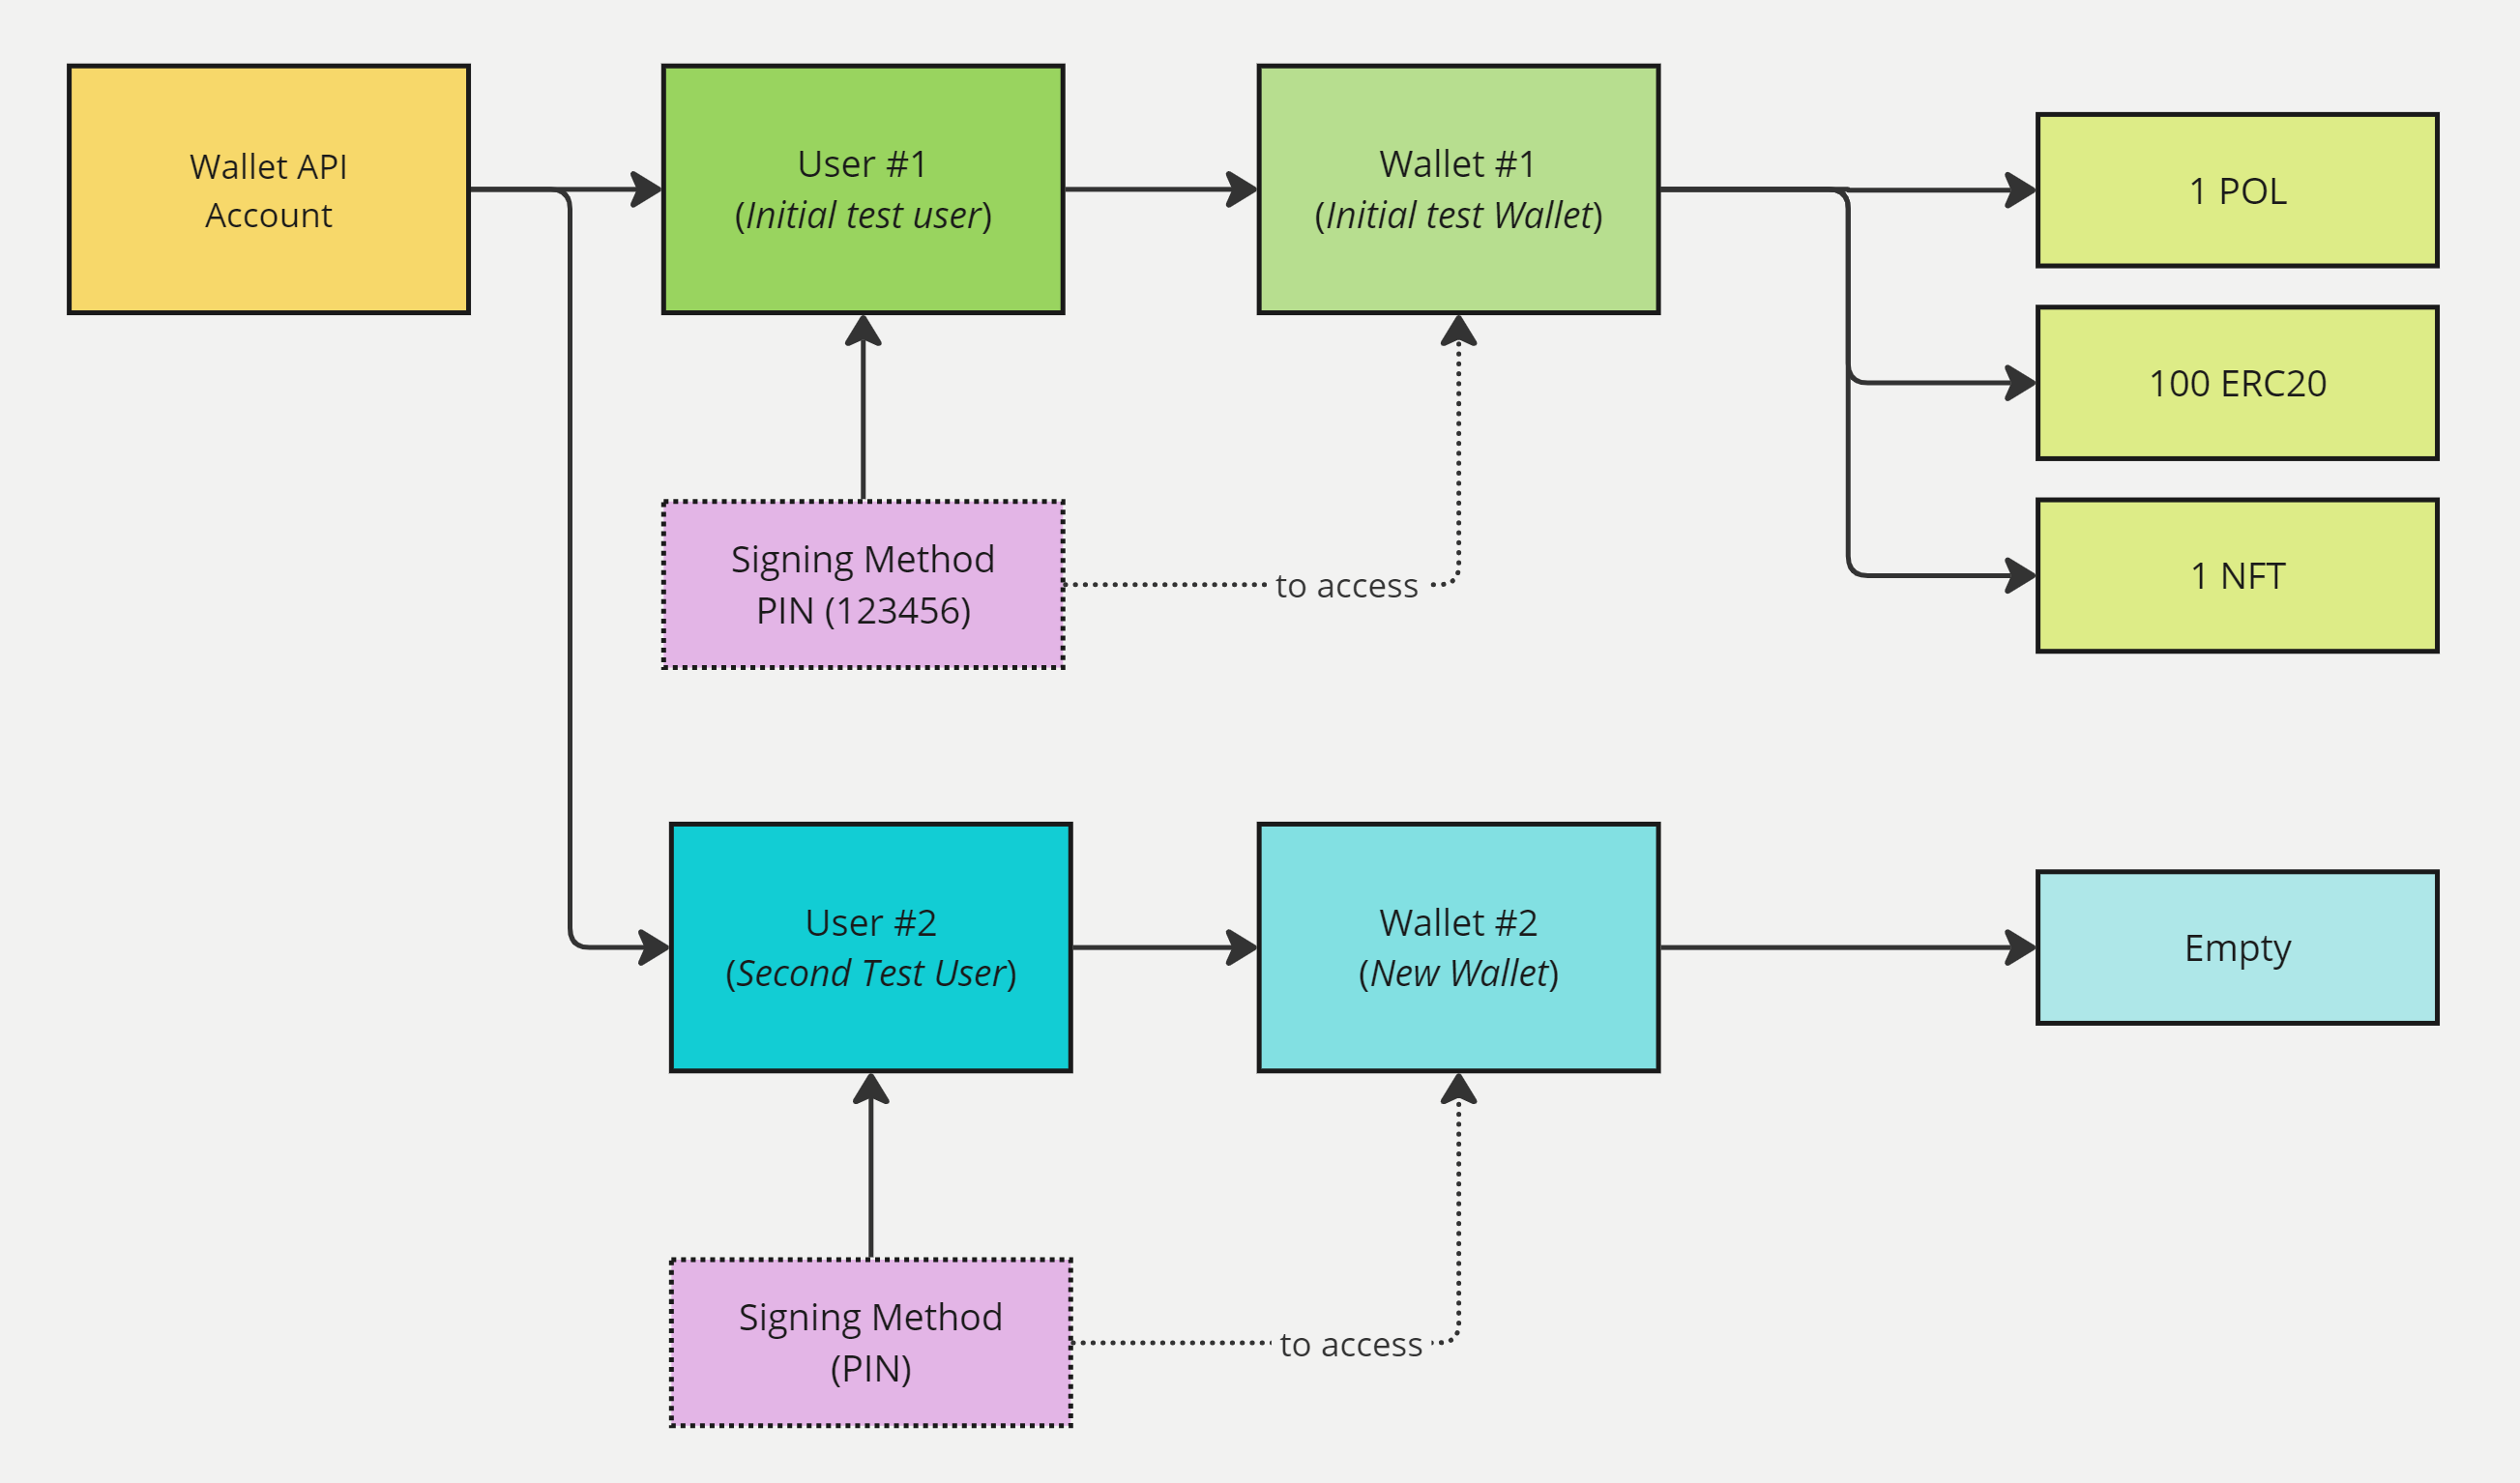
Testnet Assets Wallet & Newly Created Wallet
Next, we will transfer the testnet funds from your first wallet (which has testnet assets) to your second wallet (which is empty).
6. Transferring Funds
At this point, you should have the first wallet containing testnet funds, while the second wallet remains empty.
We will run another endpoint to transfer some funds (20 ERC20 tokens) from the first wallet to the second one.
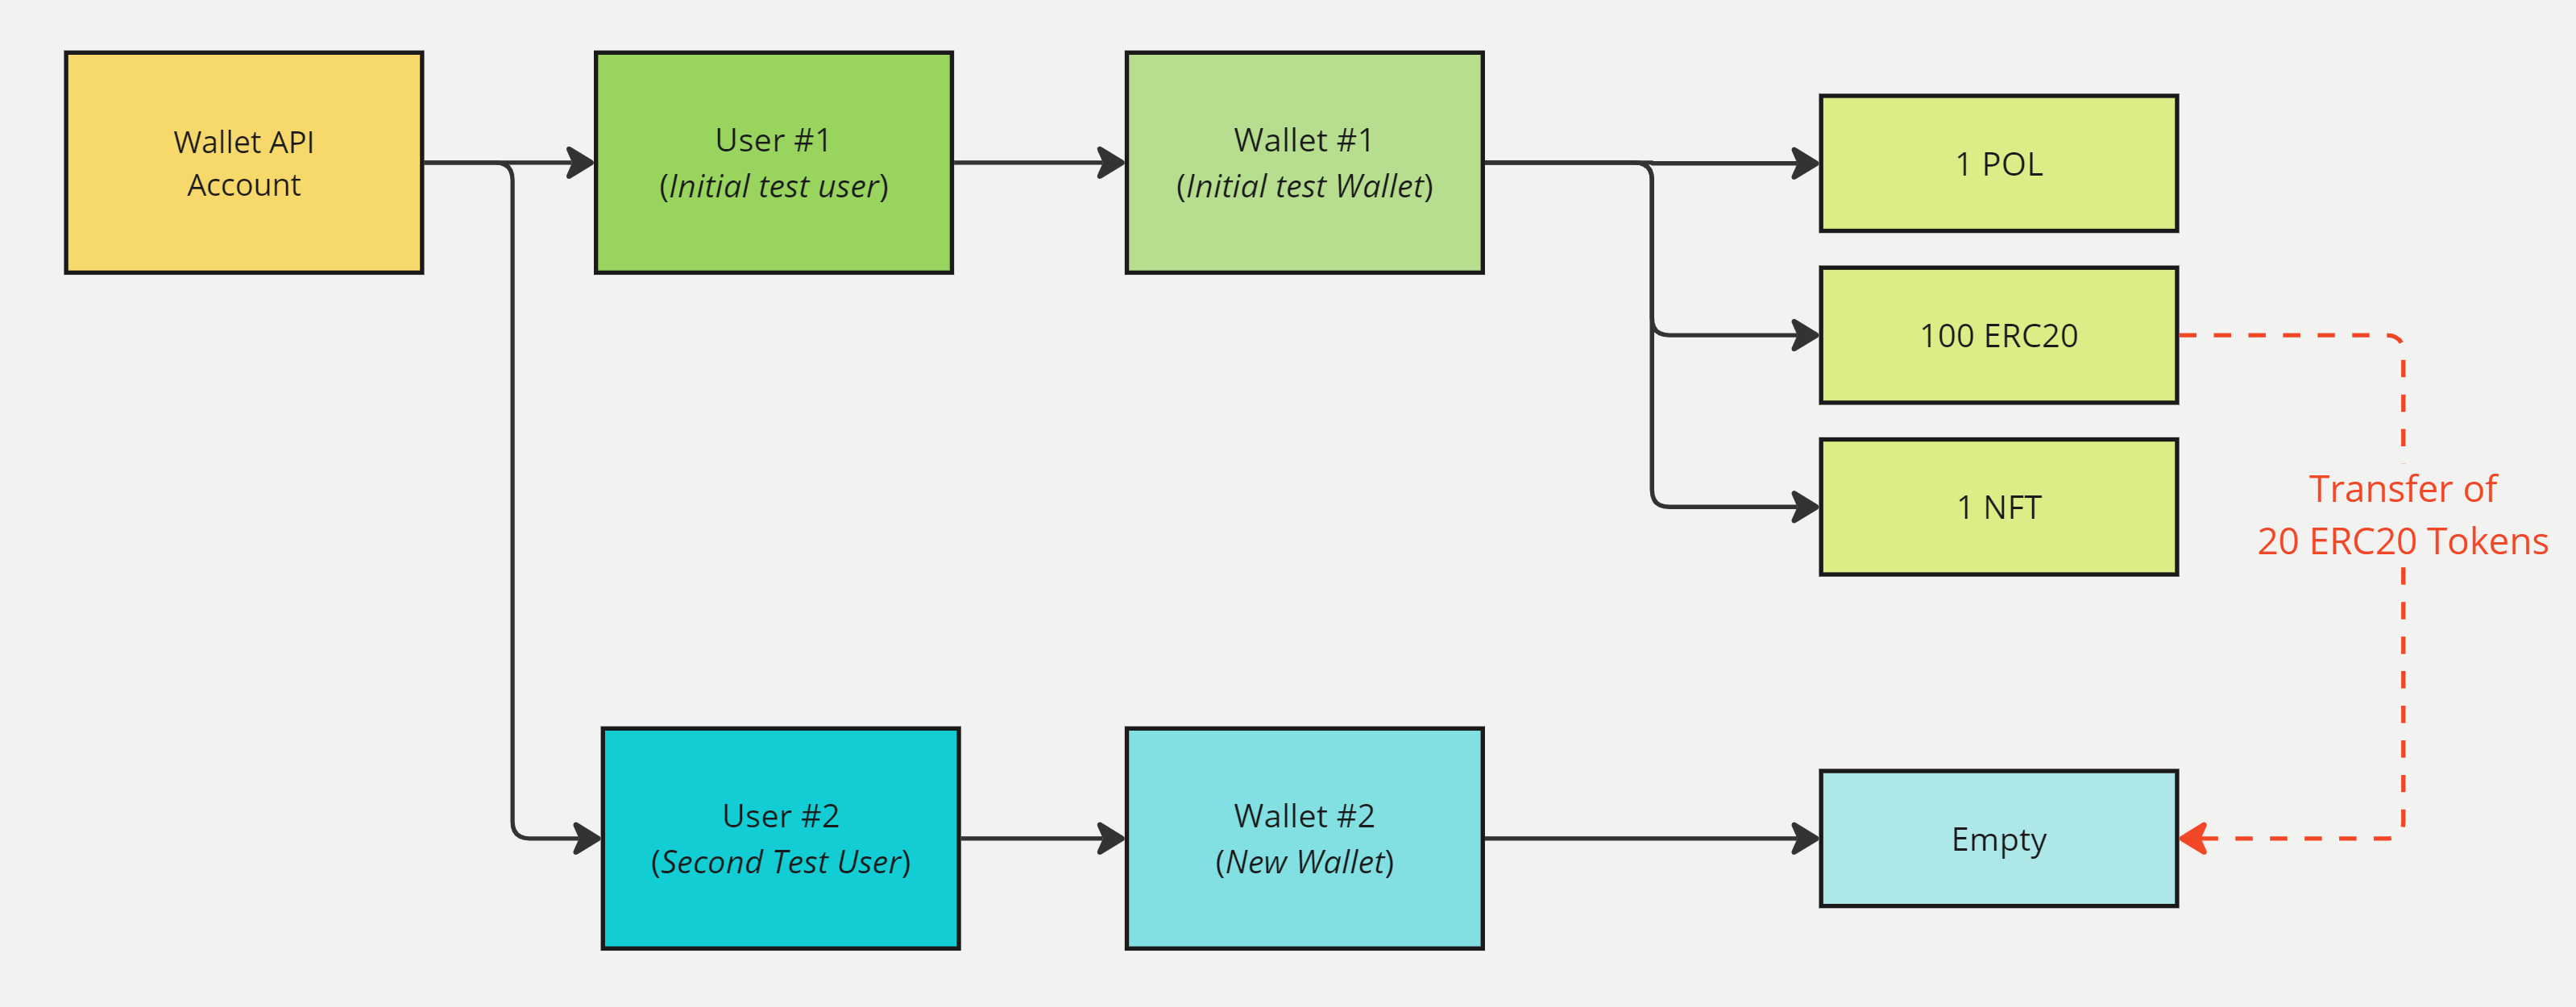
Transferring 20 ERC20 Tokens
Use the following endpoint to initiate an ERC20 token transfer:
Request Endpoint: reference
POST /api/transactions/execute| Parameter | Param Type | Value | Description | Example Value |
|---|---|---|---|---|
Signing-Method | Header | id:value | id: This is the ID of the first user's signing methodvalue: This is the value of the first user's signing method | c992826c-6311-4896-9c74-8a5f1644f9c7:123456 |
Request Body:
| Parameter | Description | Type | Required |
|---|---|---|---|
pincode (Deprecated) | Serves as the password to access your wallet. Please remember it and keep it secure to ensure the protection of your wallet and its contents. | String | ❌ |
transactionRequest | The JSON object for the transaction request data | Object | ✅ |
type | Type of transfer. In the example a normal TOKEN_TRANSFER | String | ✅ |
walletId | The wallet ID of the first wallet (The wallet that is initiating the transfer) | String | ✅ |
to | The address of the destination wallet where the funds will be transferred to. In this case, it refers to the address of the second wallet. | String | ✅ |
value | The amount mentioned here refers to the quantity of ERC20 tokens that you intend to transfer | Integer | ✅ |
secretType | Specifies the blockchain of the transaction | String | ✅ |
tokenAddress | The token address of the ERC20 token that you want to transfer | String | ✅ |
{
  "transactionRequest": {
    "type" : "TOKEN_TRANSFER",
    "walletId" : "71116253-e401-4b6c-9b3b-d23d93b5c663",
    "to" : "0xa1f04C769155195D83c7f16bC6B9540139C80b2A",
    "value": 20
    "secretType" : "MATIC",
    "tokenAddress": "0x54d71694bf8869a50d04b0a859484b3f94c738aa"
    }
  }
Response Body:
In the response, you will find a tranasactionHash, which can be used to follow up on the status of that specific transaction.
Save the
transactionHashfor later use in this guide.
{
    "success": true,
    "result": {
        "id": "2addea45-1f82-40c2-a59b-f4c3ec463a3d",
        "transactionHash": "0x3eab1a14783c9b155c9ae15e684a56b8bee85aa4dcea2178dd194efd8139e9c6"
    }
}
The "success": true in response body indicates that the transfer request was submitted successfully. It does not mean the fund transfer was completed. Since this transfer call is being made on a sandbox environment and testnet blockchain, it's important to note that the funds may arrive instantly. This may not be the case with mainnet blockchain transactions as they can take some time.
To verify whether a transfer has been completed, it is necessary to check the transaction status. This status will provide information on whether the transfer was successful or if it encountered any issues, resulting in a failure.
Mainnet Blockchain transactions are never immediate. They require time for processing, and the duration can vary depending on the specific blockchain network.
7. Check transaction status
To confirm whether a specific transaction was successful or not, you can check its status using the provided endpoint. To obtain the status of the transaction, please provide the required information. Set the secretType as "MATIC" and enter the transactionHash that you had saved earlier.
Request Endpoint: reference
GET /api/transactions/{secretType}/{transactionHash}/statusResponse Body:
From the response body, you can see that the status is "SUCCEEDED" . This indicates that the transaction was successfully executed and completed.
Funds have been sent from the first wallet to the second.
{
    "success": true,
    "result": {
        "hash": "0x3eab1a14783c9b155c9ae15e684a56b8bee85aa4dcea2178dd194efd8139e9c6",
        "status": "SUCCEEDED",
        "confirmations": 342,
        "blockHash": "0x0f510f3581446ab3f5d4d4652b8ba77b9ec81f435857b9fac8c7f98bbe1d8d15",
        "blockNumber": 5977443,
        "hasReachedFinality": true,
        "chain": "MATIC",
        "nonce": 0,
        "gas": 200000,
        "gasUsed": 52172,
        "gasPrice": 30000000015,
        "logs": [
            {
                "logIndex": 4,
                "data": "0x000000000000000000000000000000000000000000000001158e460913d00000",
                "topics": [
                    "0xddf252ad1be2c89b69c2b068fc378daa952ba7f163c4a11628f55a4df523b3ef",
                    "0x000000000000000000000000e11dbbe2460745b44f17d5234c29f02f0e18aa67",
                    "0x000000000000000000000000a80b7e3360386c495ed24476522c1b37a79f9917"
                ]
            },
            {
                "logIndex": 5,
                "data": "0x00000000000000000000000000000000000000000000000000058f8135d110000000000000000000000000000000000000000000000000000de0b6b3a764000000000000000000000000000000000000000000000000006c955c1a037403e4520000000000000000000000000000000000000000000000000ddb27327192f00000000000000000000000000000000000000000000000006c9561a984a9d4f452",
                "topics": [
                    "0x4dfe1bbbcf077ddc3e01291eea2d5c70c2b422b415d95645b9adcfd678cb1d63",
                    "0x0000000000000000000000000000000000000000000000000000000000001010",
                    "0x000000000000000000000000e11dbbe2460745b44f17d5234c29f02f0e18aa67",
                    "0x00000000000000000000000004ba3ef4c023c1006019a0f9baf6e70455e41fcf"
                ]
            }
        ],
        "from": "0xc8a14eEe713887B4ad2E53DA45a52332b982FBa6",
        "to": "0xa1f04C769155195D83c7f16bC6B9540139C80b2A",
        "rawValue": 0,
        "value": 0,
        "timestamp": "2024-04-17T15:51:46"
    }
}
Check balance after transfer
Let's use the same endpoint once again to check the balance of your second wallet. Please provide the id (walletId) of your second wallet to retrieve the updated balance information.
Request Endpoint: reference
GET /api/wallets/{walletId}/balance/tokensResponse Body:
The response body shows the
balanceas 20, indicating it has 20 ERC20 tokens.
{
    "success": true,
    "result": [
        {
            "tokenAddress": "0x54d71694bf8869a50d04b0a859484b3f94c738aa",
            "rawBalance": "20000000000000000000",
            "balance": 20,
            "decimals": 18,
            "symbol": "VTT",
            "type": "ERC20",
            "transferable": true,
            "name": "Venly Test Token",
            "possibleSpam": false
        }
    ]
}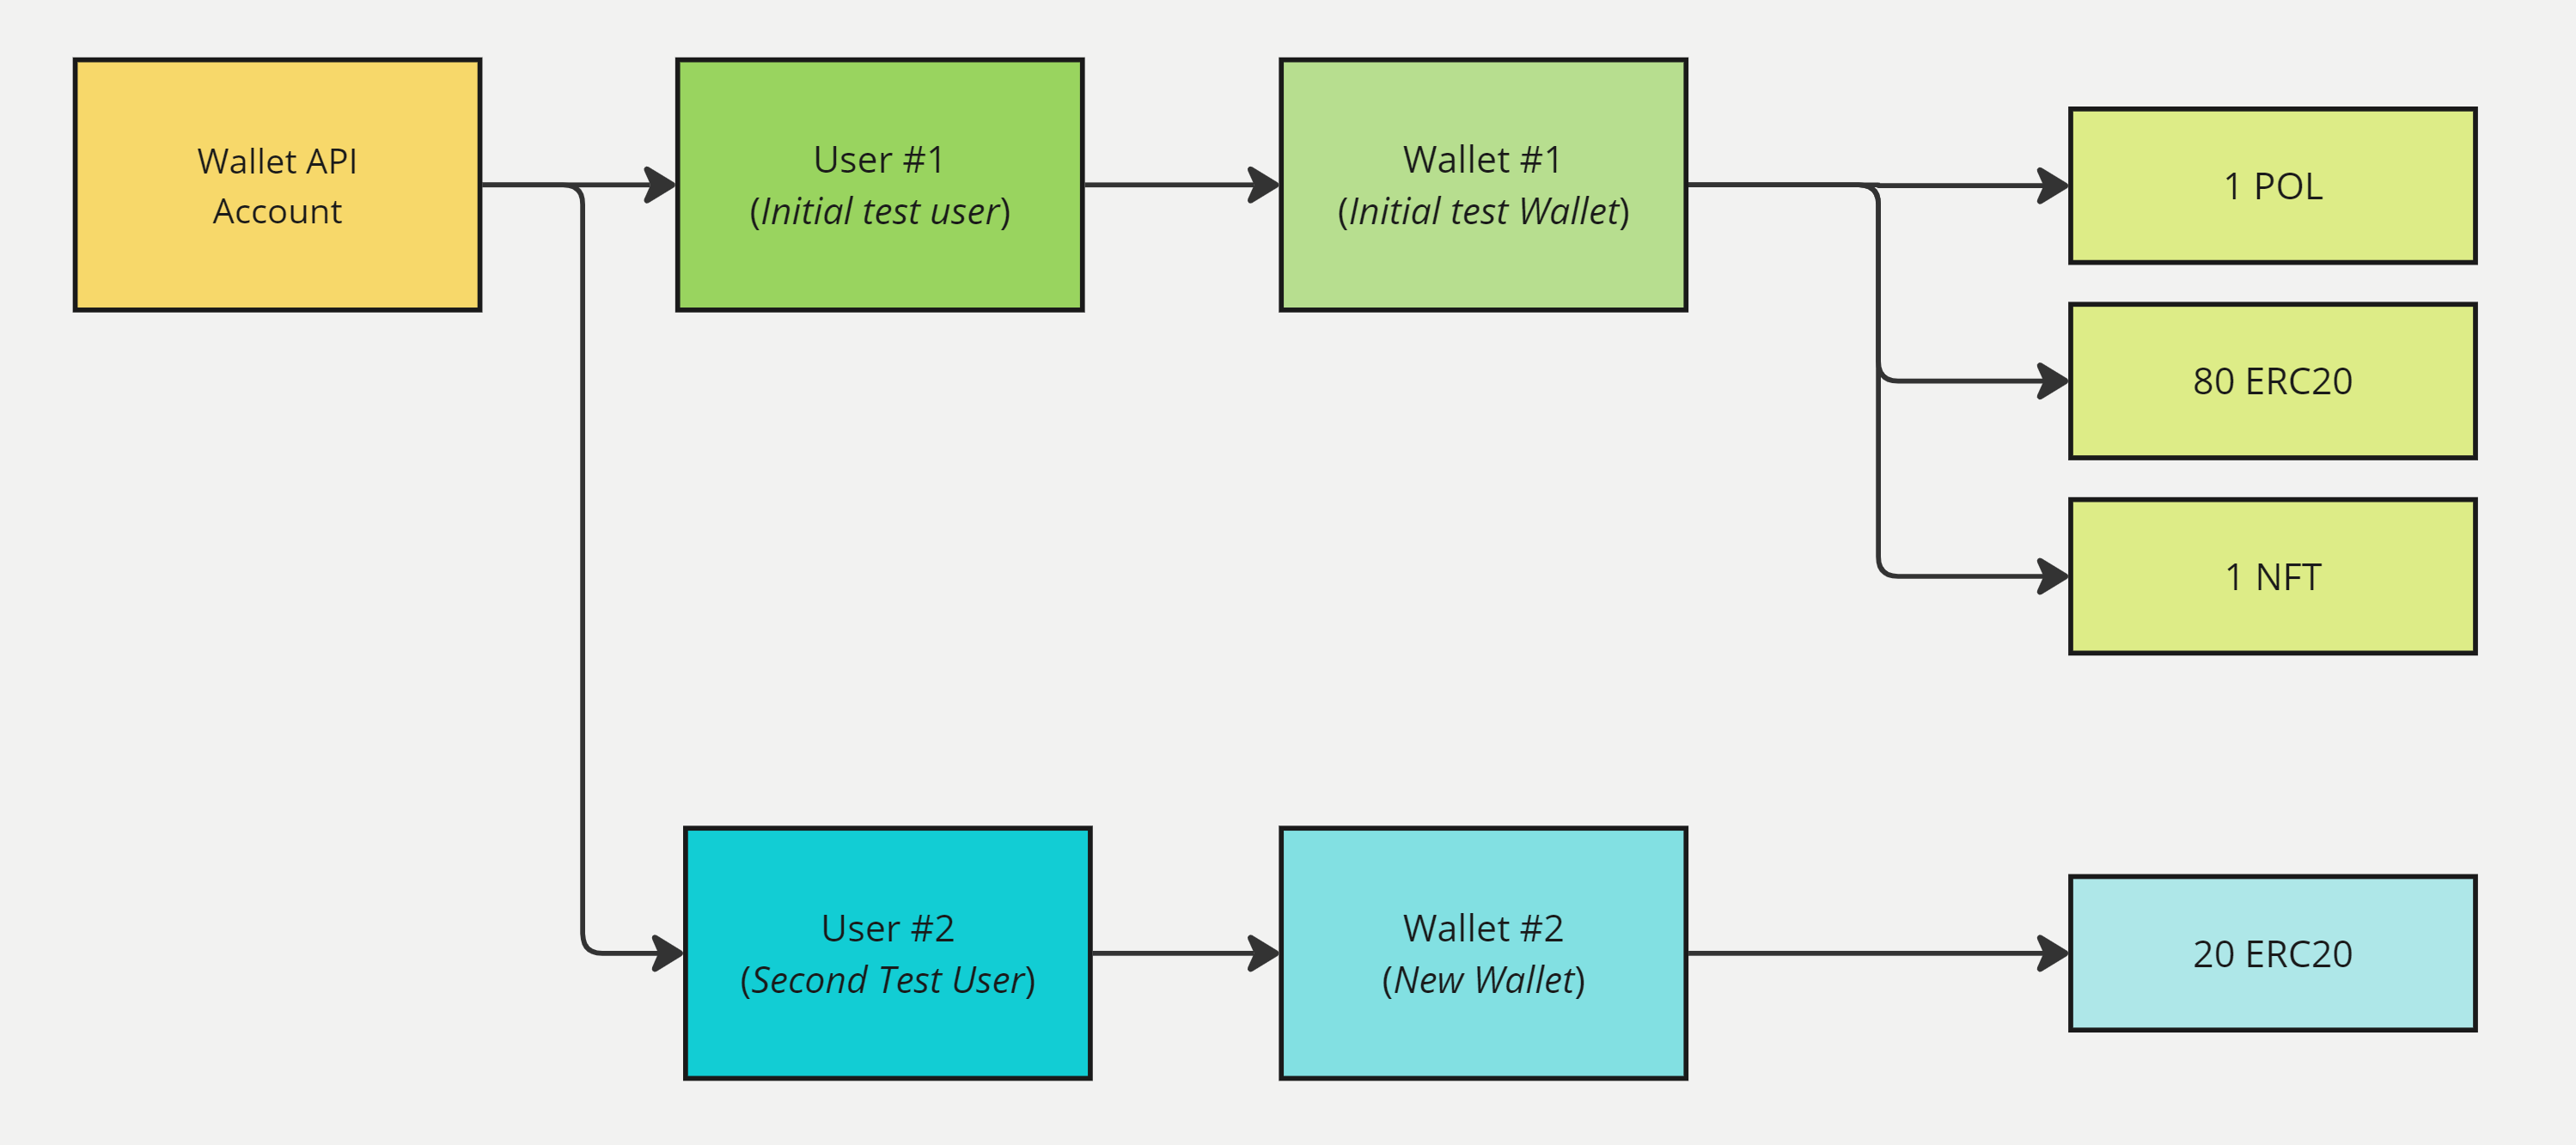
Balance after Transfer of ERC20 Tokens
Next Steps
Following are a few basic guides that you should try next to experiment with your testnet assets:

Schedule a demo with our team to explore tailored solutions or dive in and start building right away on our portal.
Updated 9 months ago