
Zapier: Mint ERC20 Tokens
This guide describes hwo to use the Zapier integration for ERC20 minting.
Introduction
With the Venly Zapier app, you can create ERC20 token contracts and mint ERC20 tokens directly to your users' wallets, no blockchain expertise needed. Whether you're building a rewards system, launching a community token, or testing new use cases, the Venly integration simplifies the entire process.
Point & Click Solution! No coding or programming is required. With just a few clicks, you can deploy your own ERC20 smart contracts and mint tokens instantly using automated Zapier workflows.
Onboarding with Zapier
You need to complete the prerequisites before you can start using Zapier to mint ERC20 tokens.
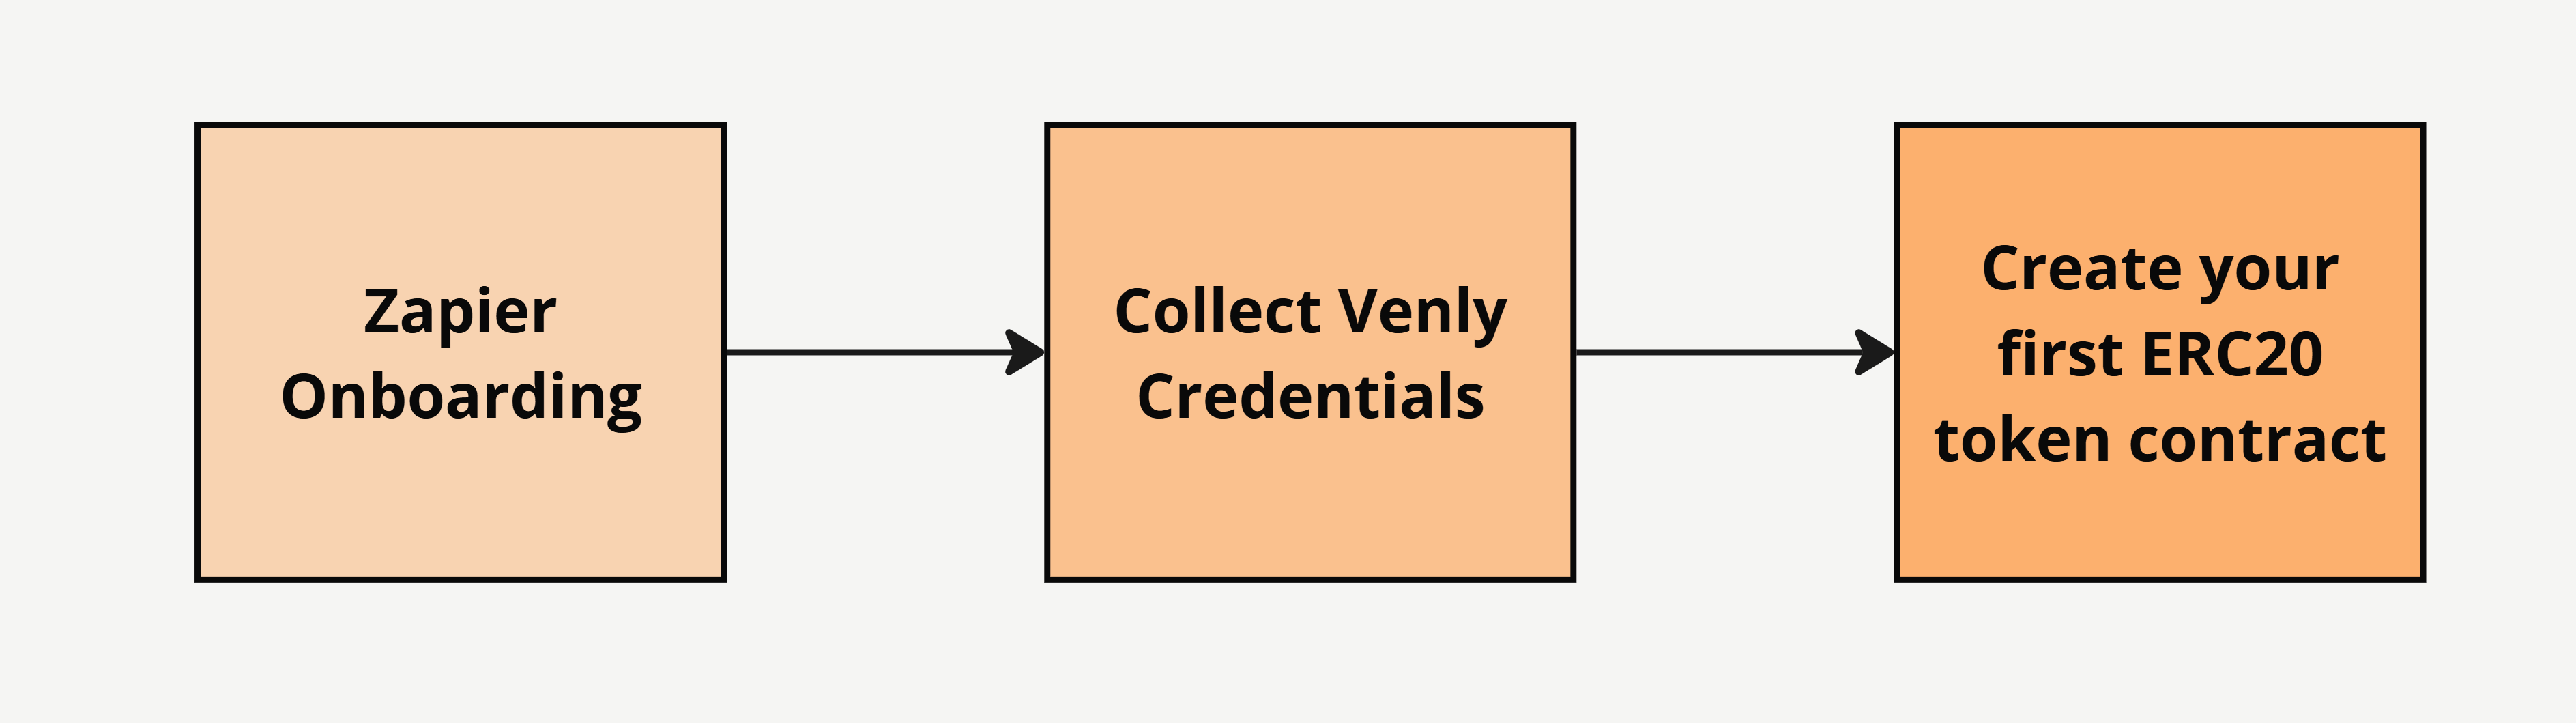
- The first one is getting client credentials from the Portal
- Next is signing up or logging in to Zapier
- Lastly, create/set up your first ERC20 token contract.
1. Client Credentials
Obtain your client credentials from the Portal, or click here to learn how to onboard with Venly and get your Client ID and Client Secret.
2. Sign Up on Zapier
Visit Zapier and sign up or log in.
3. Create your first ERC20 Token Contract
The next step is to create your first ERC20 contract that will contain all your minted ERC20 tokens.
3.1 Setting up the basics
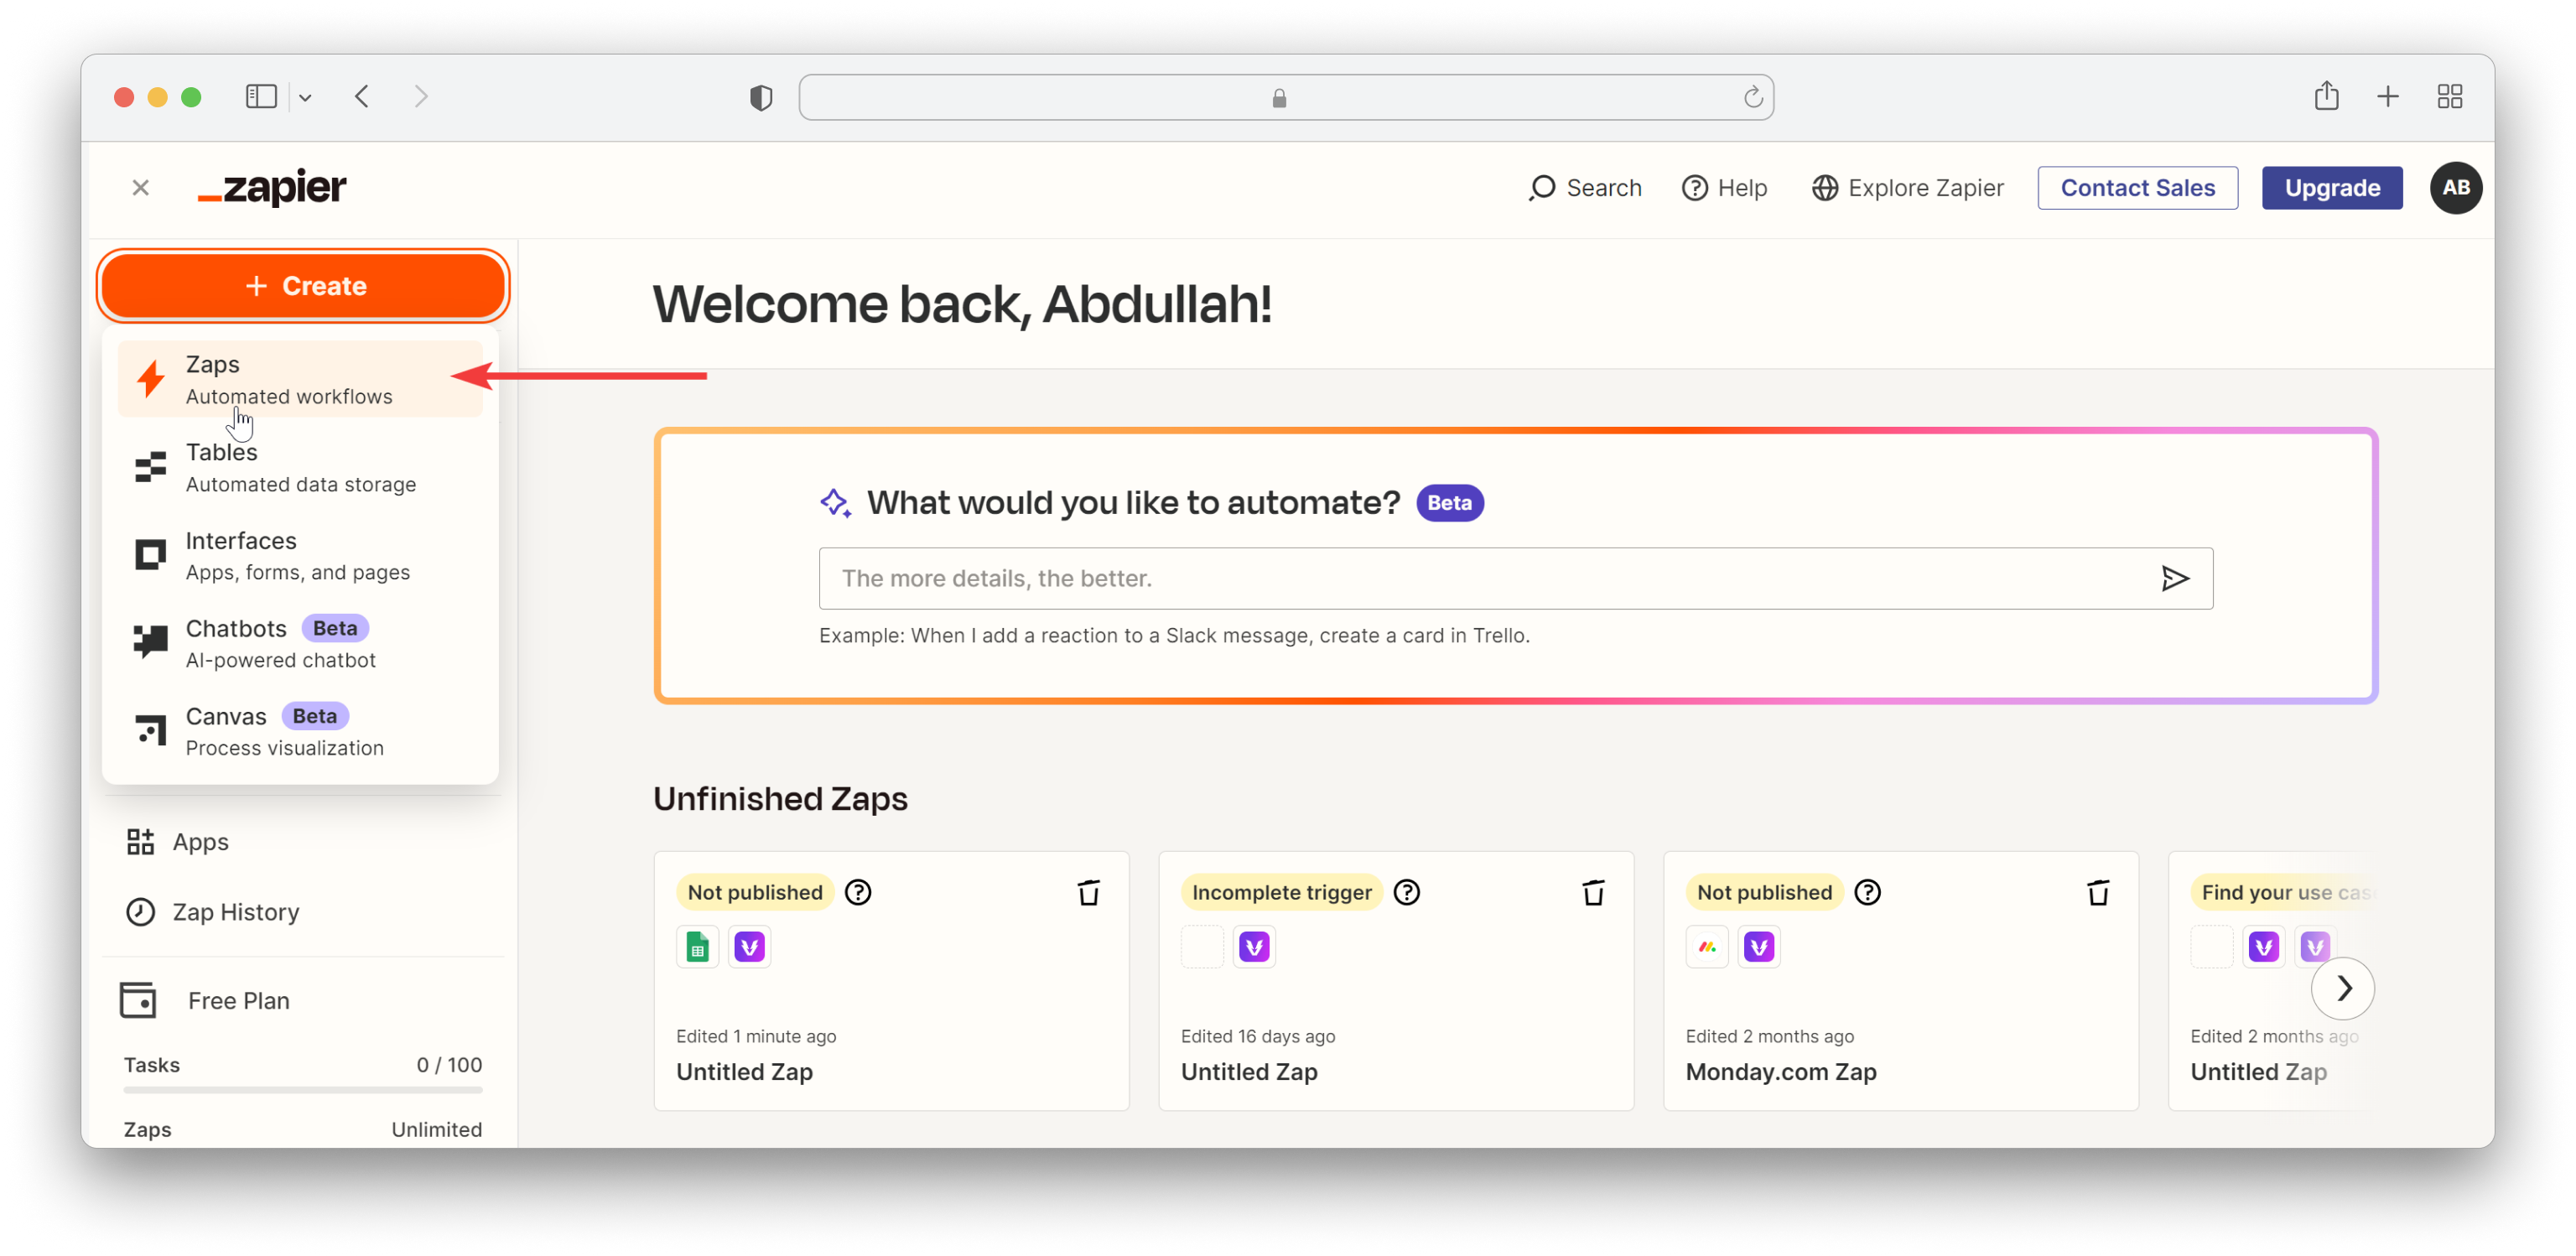
Head over to your Zapier dashboard:
- Click on + Create and then select Zaps
Zapier Dashboard
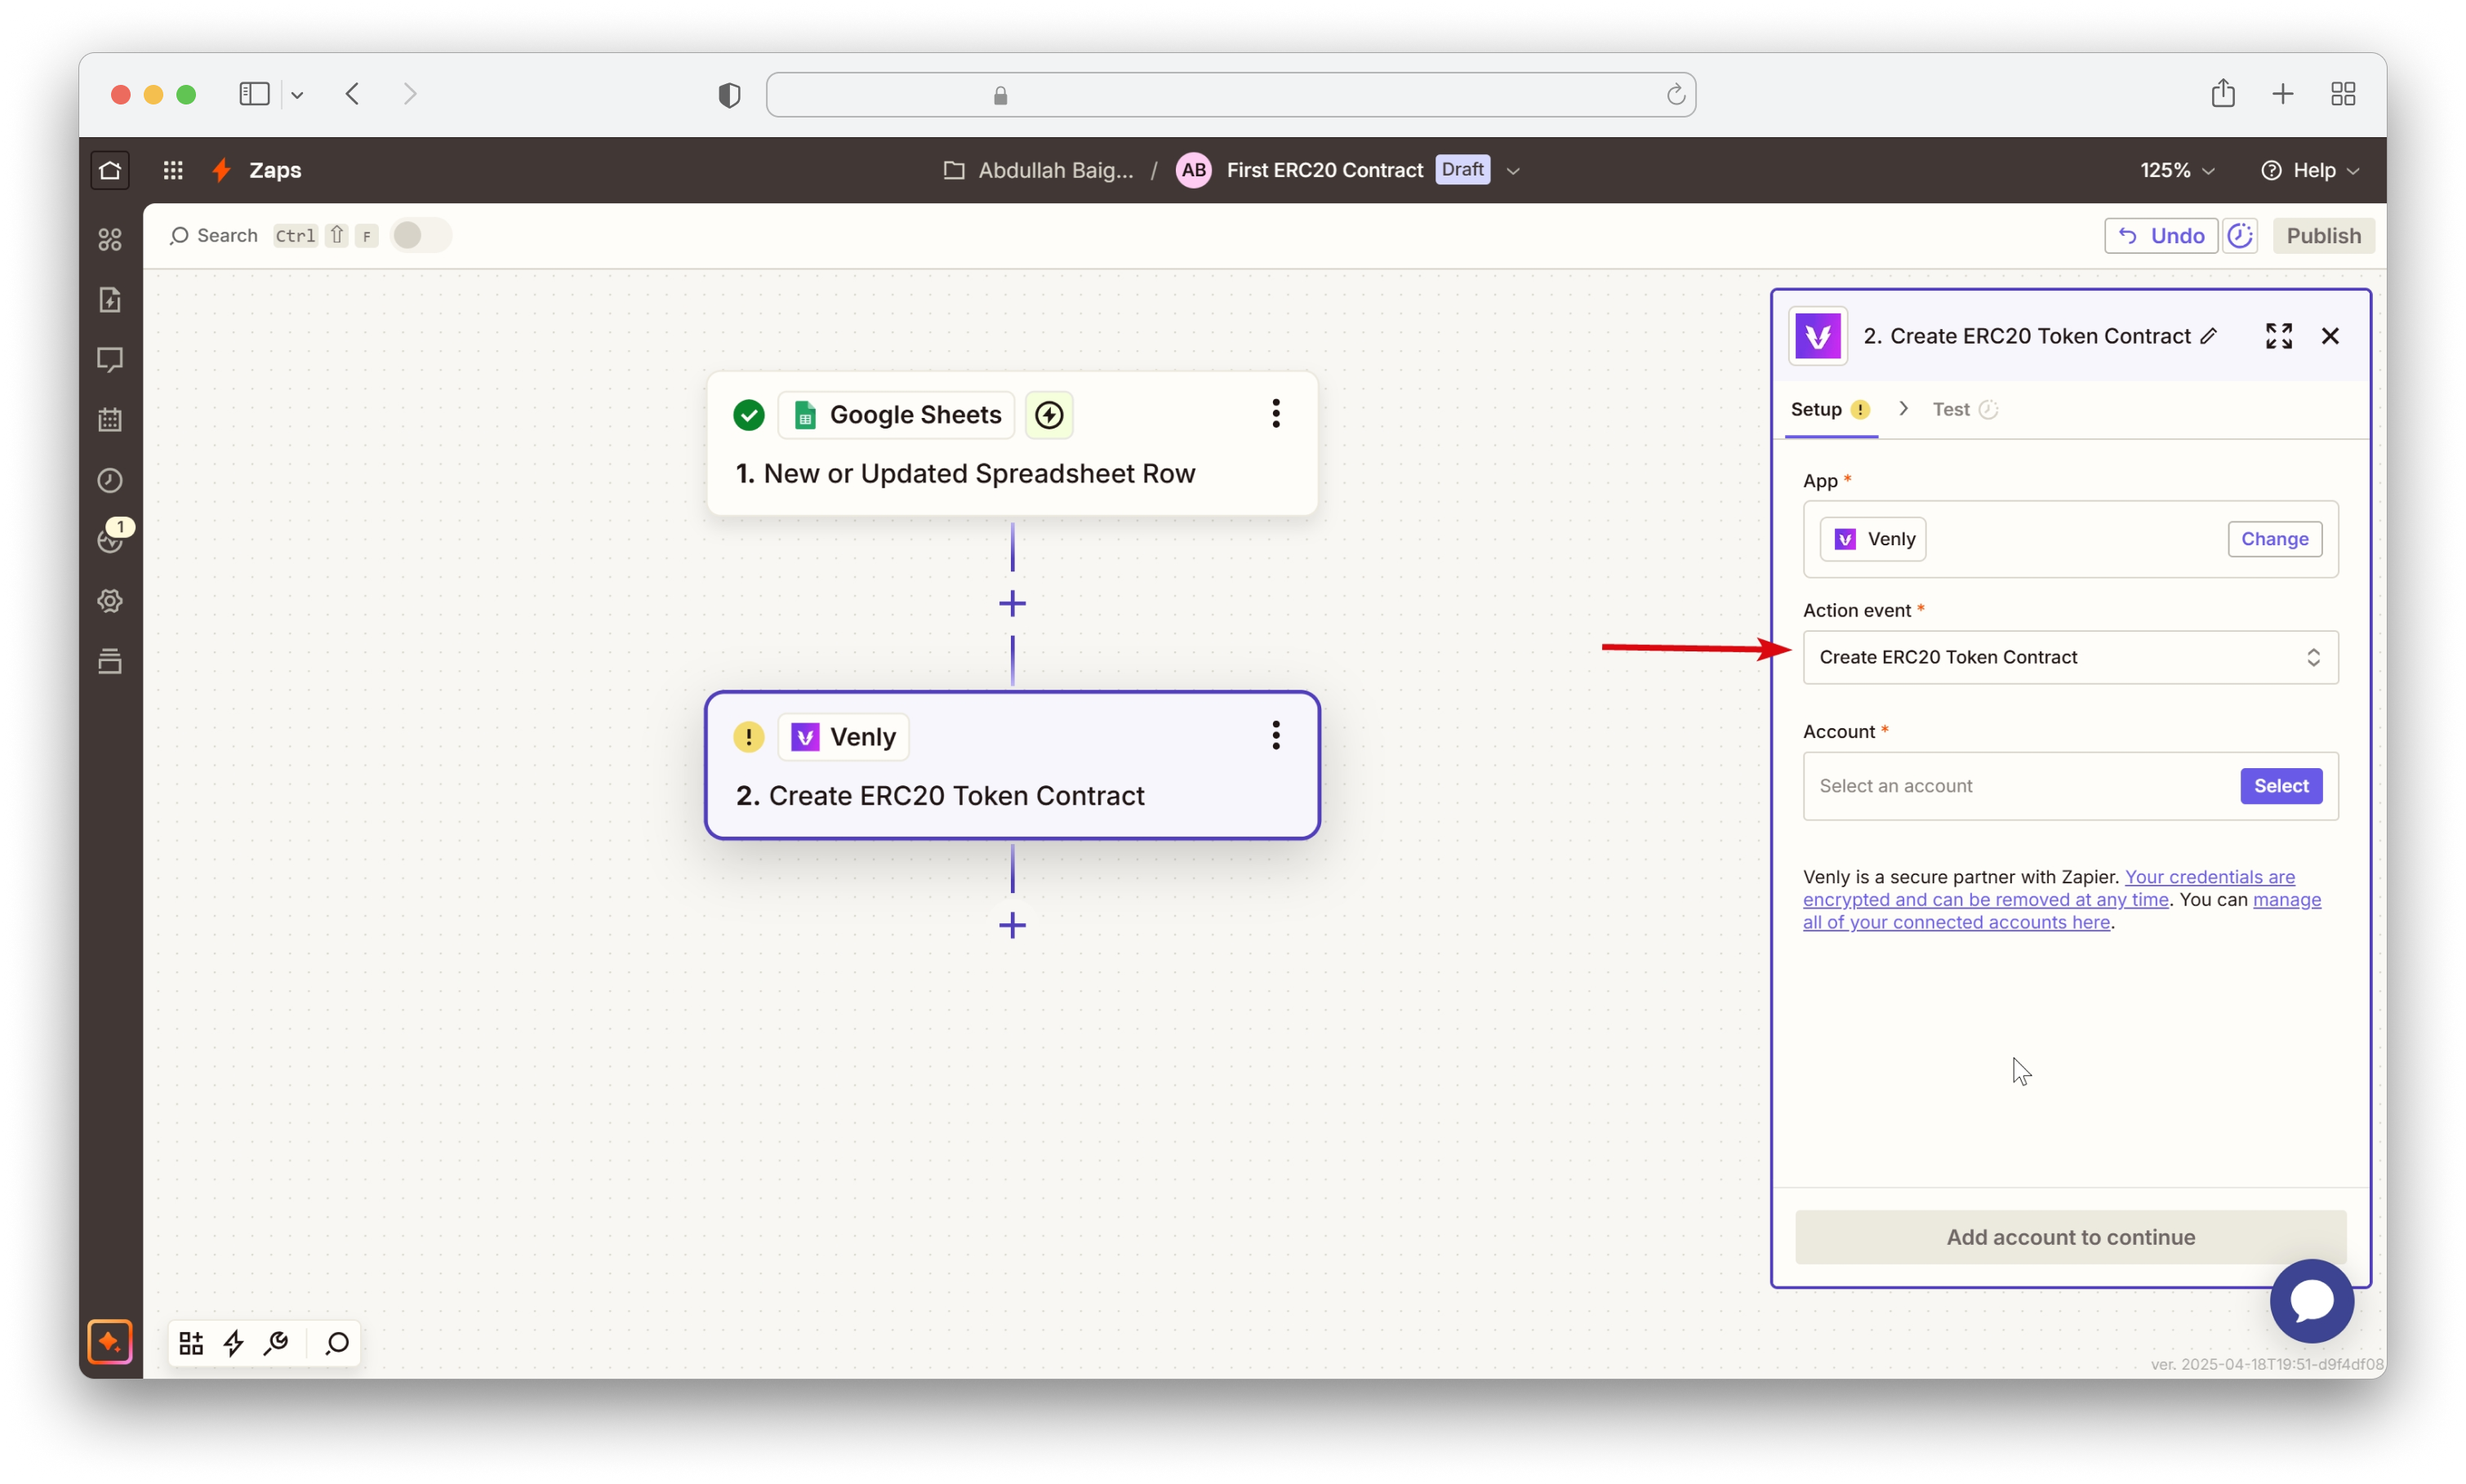
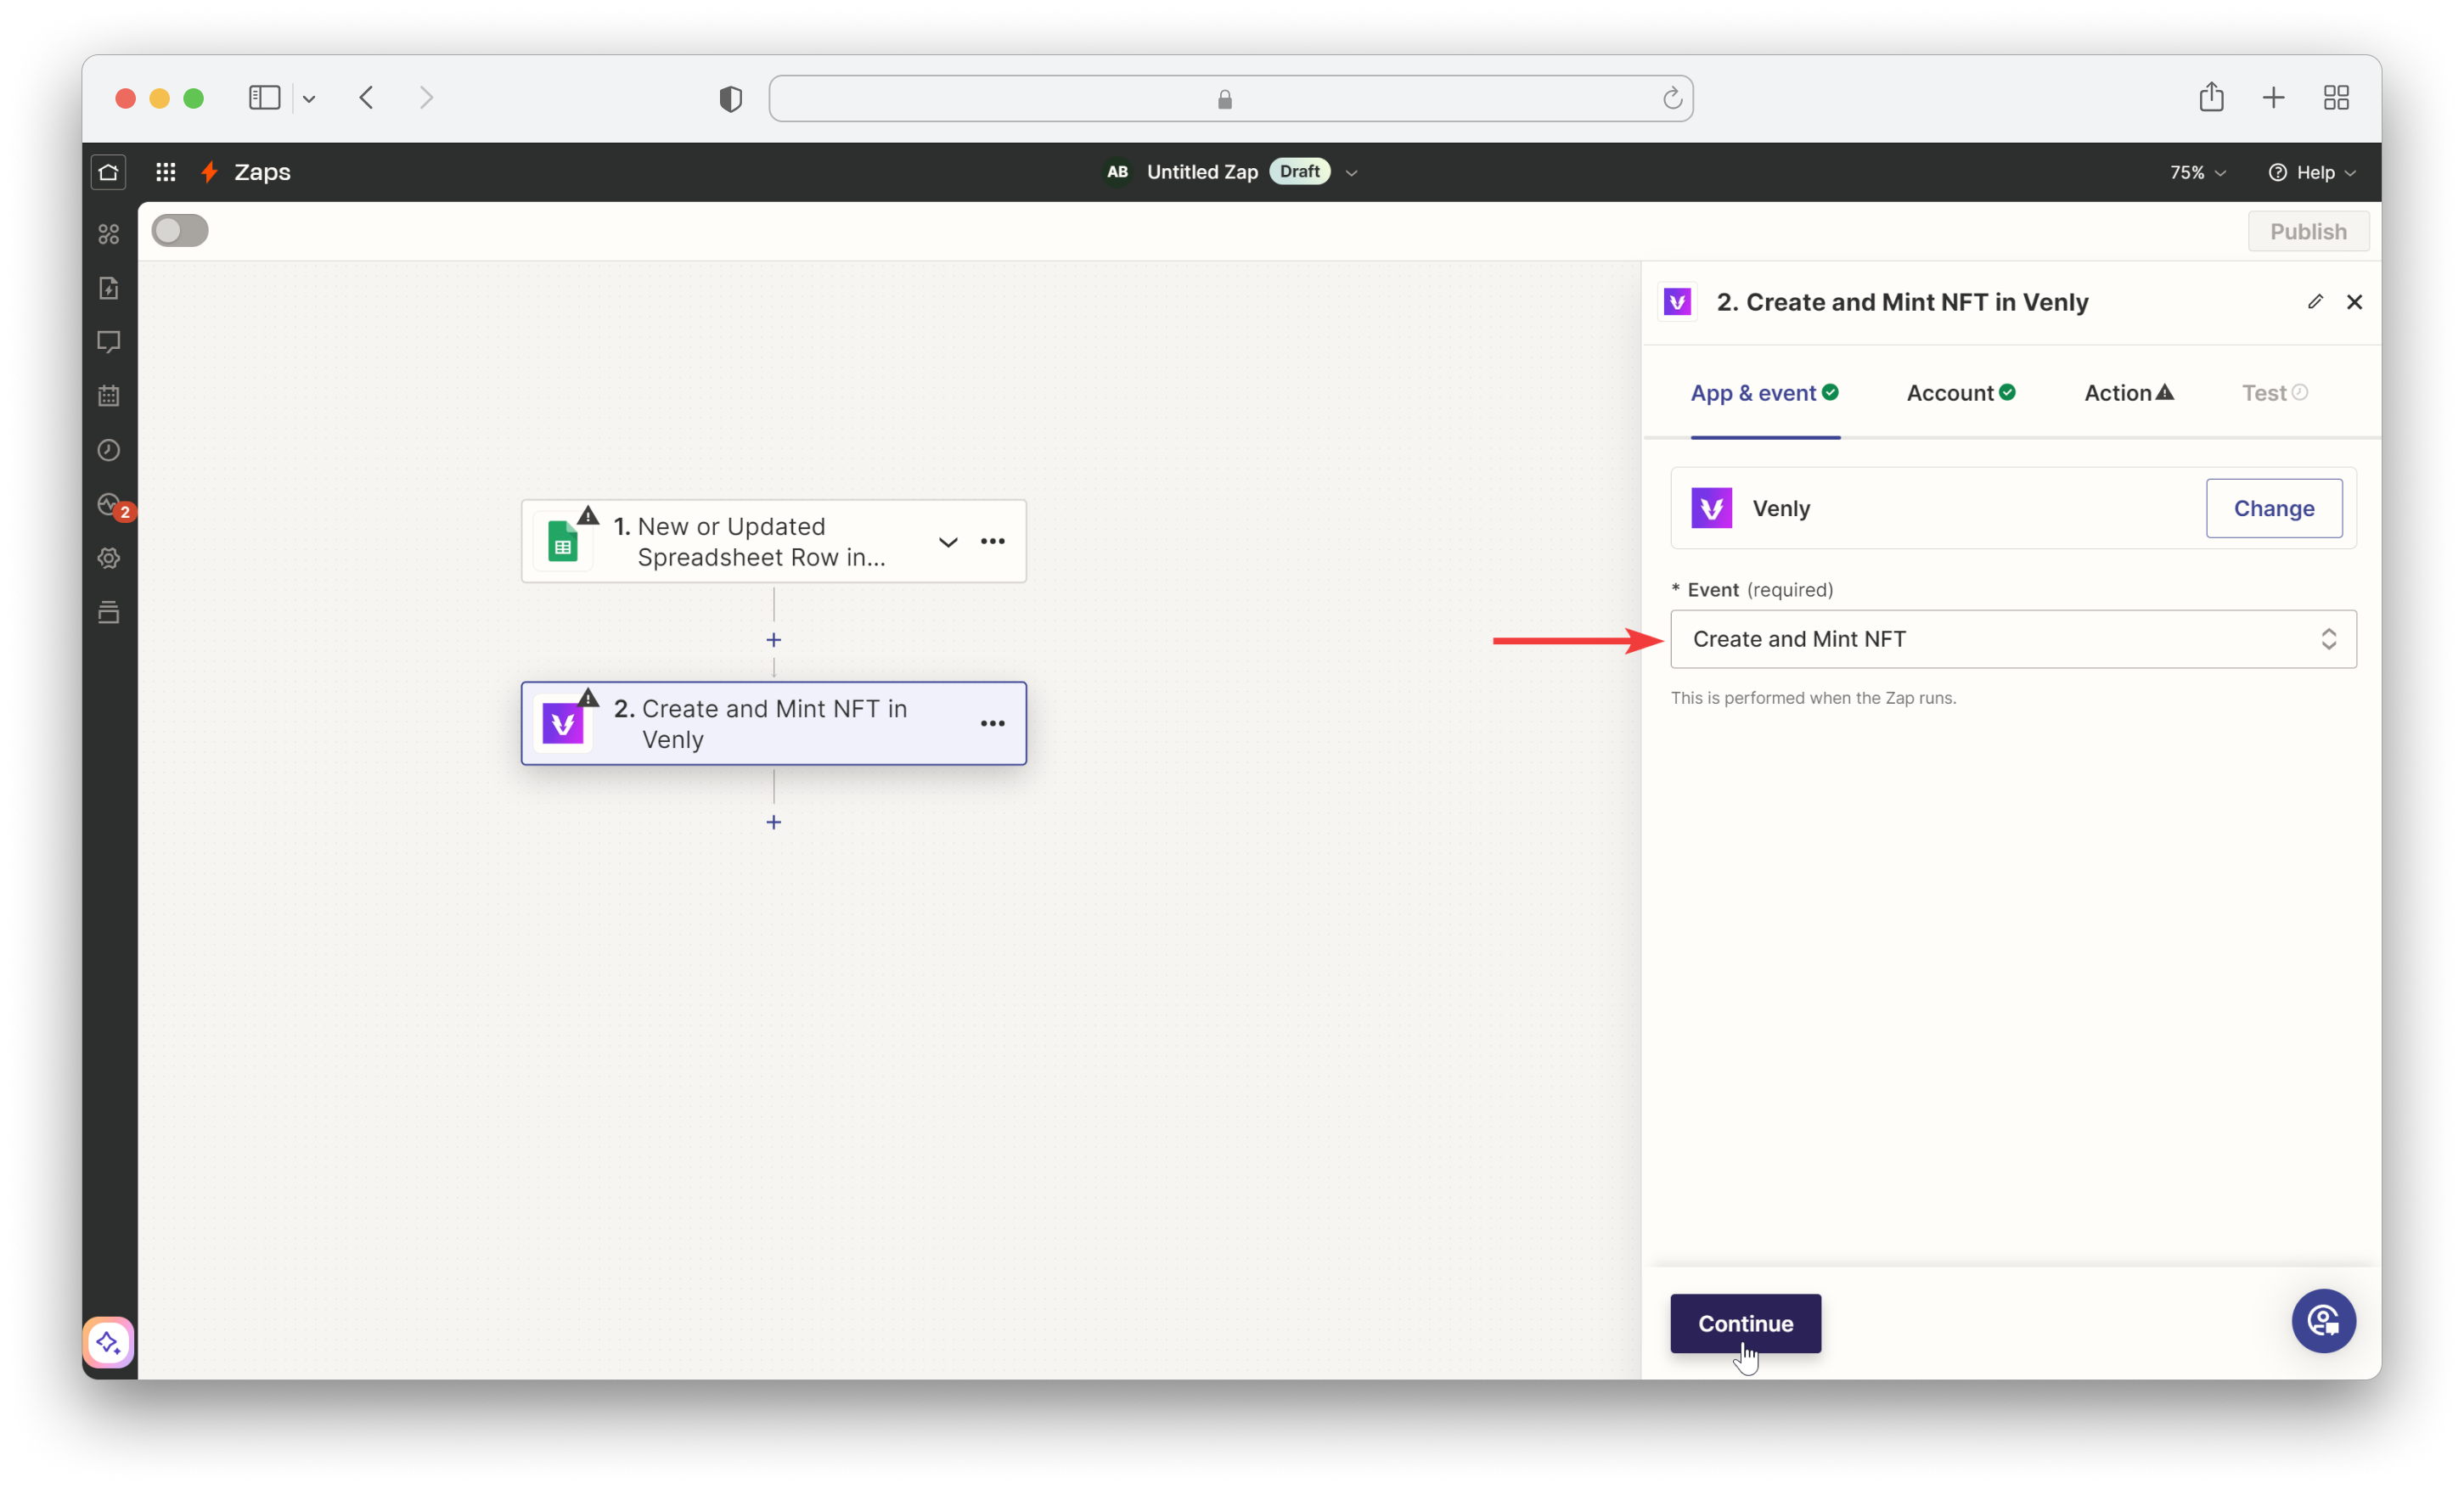
- Next, select any trigger of your choice in the first box.
- In the second box, select the Venly action.
- In the Event, select Create ERC20 Token Contract from the drop-down.
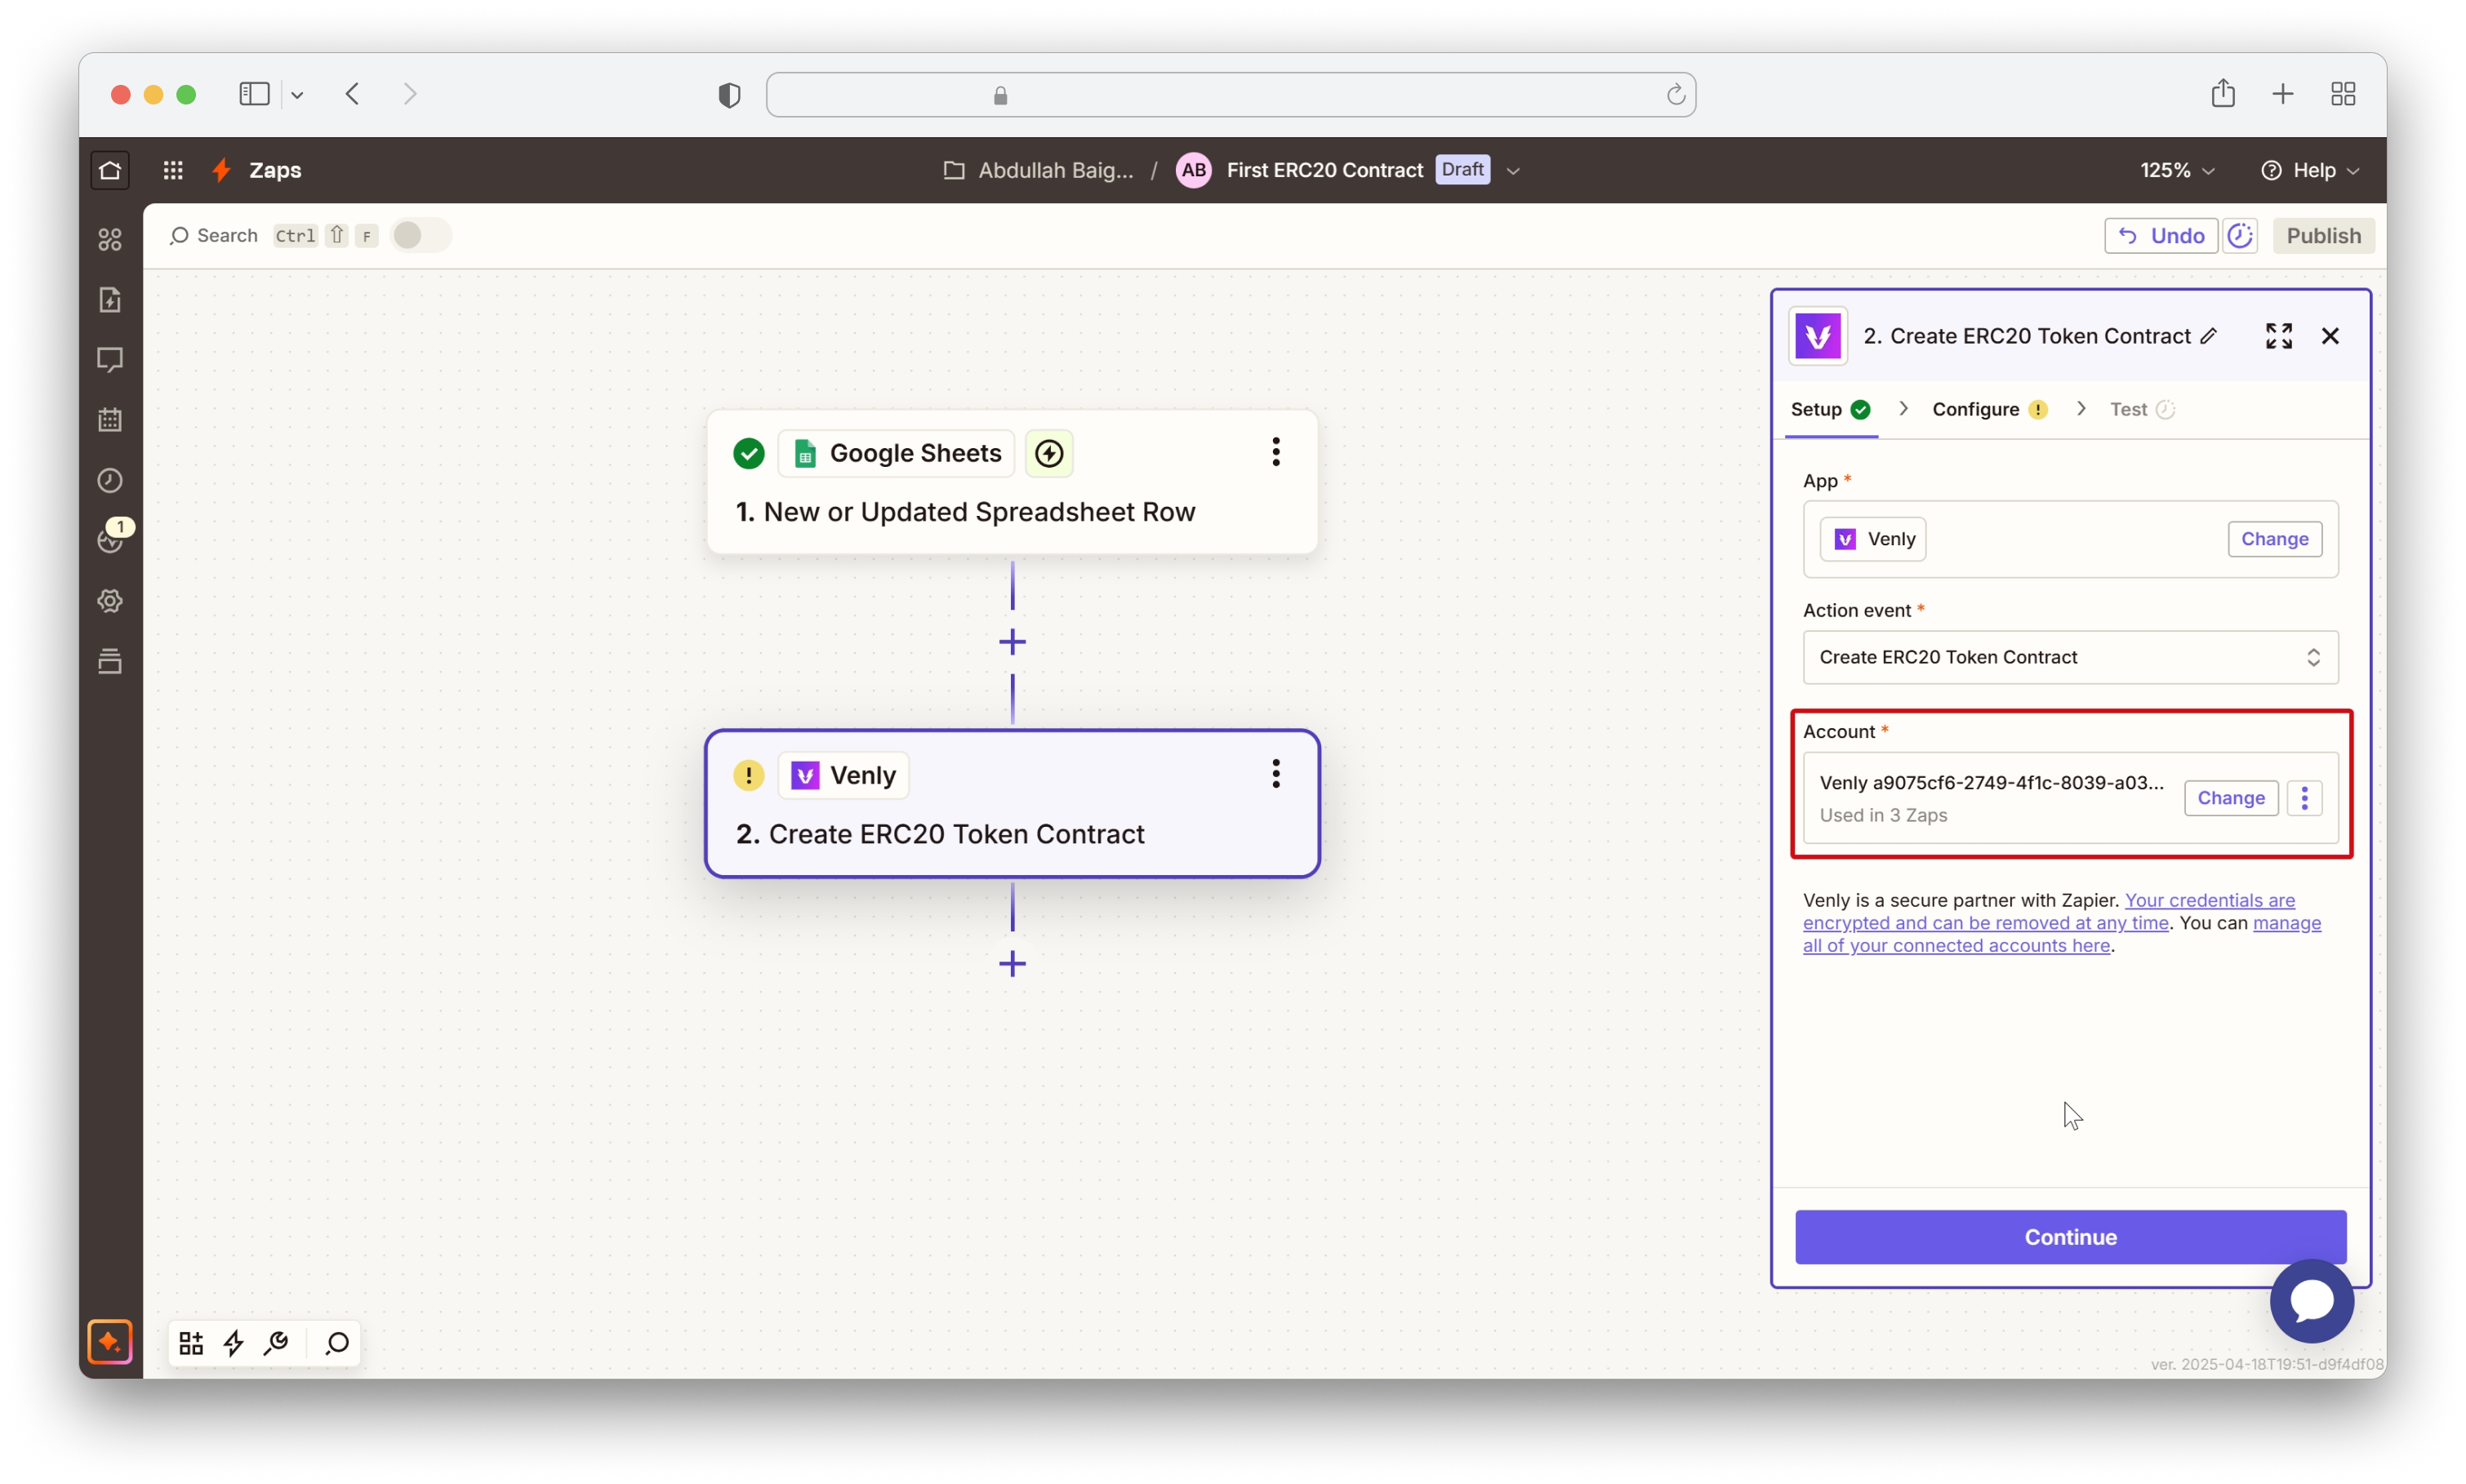
3.2 Connecting Venly with Zapier
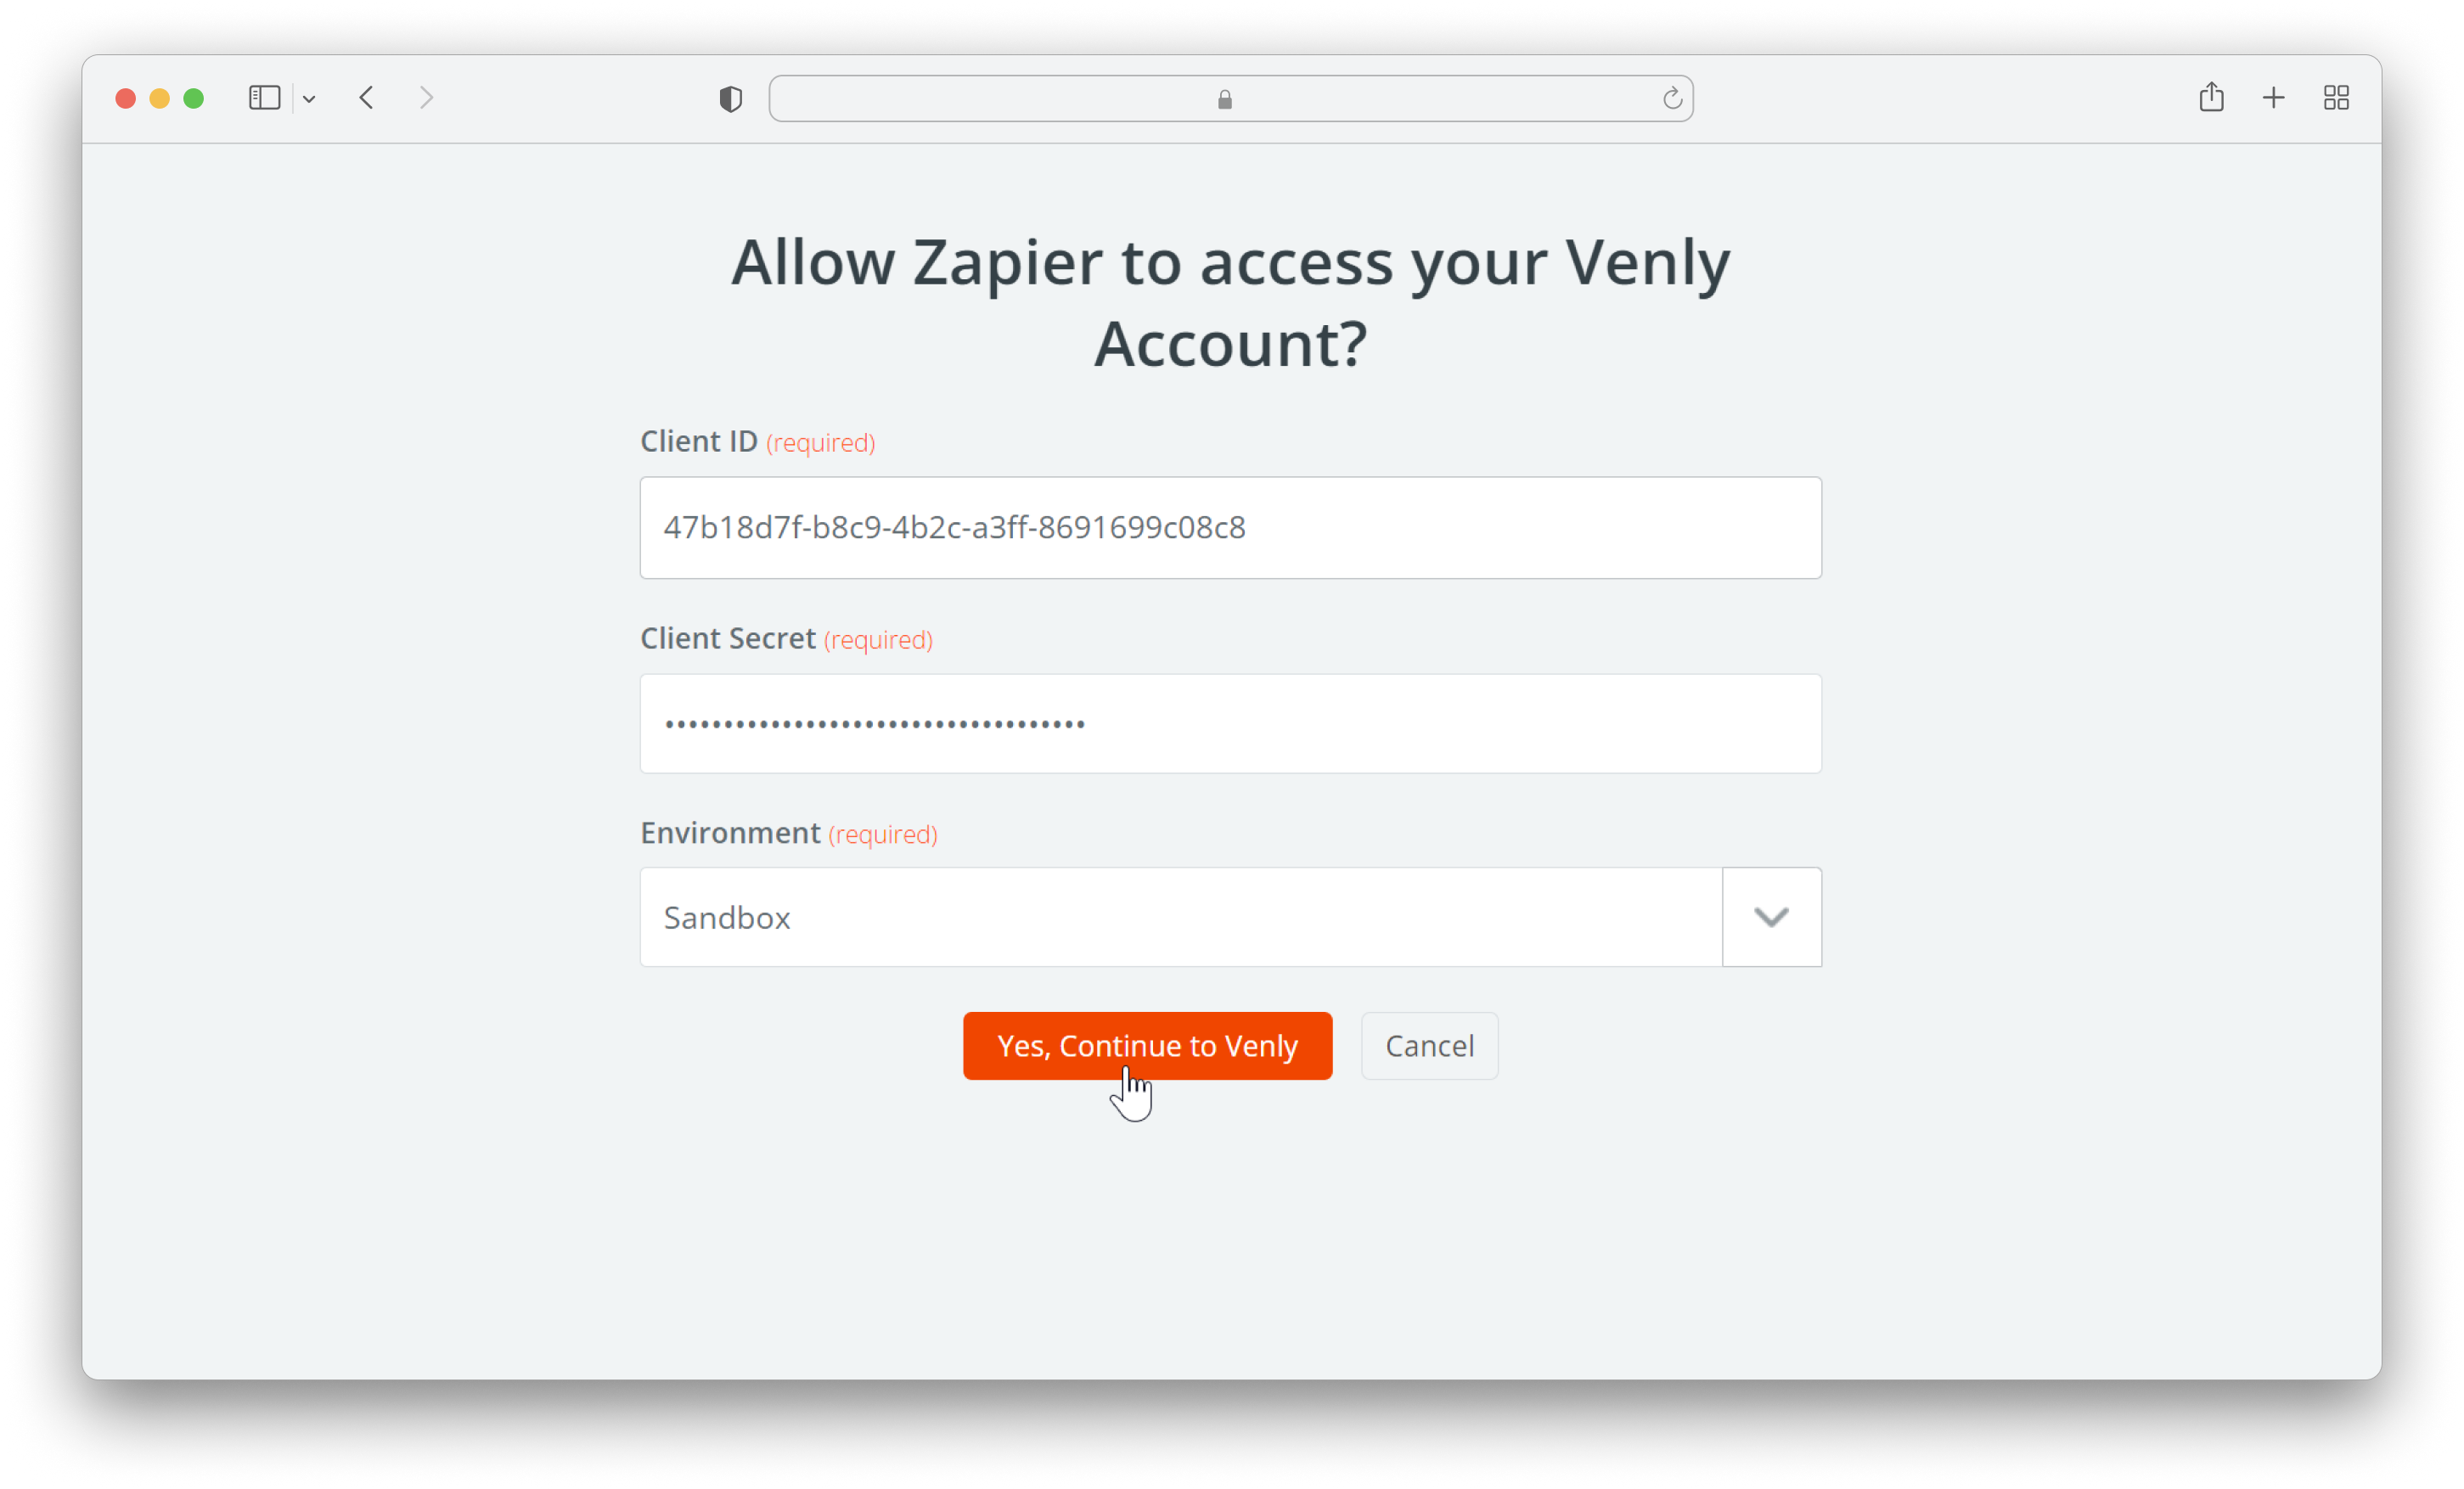
Next, you need to connect your Venly account with Zapier. Under Account, click on Sign In or Choose. A new pop-up screen will appear.
Enter your previously saved Client ID and Client Secret. You can get them by logging into the Portal.
Finally, select one of the following environment and click on Yes, Continue to Venly.
- Sandbox: Use this to run tests on testnet blockchains.
- Production: Use this to run calls on real mainnet blockchains.
Read more information on testnet and mainnet.
Connect Venly using access credentials
If connected successfully, your Client ID and environment(sandbox in this case) will be displayed as shown below. Click on Continue to proceed.
Venly Account Connected
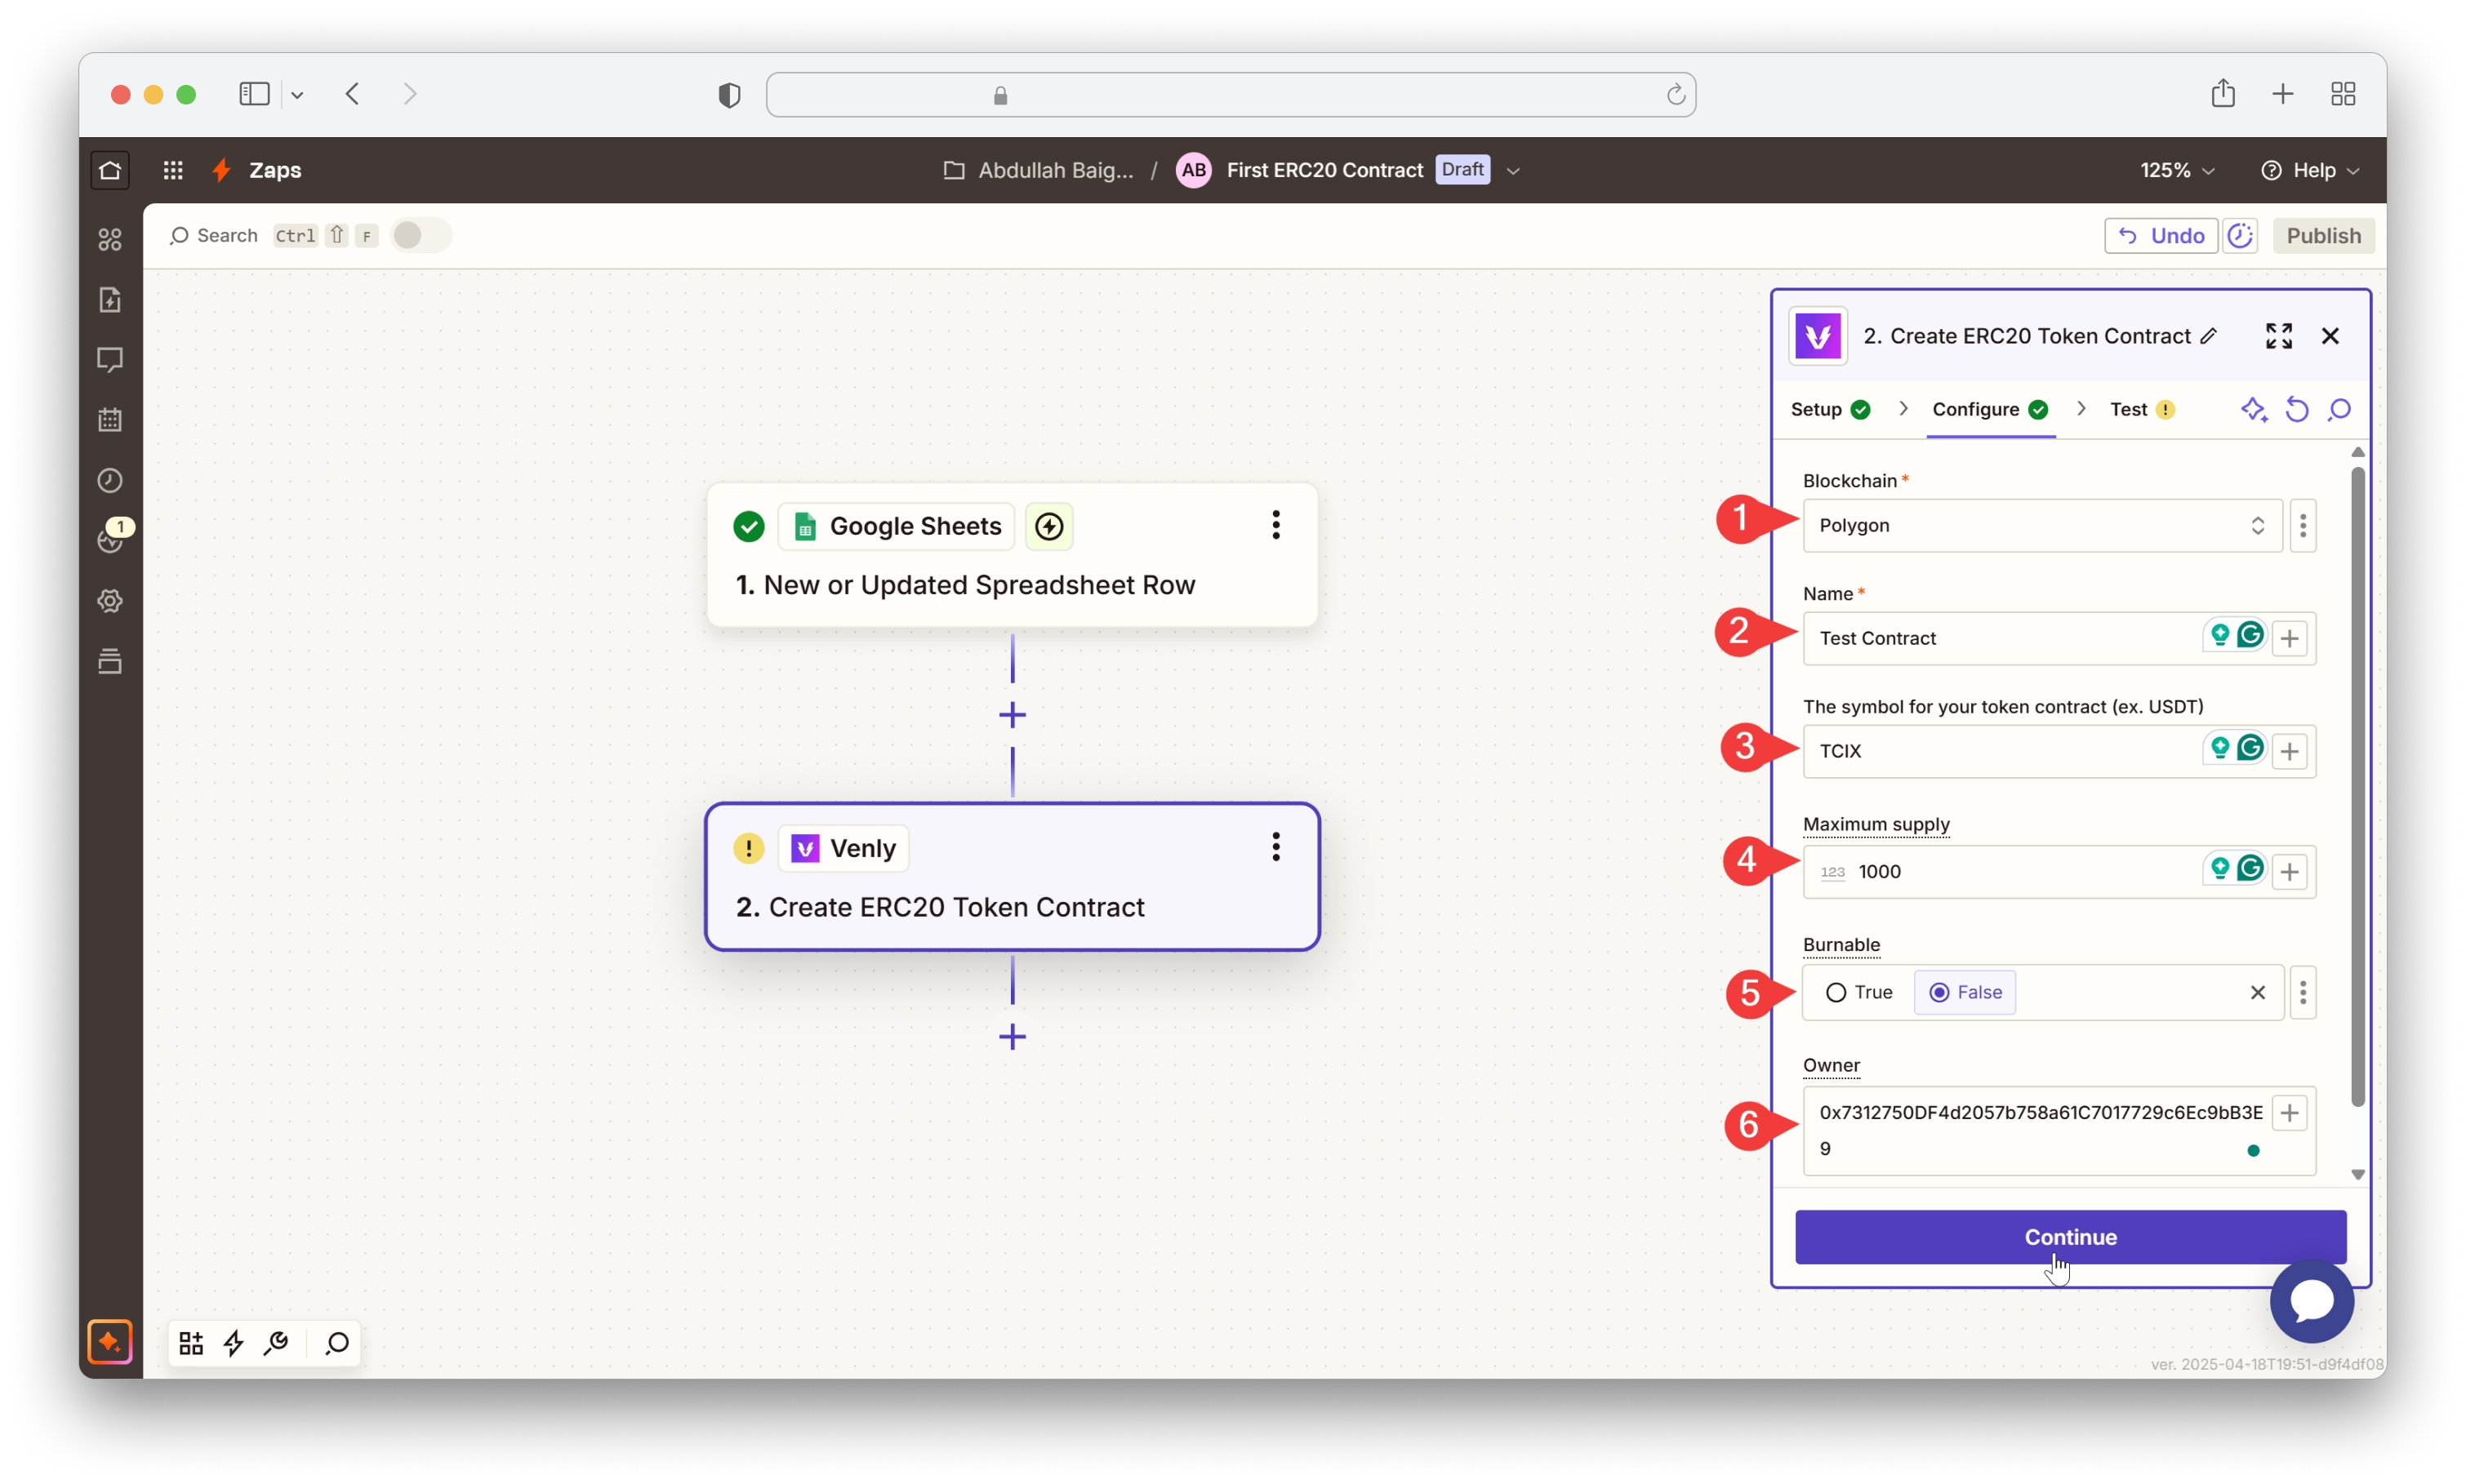
3.3 Defining the ERC20 Token Contract
Fill in the required fields to create your first ERC20 Token Contract. These fields can be filled in manually if you are creating only one contract. If you wish to create multiple token contracts, then you should configure the fields dynamically using data from any trigger, such as Google Sheets, Google Forms, etc.
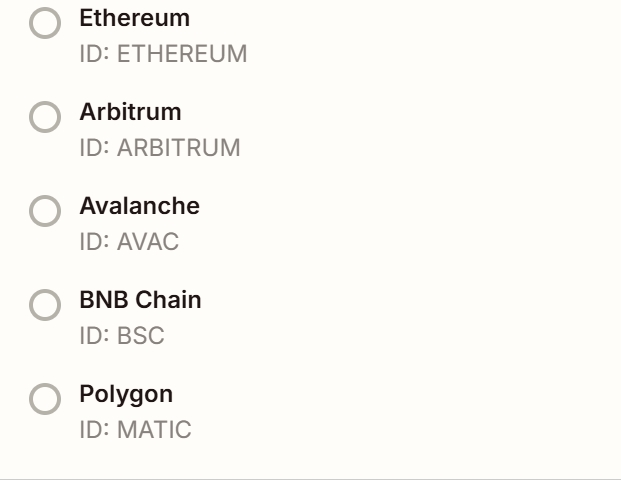
- Blockchain: This is the blockchain on which your ERC20 contract will be created. You can choose the following blockchains: Ethereum, Arbitrum, Avalanche, BNB Chain, and Polygon (Matic).
- Name: The name of your token contract.
- Symbol: The symbol for your token contract, for example, IXFT.
- Maximum Supply: The maximum amount of tokens allowed to be minted under this token contract.
- Burnable: Specify whether the tokens will be burnable or not. Burning tokens is the act of sending tokens to a wallet that cannot be accessed.
- Owner: The wallet address that will be the owner of this token contract. The owner will have admin rights on the token contract
When creating a contract, you may leave the Trigger empty if you're going to create only one ERC20 Token Contract.
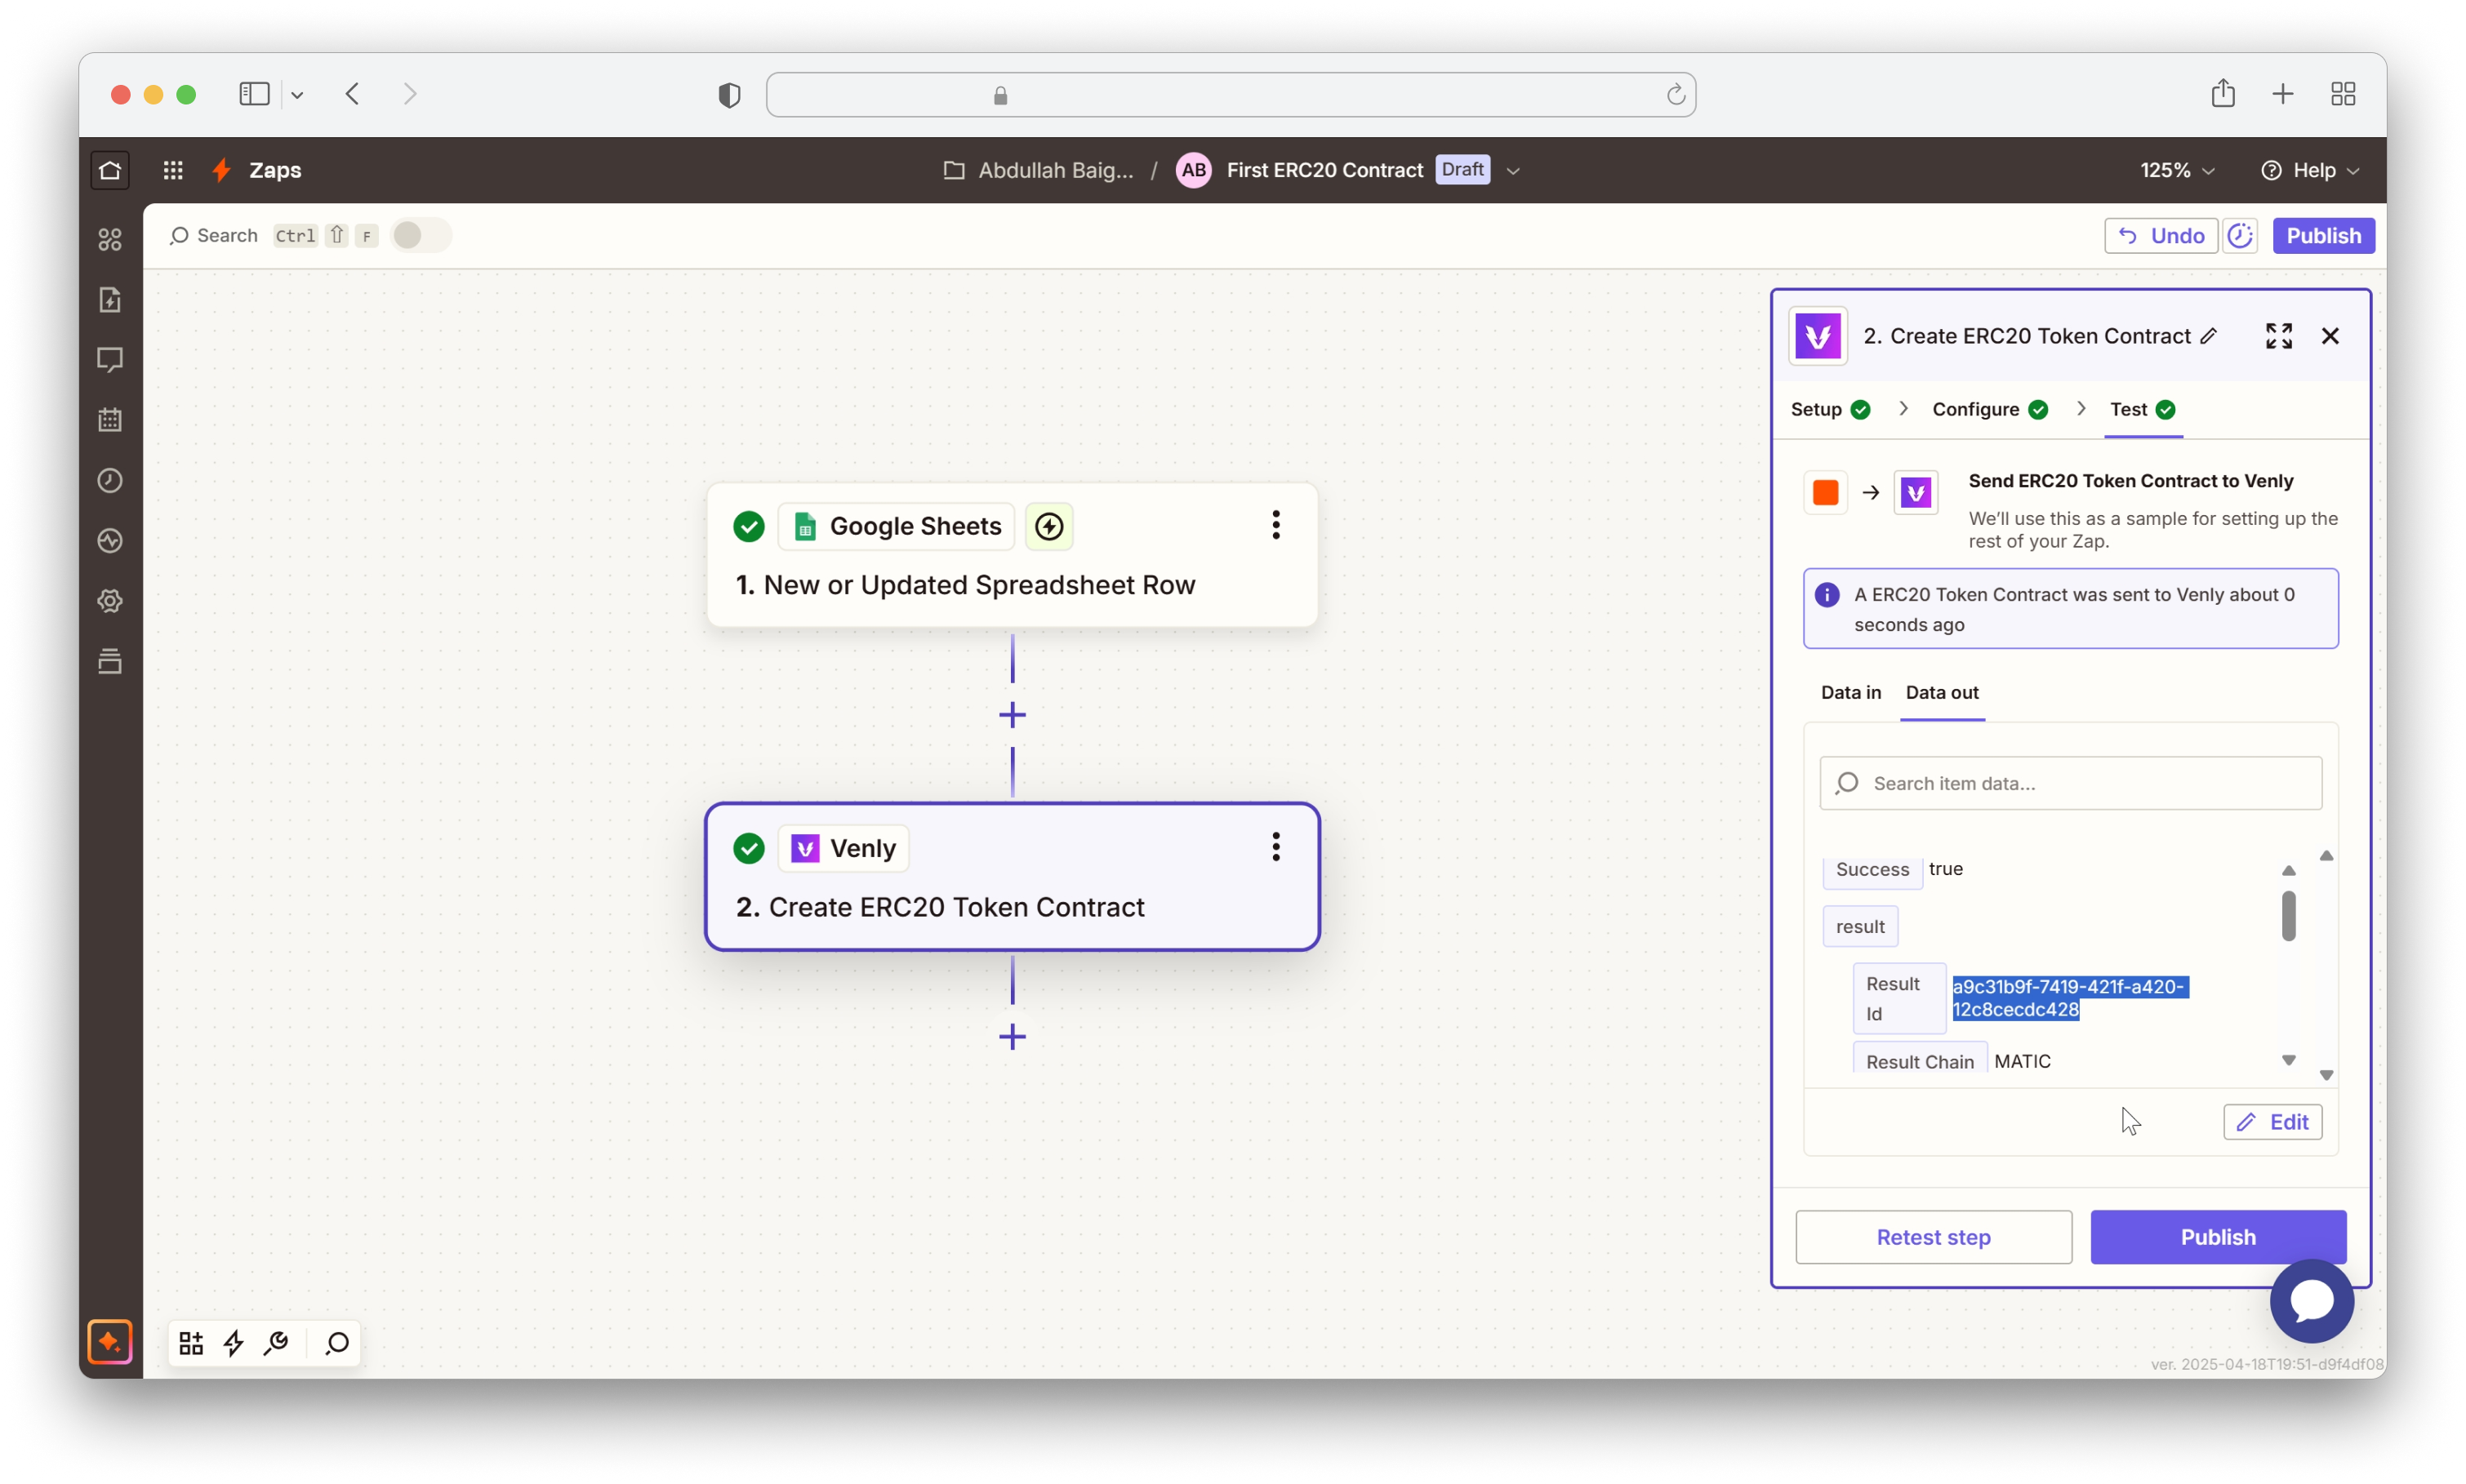
Next, click on Test step.
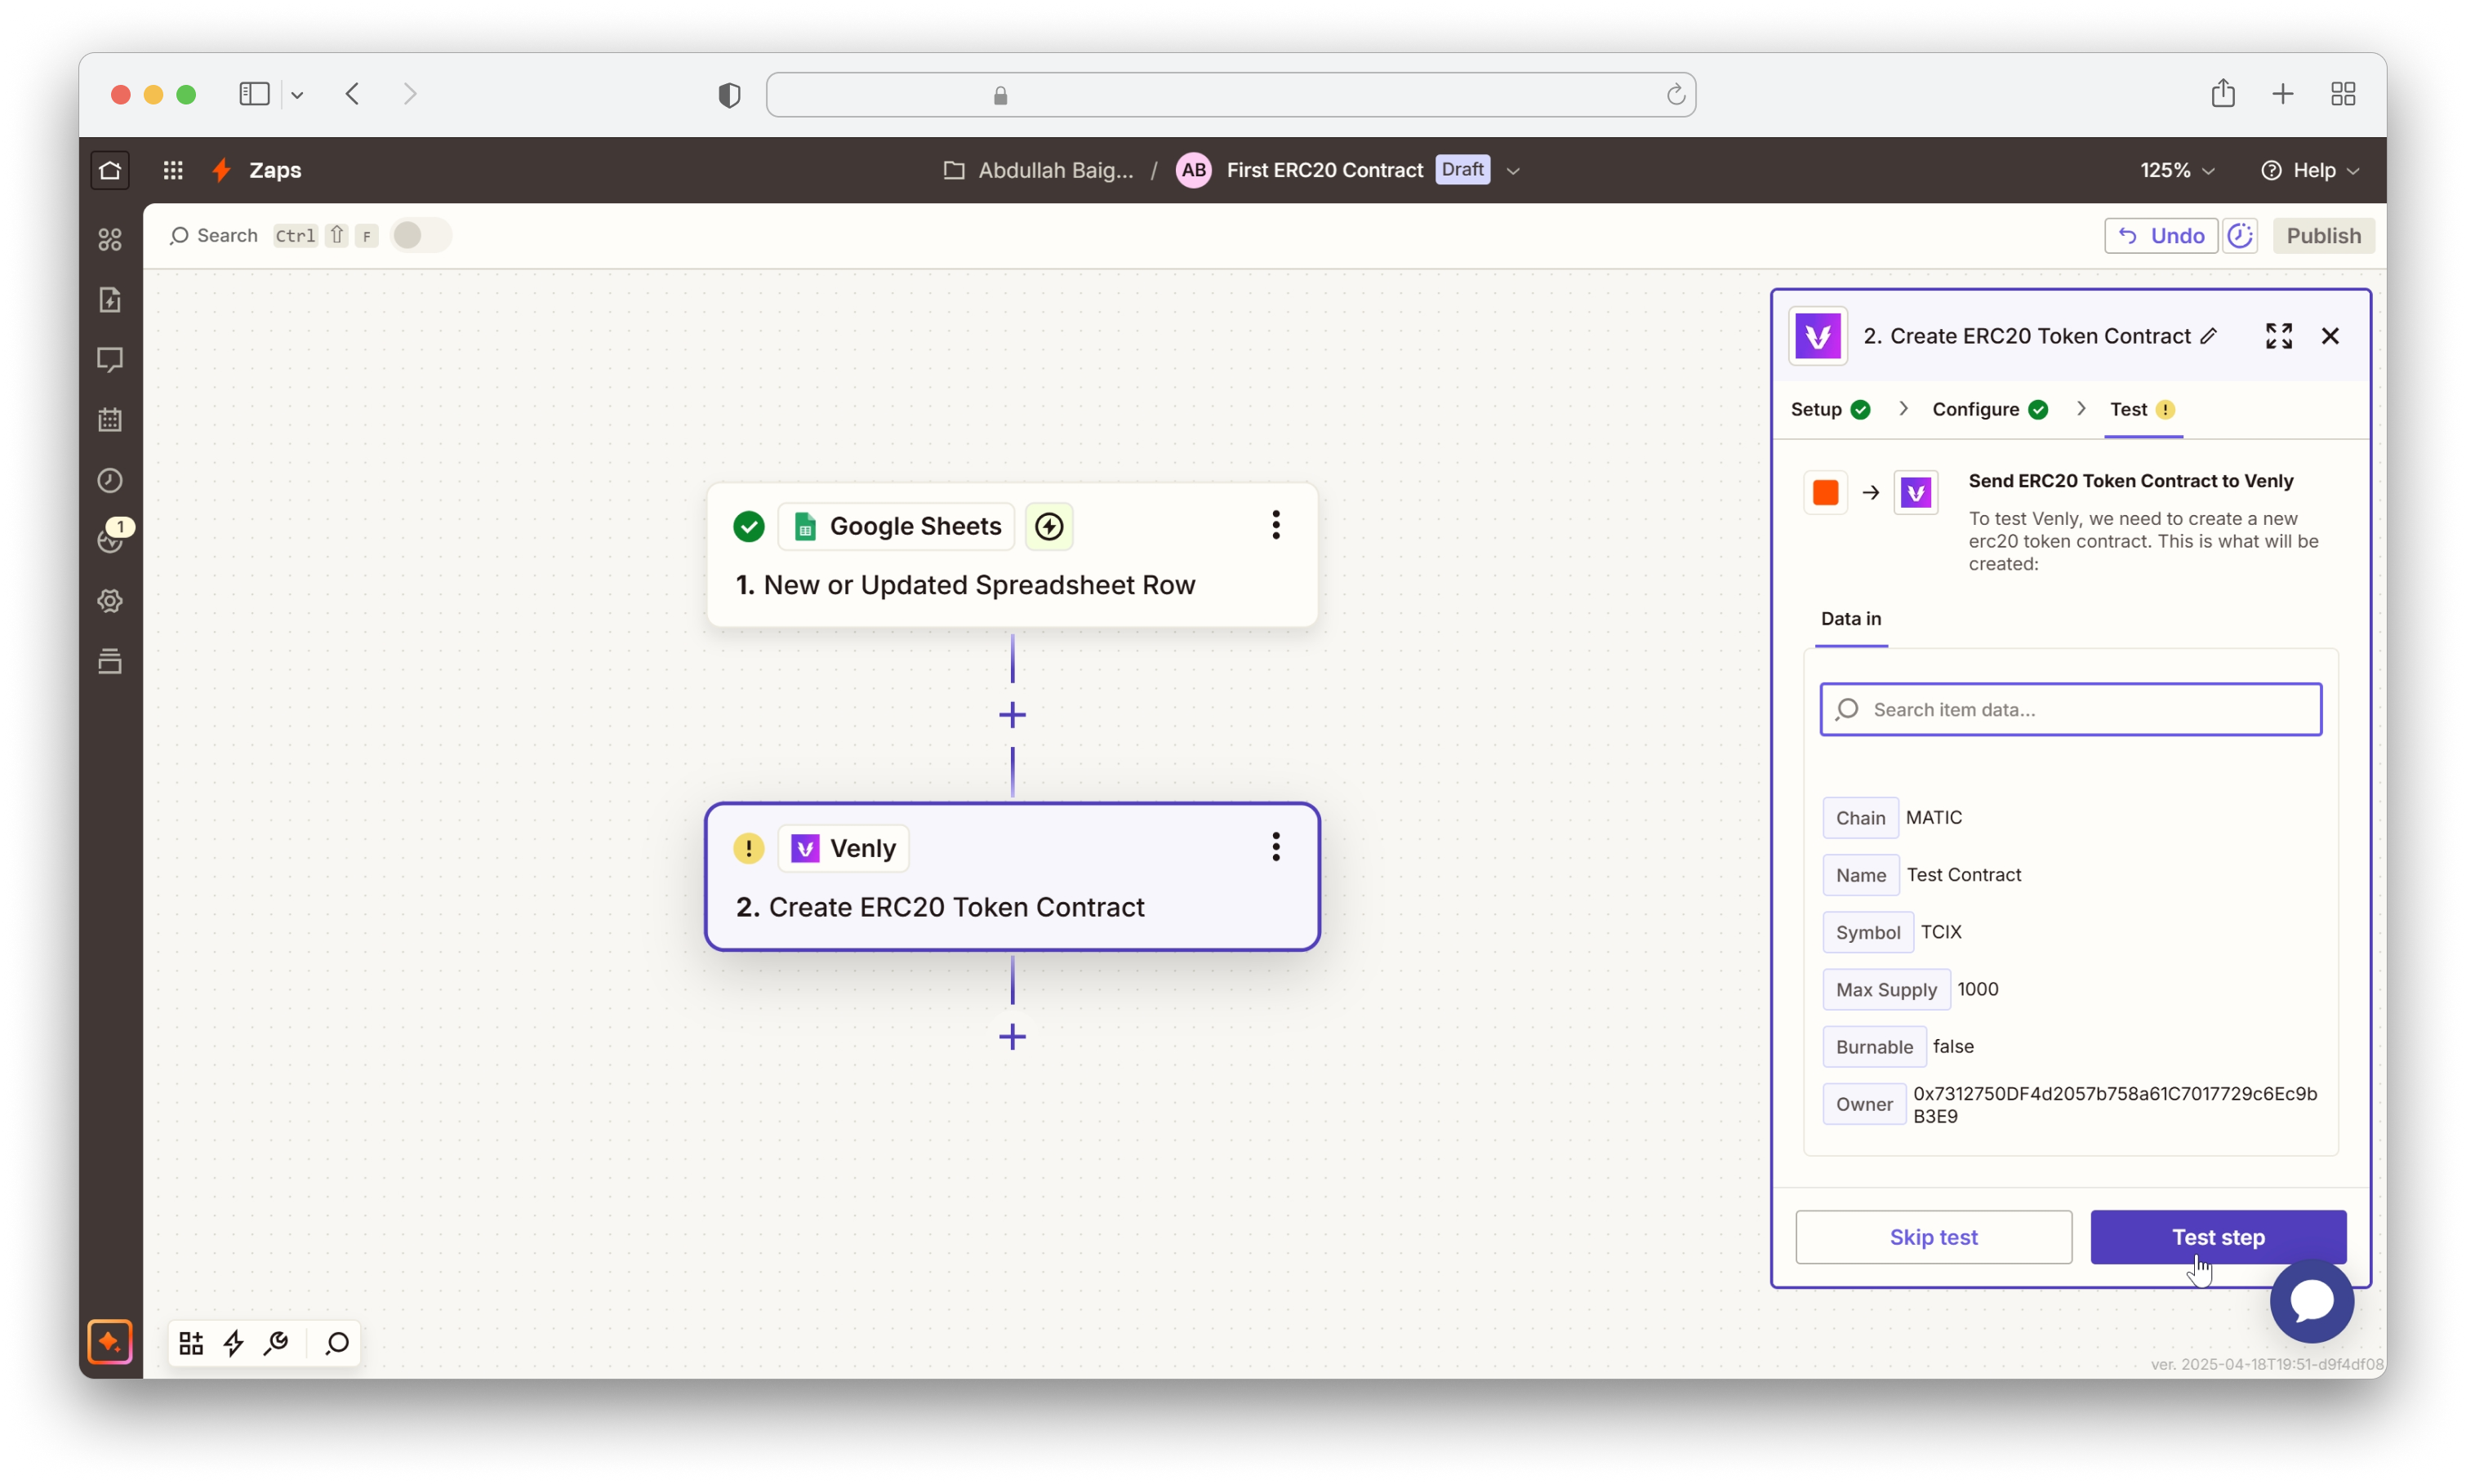
If successful, you'll receive a message containing information about your newly created ERC20 contract.
You can repeat this process to create more ERC20 contracts anytime.
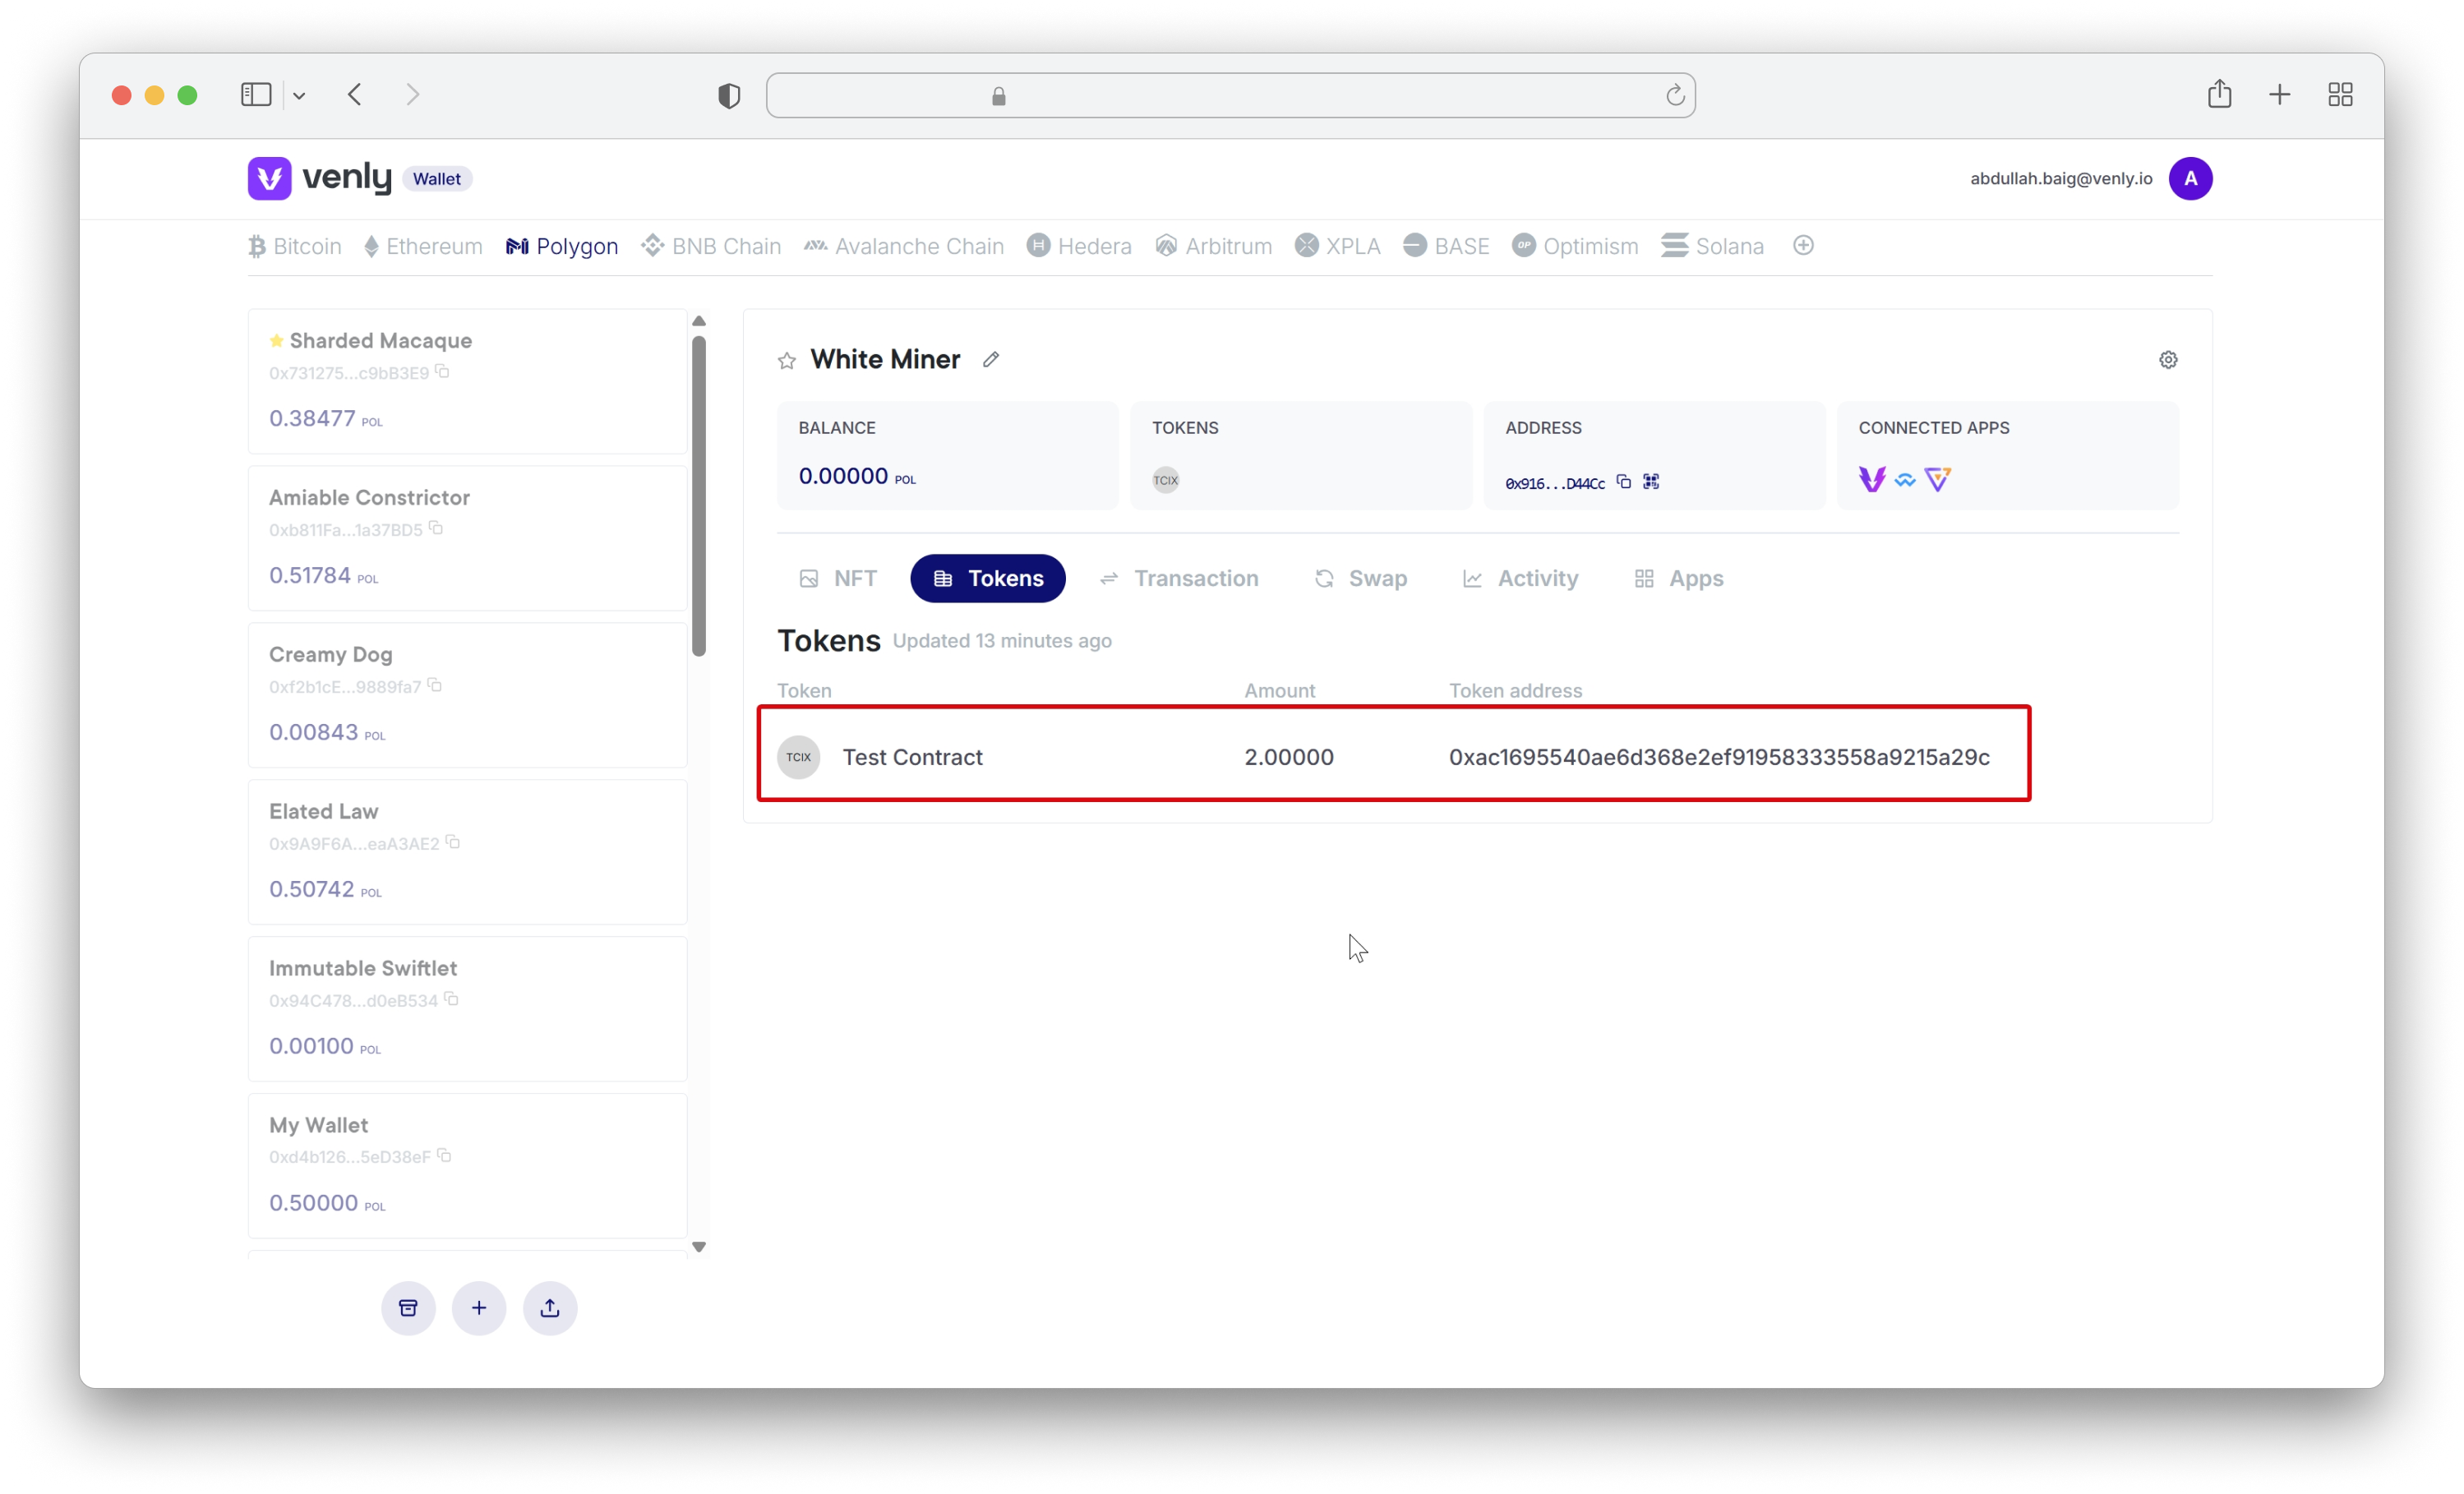
3.4 View your created ERC20 contract on Portal (COMING SOON!)
Head back to the Portal, and go to Token API. Here you will find all your ERC20 contracts. In the search bar, enter the name of your newly created contract and then proceed by copying the contract address as shown below. Save the contract address, as it will be used later in the guide.

Mint ERC20 Tokens with Zaps
Once you have created your ERC20 token contract, the next step is minting tokens directly to your end-user's wallets.
Go to App & event and select Mint ERC20 Token. Click Continue to proceed.
Your Venly account should already be connected with Zapier. Click on Continue to proceed.
Mint ERC20 token action
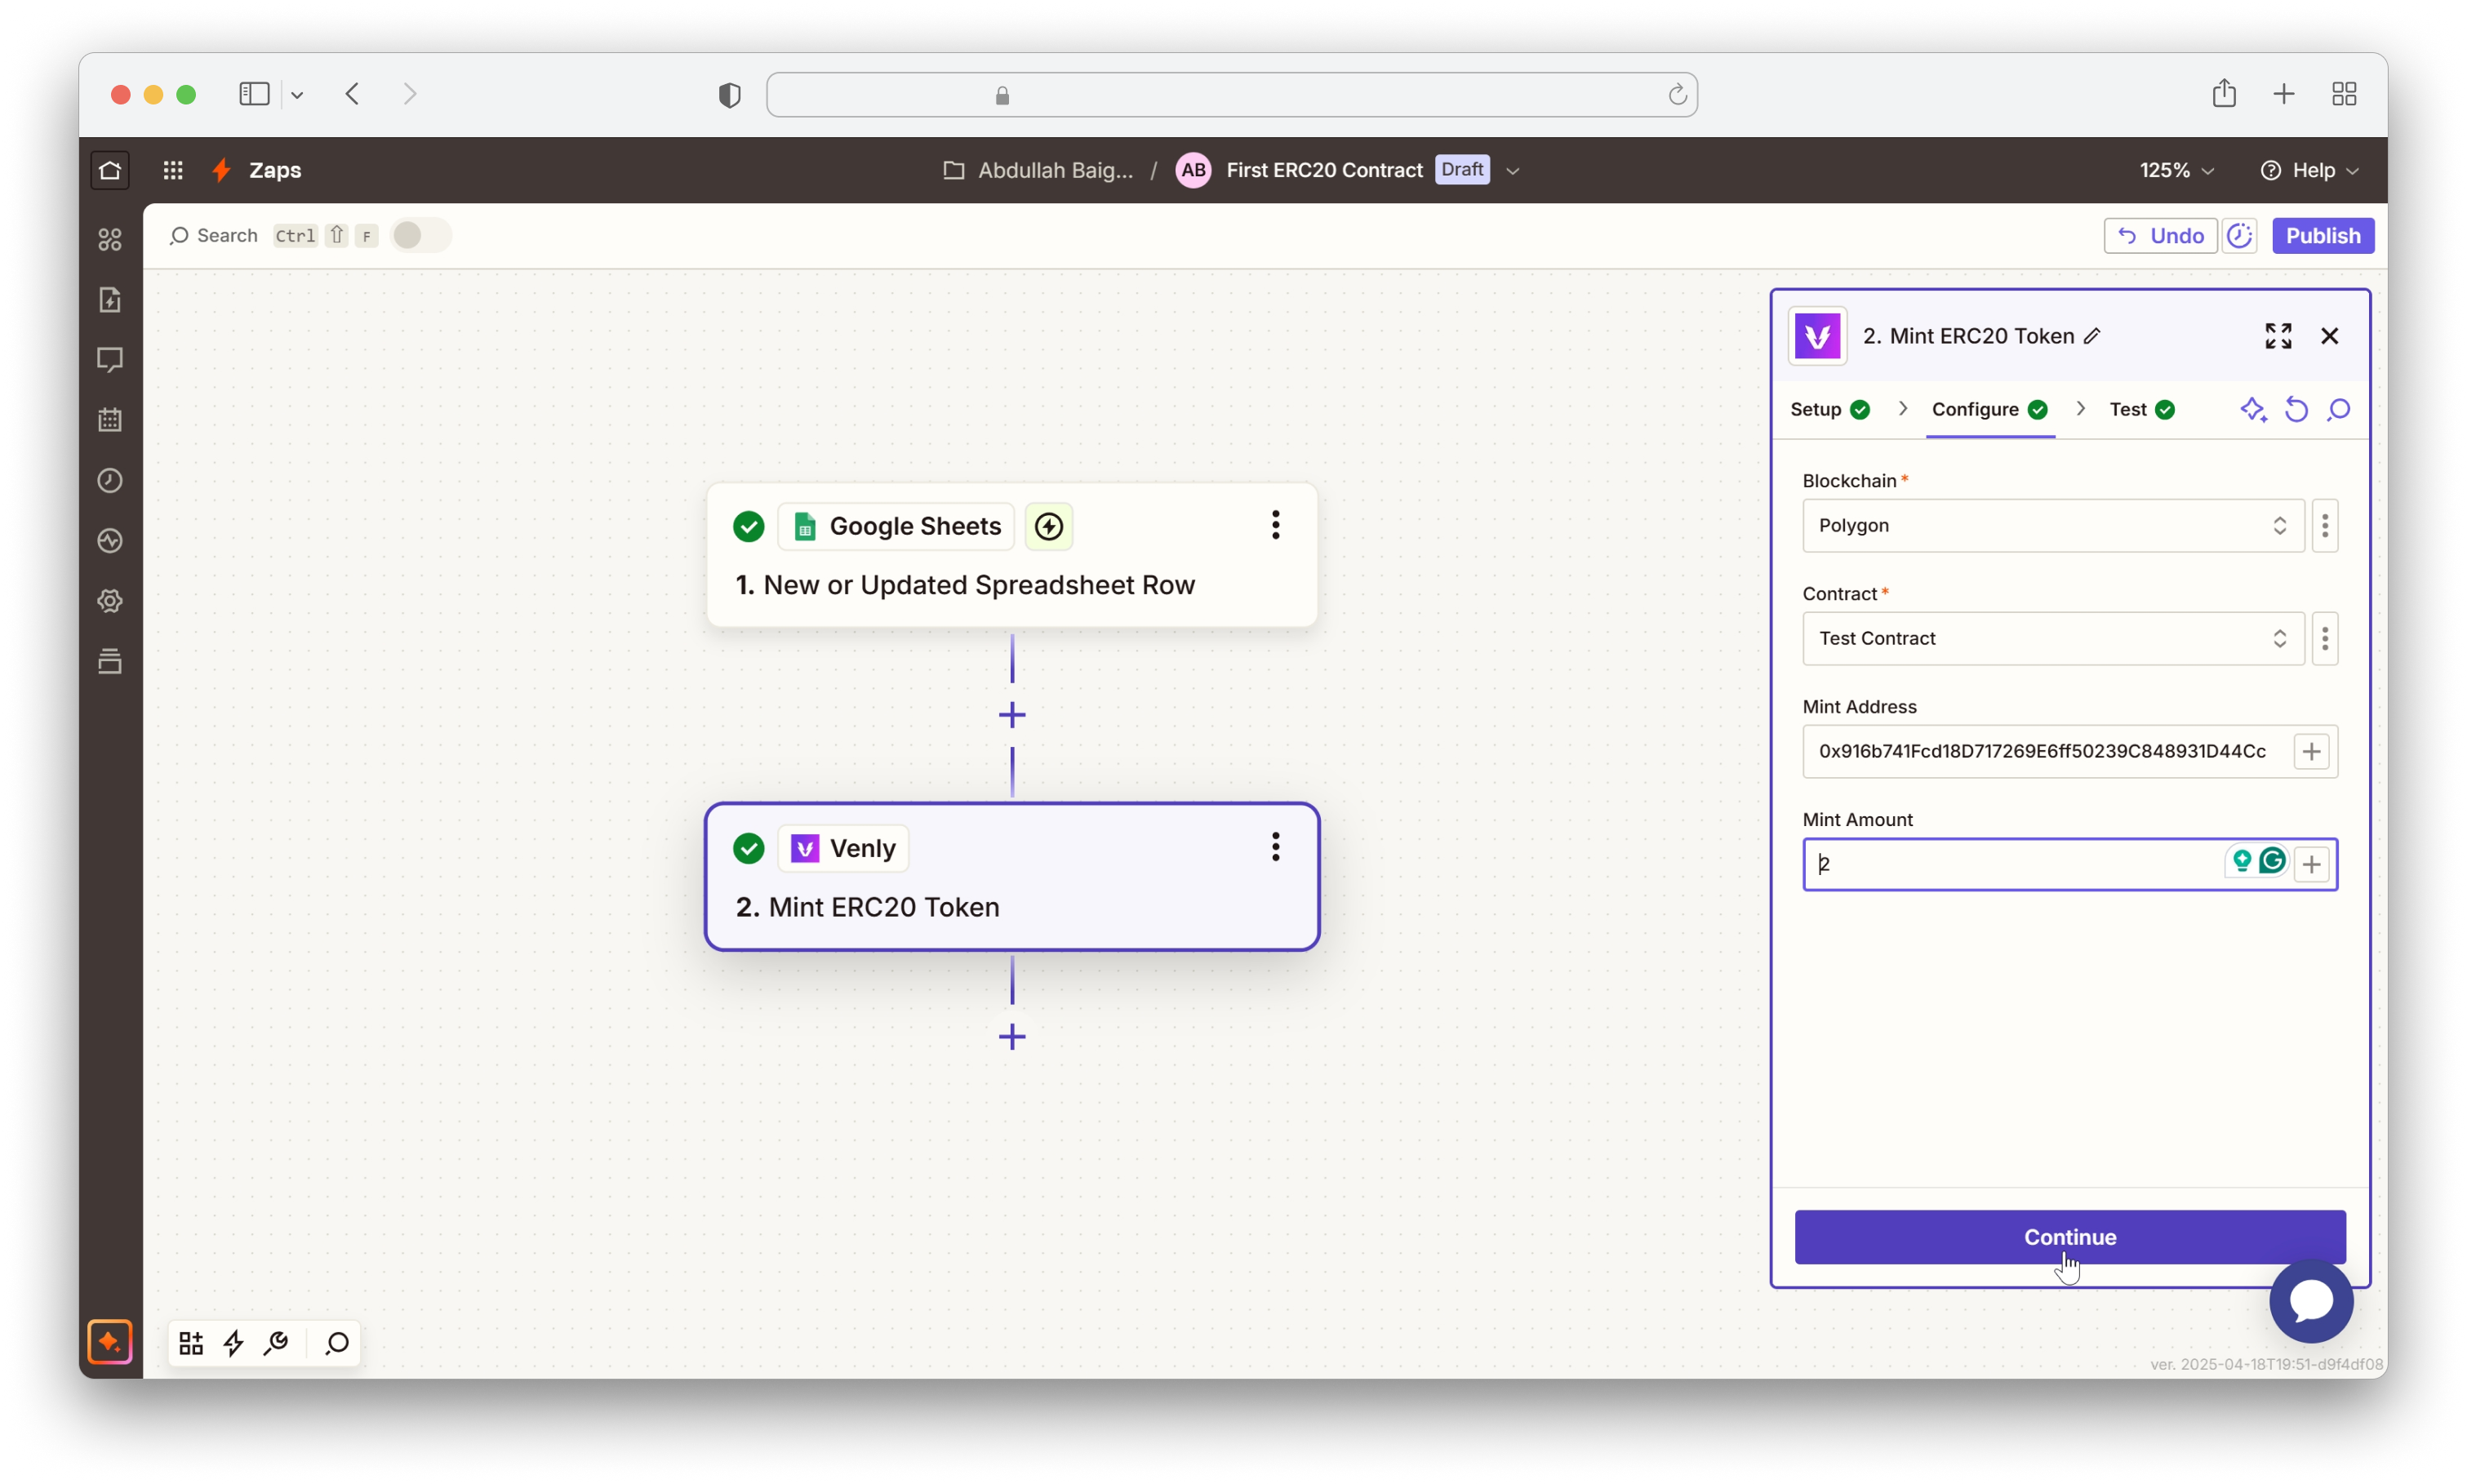
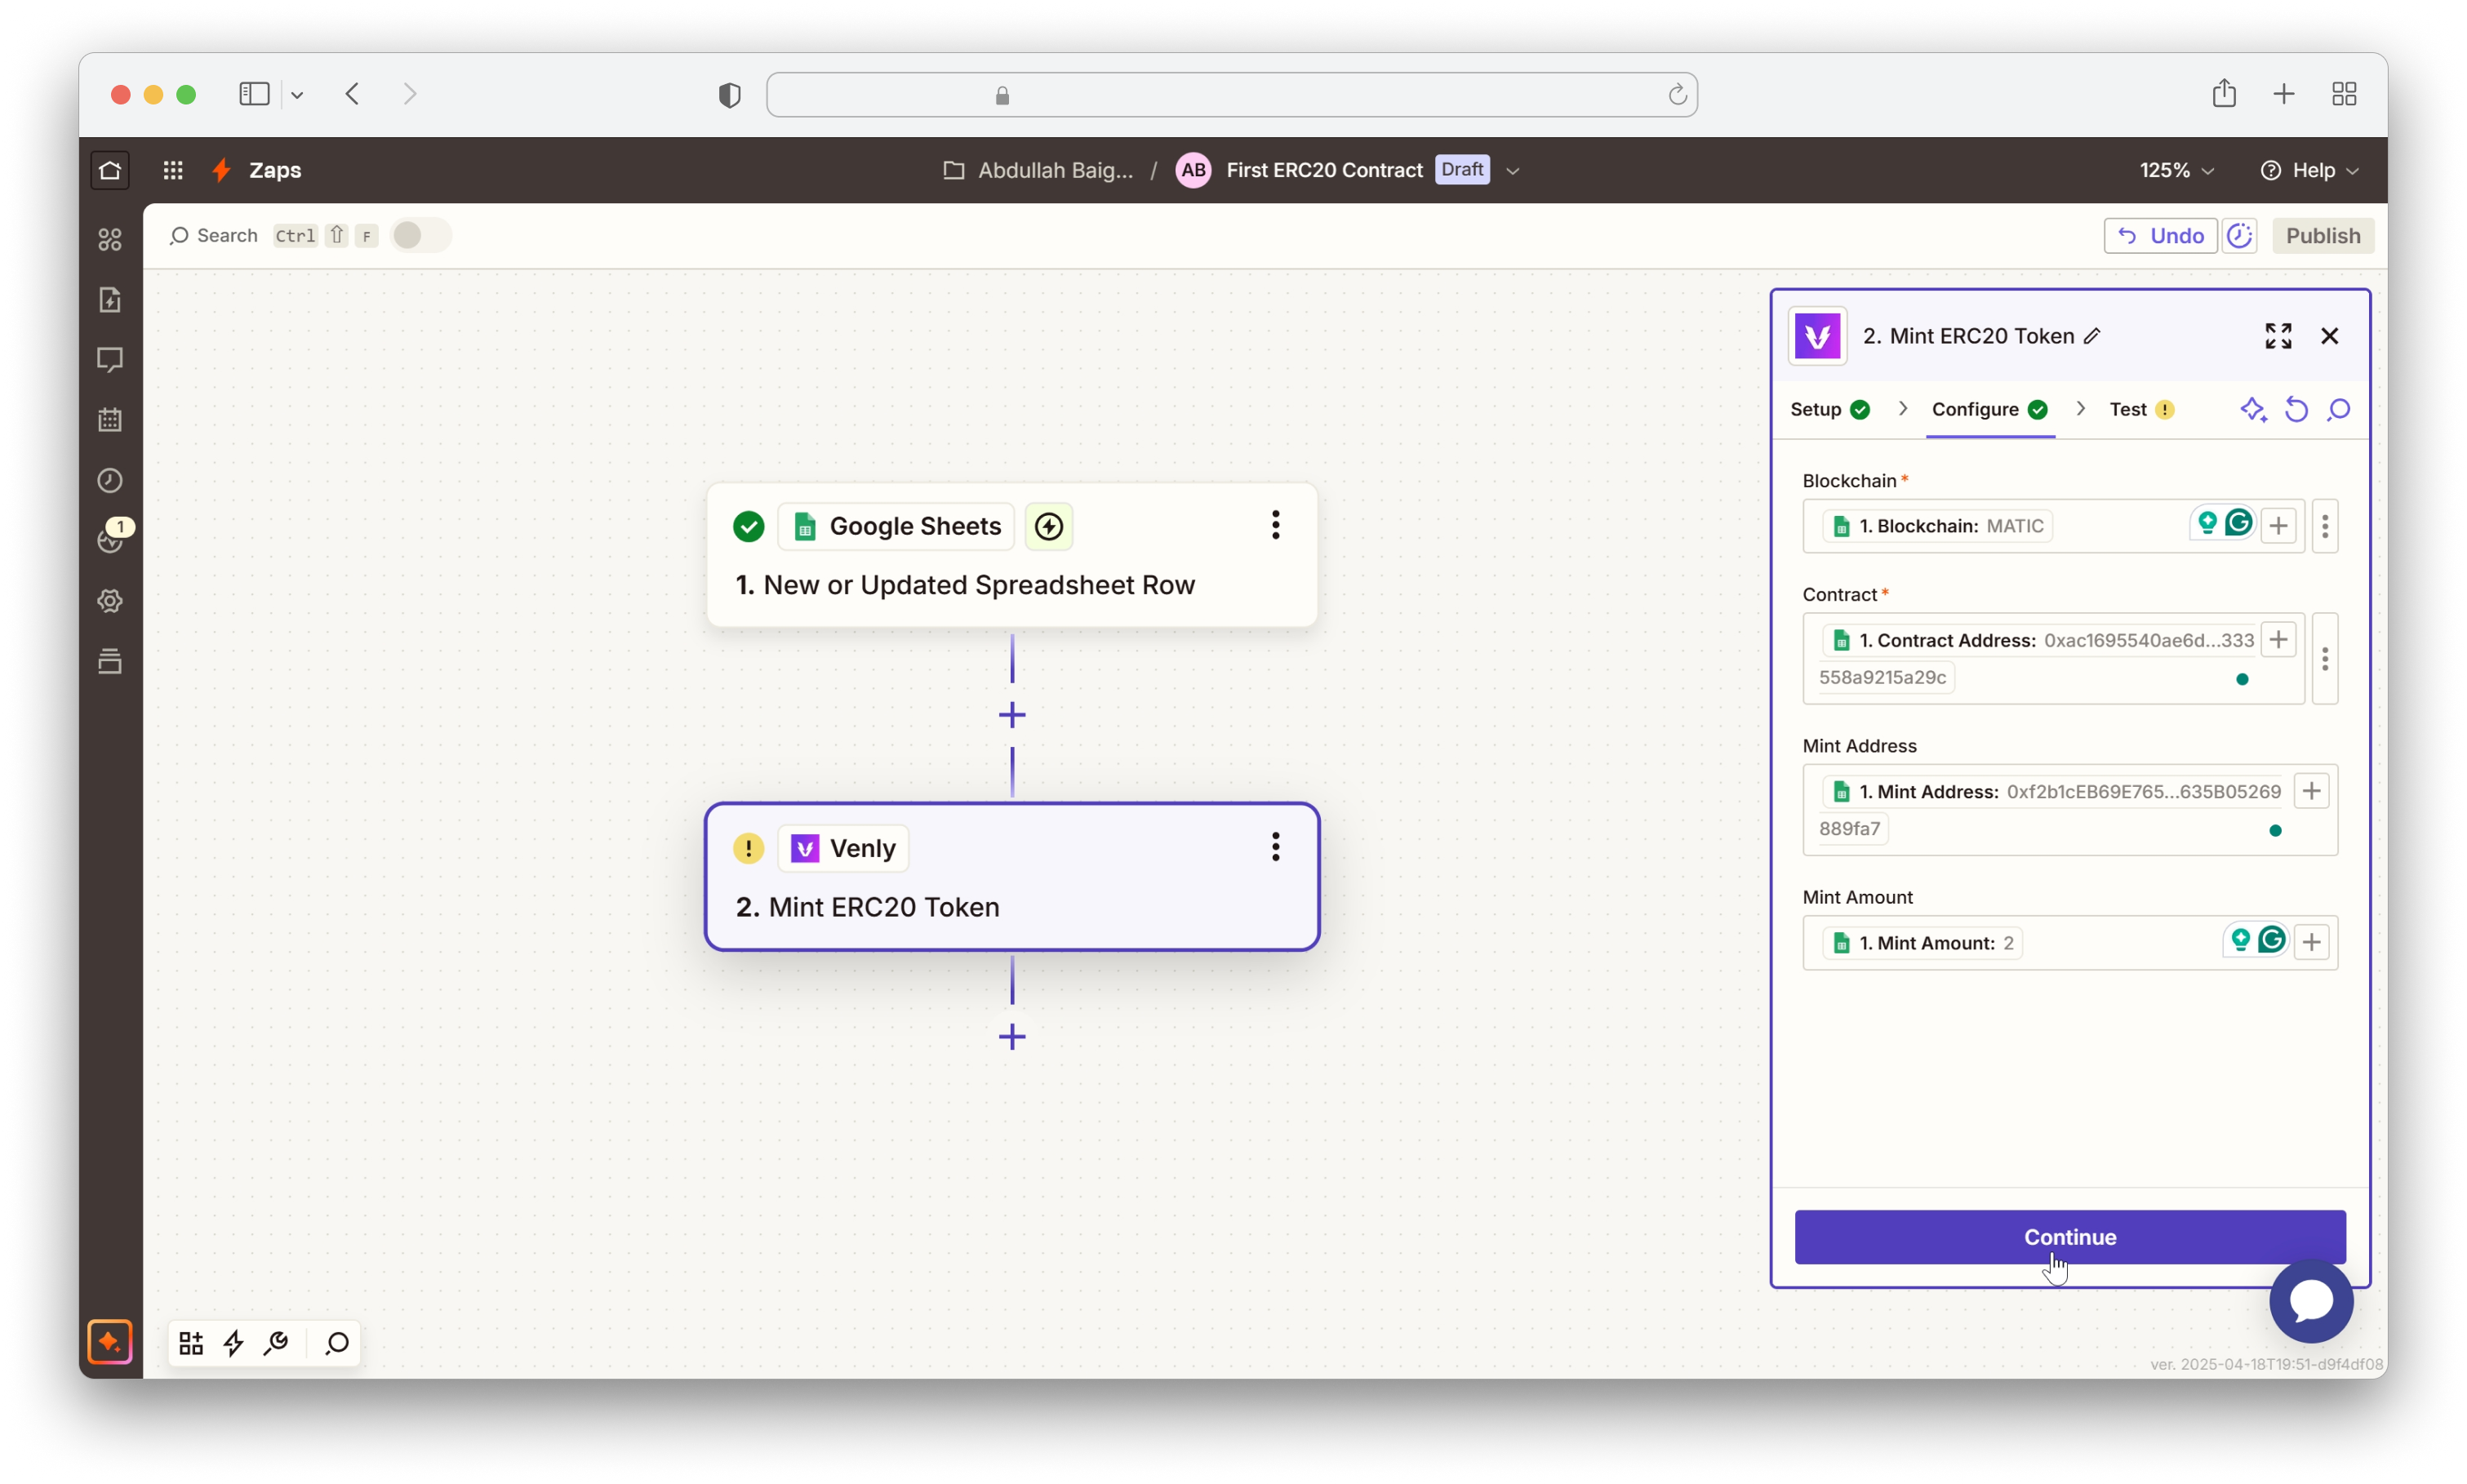
Next, you must fill out the required fields to mint your ERC20 tokens. For this example, we are adding the details manually.
You can dynamically fetch data from a trigger to fill all the required data, like the blockchain, contract, mint address, and mint amount. For this, you need to store the data, for example, on Google Sheets.
For this example, we have filled the fields manually. Please use an app like Google Sheets to fetch data and autofill the fields dynamically.
The fields are described below:
- Blockchain: Select the blockchain network where your ERC20 contract is deployed from the drop-down menu. Or dynamically pass the value of the blockchain ID for the corresponding blockchain as shown below:
- Contract: Choose your deployed ERC20 token contract from the drop-down list based on the selected blockchain. Or you can dynamically supply the contract address of your token contract using data from a trigger.
Make sure there are no capital letters in your contract address.
- Mint Address: The wallet address of your end-user where the ERC20 tokens will be minted/transferred.
- Mint Amount: The number of tokens you want to mint to your end-user's wallet.
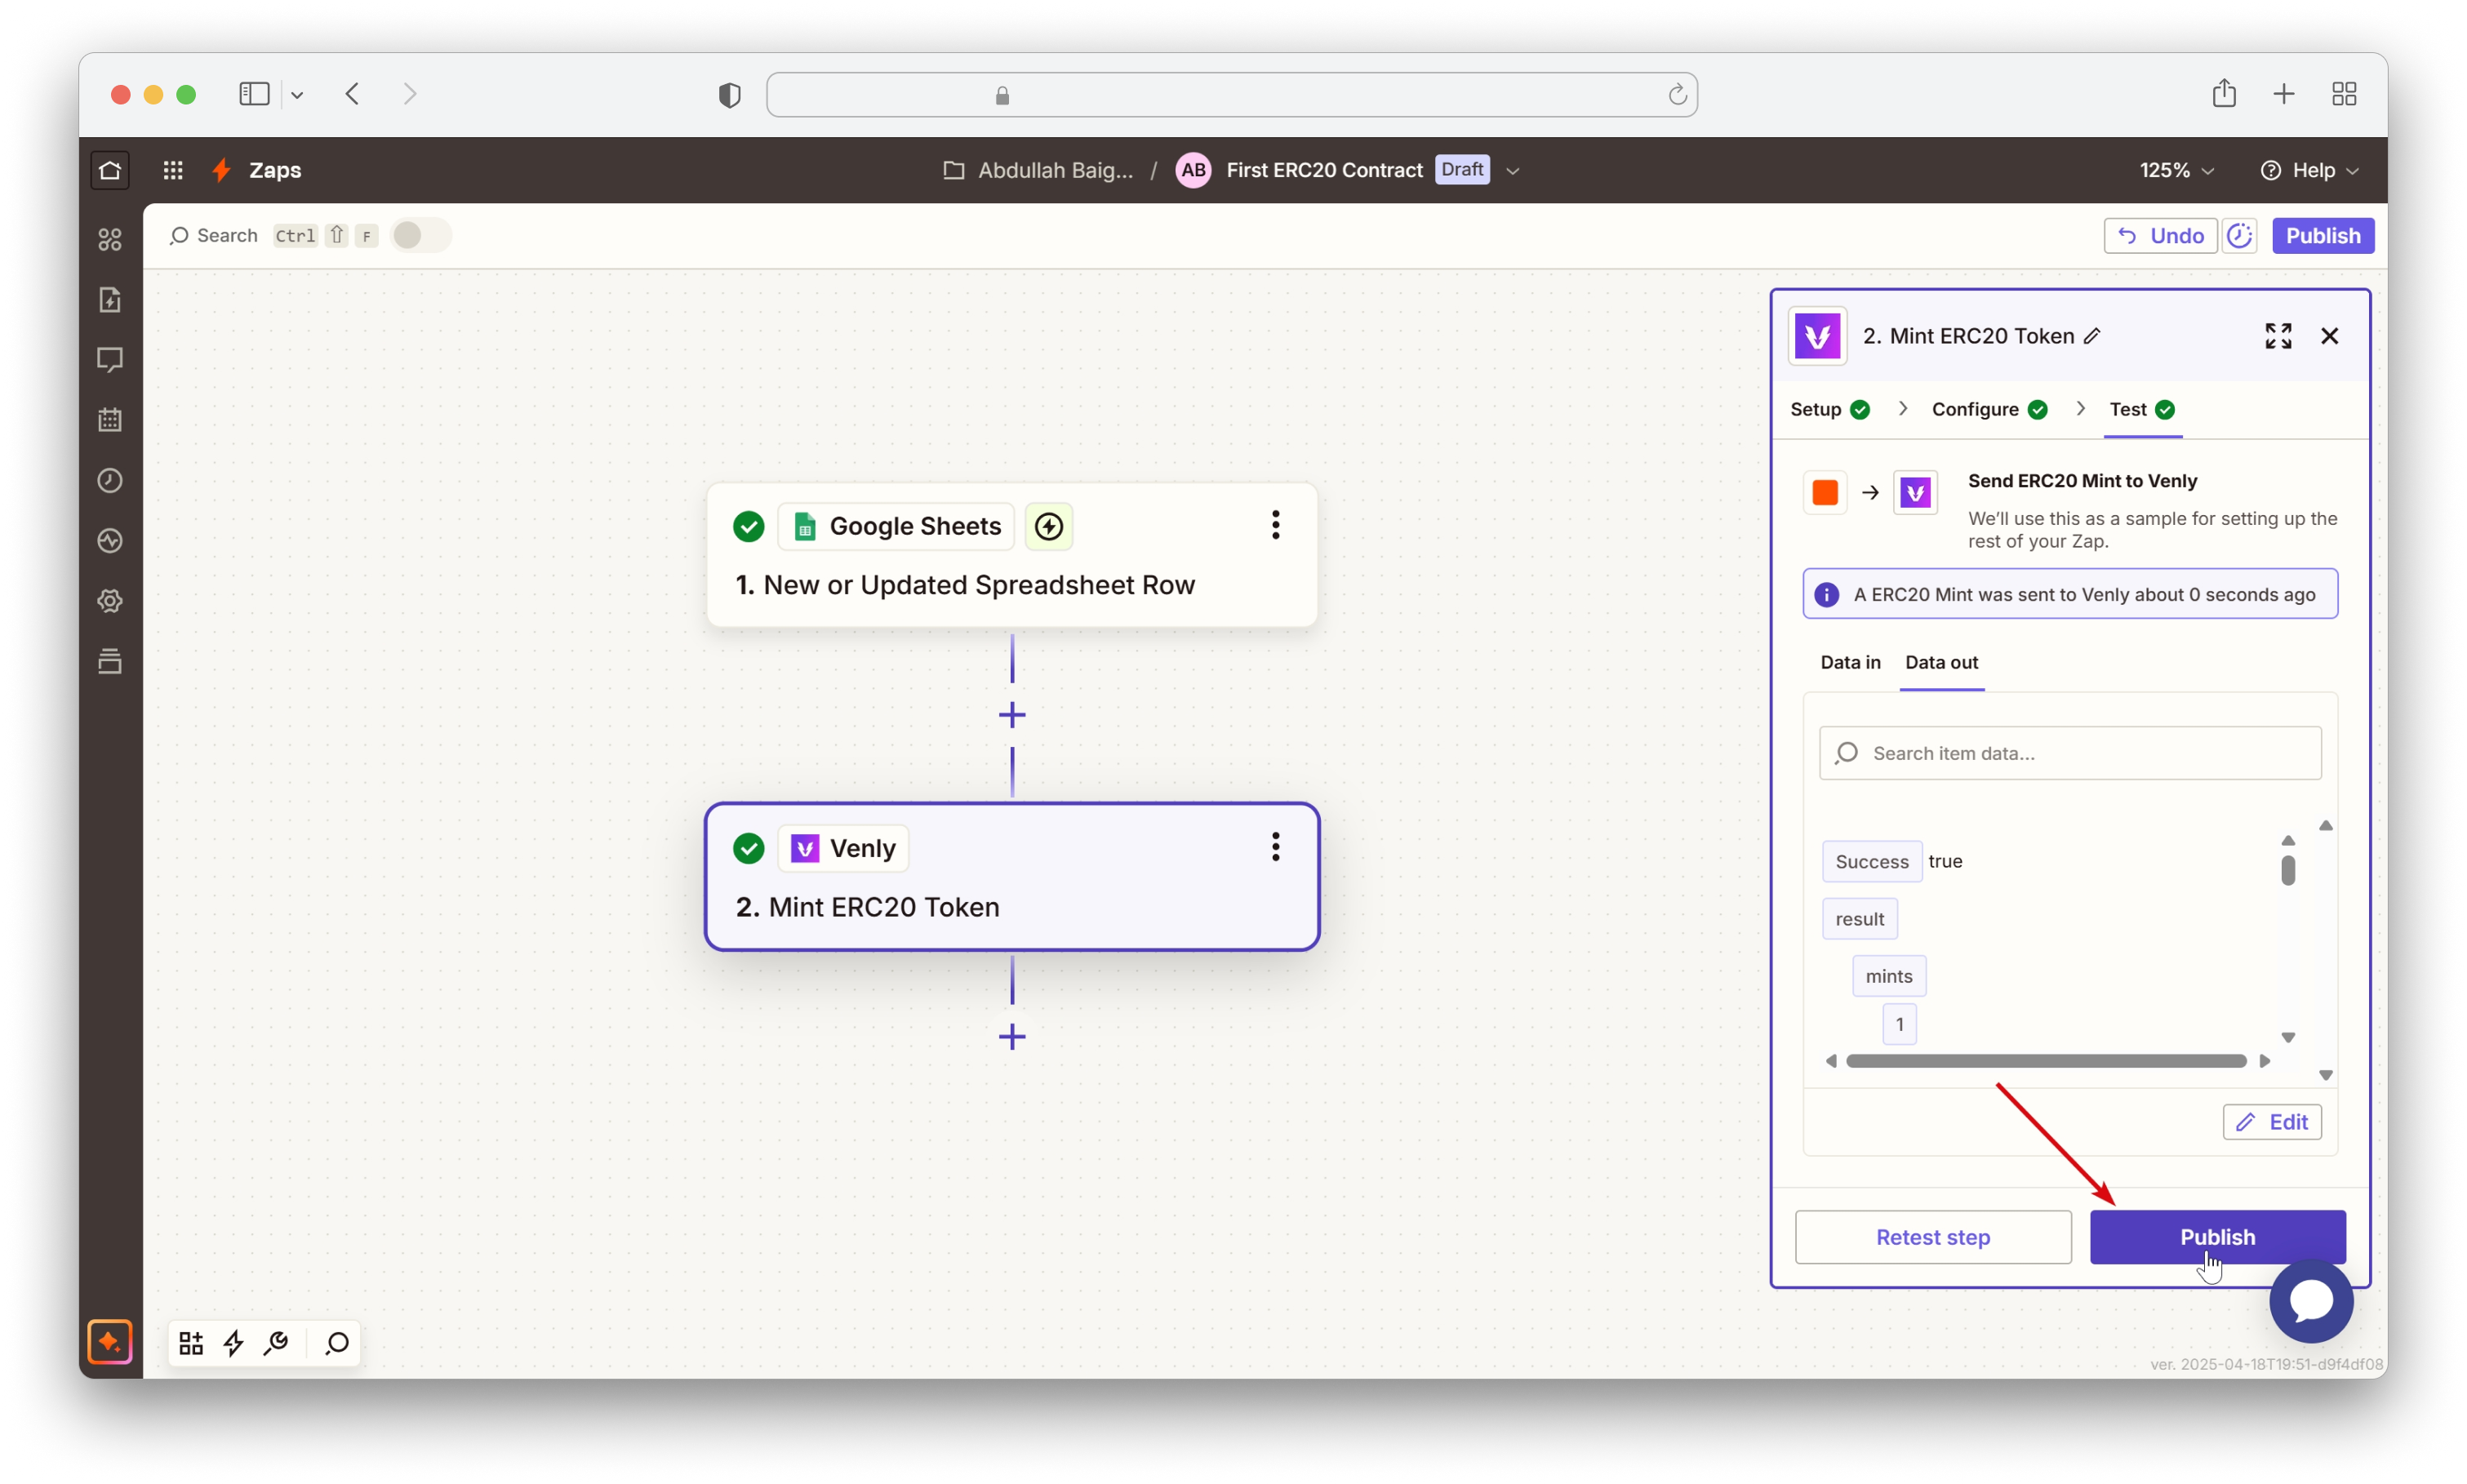
After filling in all the fields, click on Continue and then Test step.
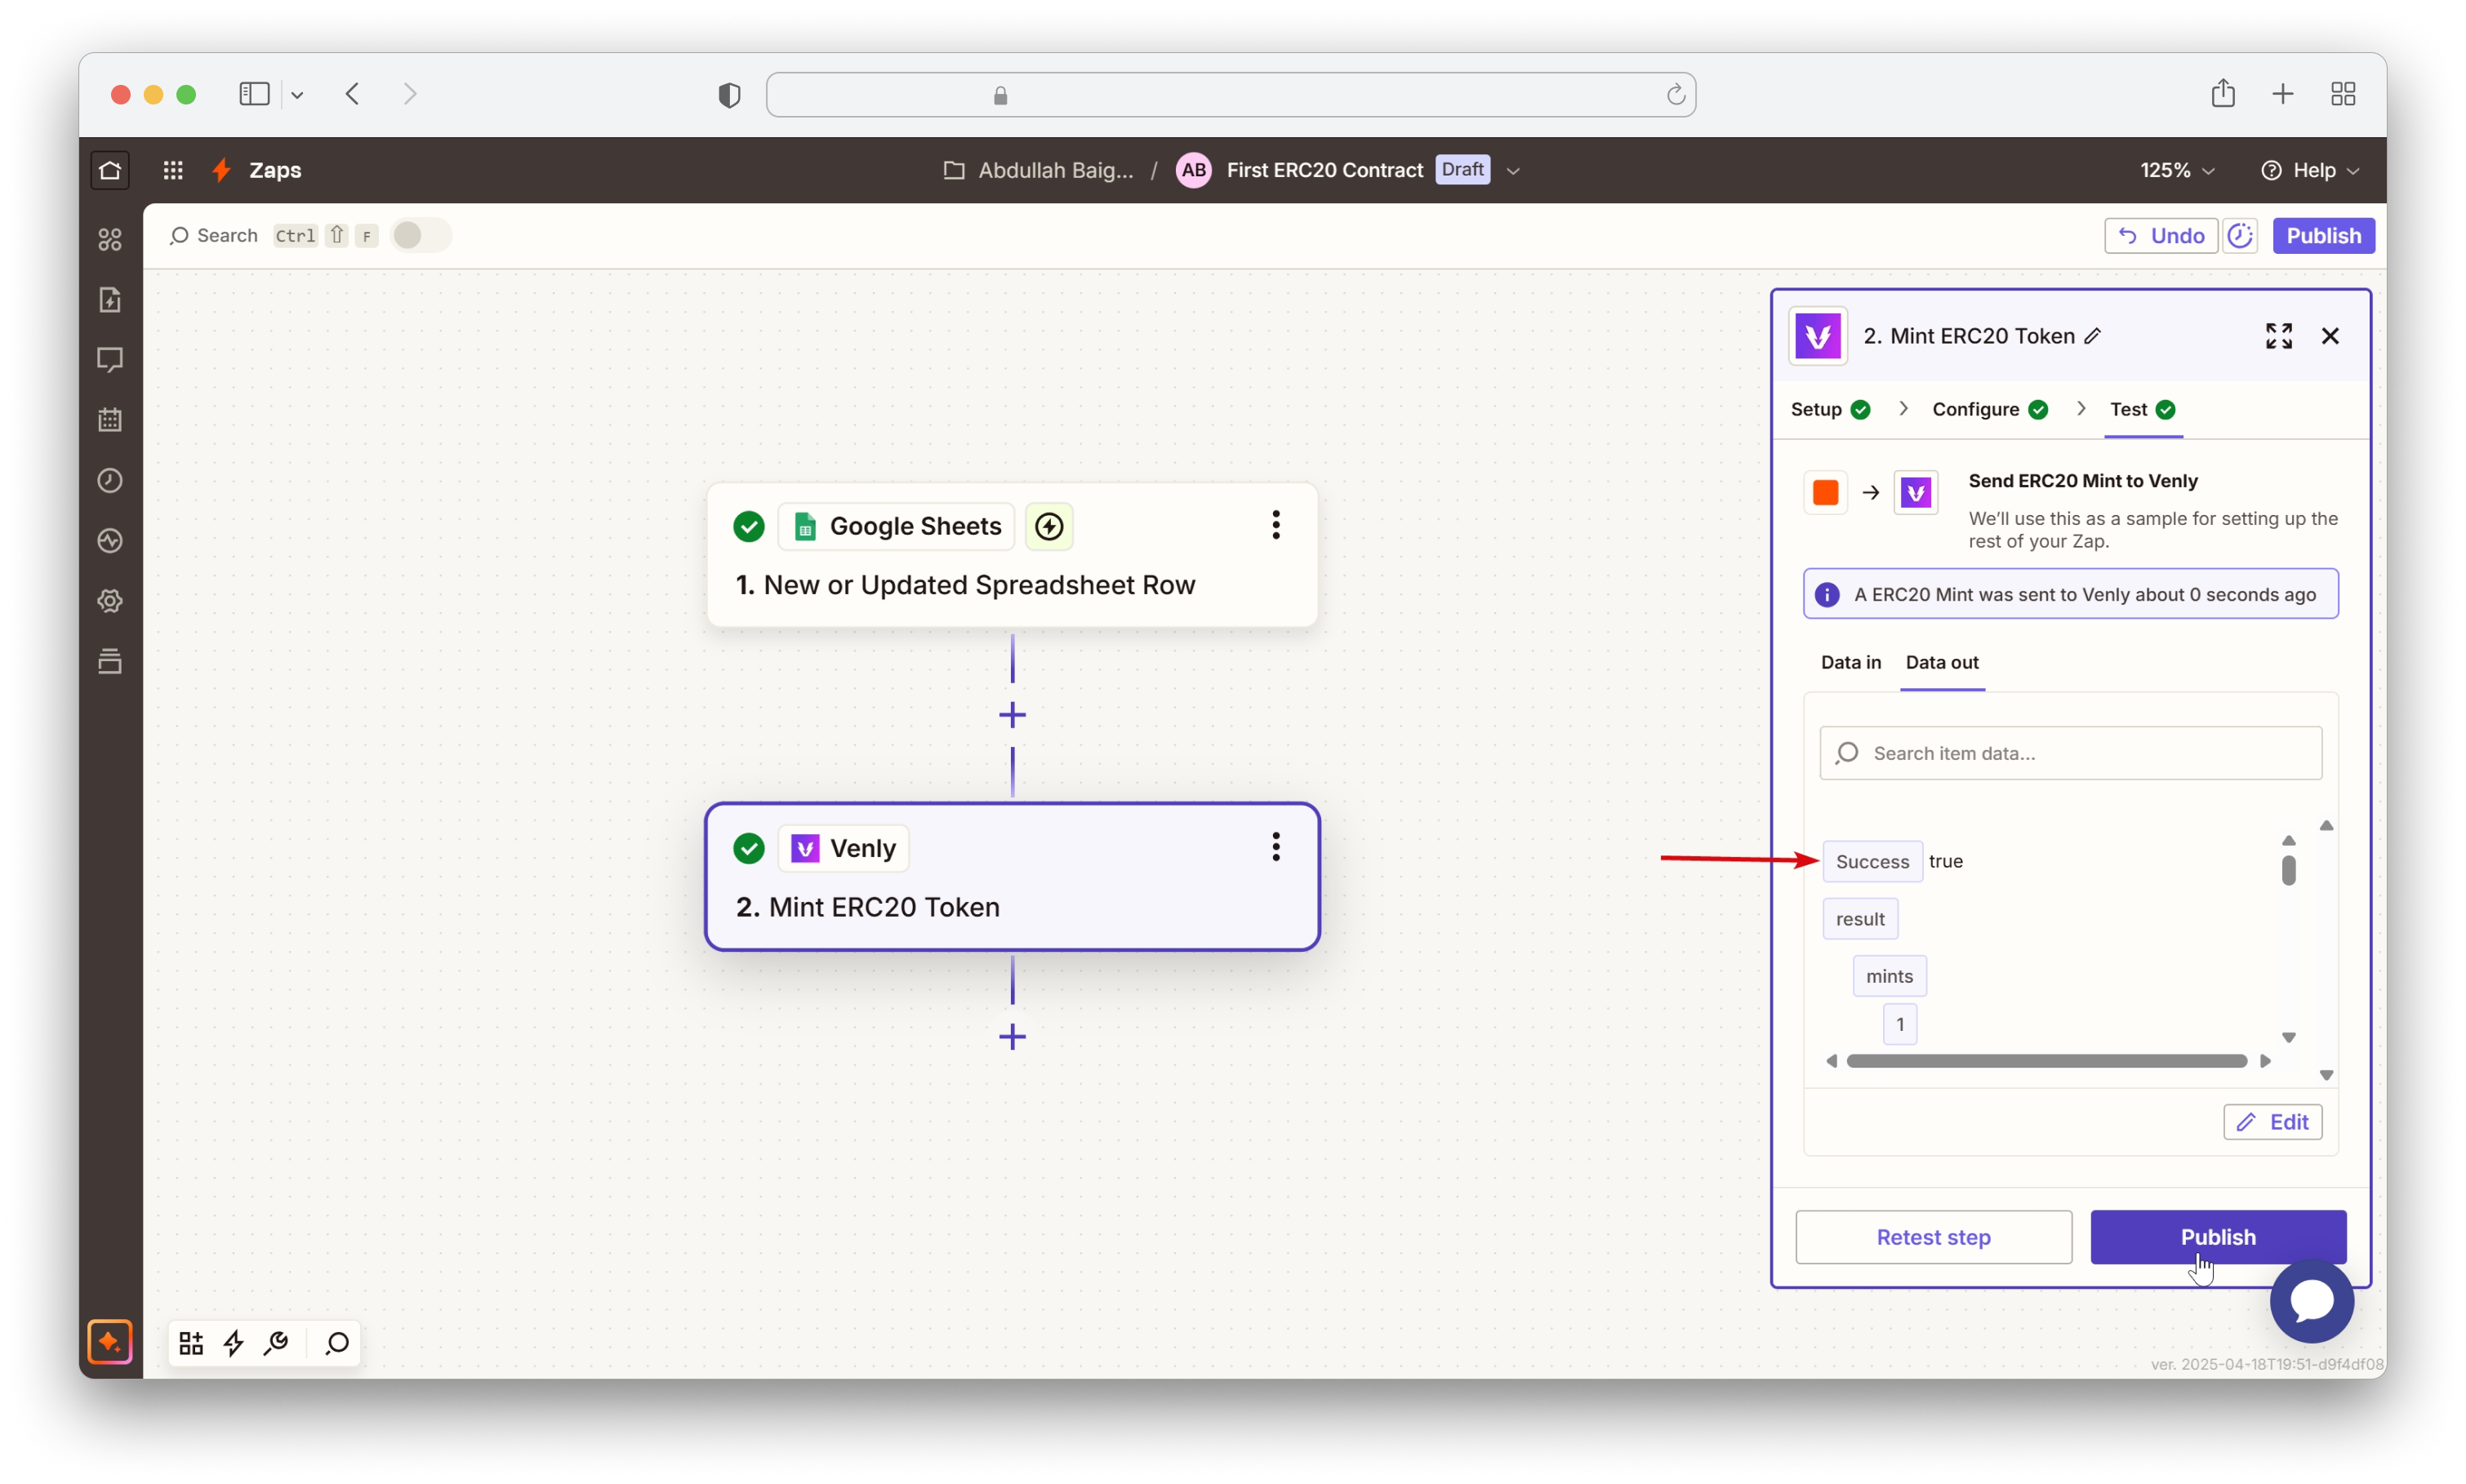
You will see a message, indicating that the ERC20 tokens were successfully minted to the provided Mint Address (wallet address). In the response under Data out, you can also see the Success: true indicating that the token mint request was successful.
Once you have set up the trigger and tested the Mint ERC20 Token event, you can click on Publish to activate your zap.
Example of dynamically passing data
Here is the link to an ERC20 token minting Google Sheet. Open the sheet and make a copy to store it on your drive. Using this sheet following is an example of dynamically supplying data to simplify the zap:
Token Mint Confirmation
Updated 9 months ago