Perform your first Crypto Transaction
This guide explains all the steps to initiate your first crypto transaction.
Your first crypto transaction
Using this guide, you'll learn how to make a very straightforward crypto transaction.
Prerequisites
- You need a Venly business account, if you don't have one, click here to register in our Developer Portal, or follow our step-by-step guide, Getting Started with Venly.
- You need an active trial or paid subscription of the Wallet-API. You can start a 30-day free trial for the Wallet-API as shown below.
- You need your Client ID and Client Secret which can be obtained from the Portal as shown below.
Starting a trial subscription and obtaining a Client ID and Client Secret
All the API calls for this guide run on a sandbox environment. You can test and experiment with API calls without causing any harm to the actual blockchain or data.
There are several ways to run API calls, but for this guide, you can use the API-Reference or Postman to execute the different endpoints.
Authenticating
To obtain a bearer token and authorize all API calls, you will need your Client ID and Client Secret. These credentials are necessary for authentication purposes.
Click here to learn how to retrieve a bearer token and authenticate API calls.
Please note that the base path for all Wallet API endpoints is https://api-wallet-sandbox.venly.io
1. Creating a User
The very first thing you need to do is create a user. This user will then be linked to a wallet. (More on this later in the guide)
Use the following endpoint to create your first user. In the request body, we are also creating a signing method for this user. This signing method will be used to authenticate transactions, more on this later in the guide.
Request Endpoint: reference
POST /api/users
| Parameter | Param Type | Description | Data Type | Mandatory |
|---|---|---|---|---|
reference | Body | A free-form text to specify a reference for the user you create. It can help group specific users. | String | ❌ |
signingMethod | Body | This object contains the signing method details | String | ❌ |
signingMethod.type | Body | The type of signing method to create for the user | String | ❌ |
signingMethod.value | Body | The value of the signing method | String | ❌ |
Request Body:
{
  "reference": "Test User",
  "signingMethod": {
    "type": "PIN",
    "value": "123456"
  }
}
Response Body:
result.id: This is the User ID.result.signingMethods.id: This is the signing method ID.
{
    "success": true,
    "result": {
        "id": "8d906163-b4d1-4f71-b5a1-b8b66a352d38",
        "reference": "Test User",
        "createdAt": "2023-12-26T13:46:08.109605946",
        "signingMethods": [
            {
                "id": "fa92967a-0b5e-46d1-bcbf-078cc26af0a0",
                "type": "PIN",
                "incorrectAttempts": 0,
                "remainingAttempts": 10,
                "hasMasterSecret": true
            }
        ]
    }
}
2. Creating a Wallet
The next step is creating a wallet for the user. We will include the userId in the request body, and this way the wallet will be created and linked to the specific user. The user can then access the wallet with their signing method.
Since you are currently using the API calls in a sandbox environment, the wallets will be created on a testnet chain. In this example, we will create our first wallet on the Polygon (MATIC) Blockchain.
Explore testnet chains further by clicking here.
Use the following endpoint to create your first wallet:
Request Endpoint: reference
POST /api/wallets
| Parameter | Param Type | Value | Description |
|---|---|---|---|
Signing-Method | Header | id:value | id: This is the ID of the user's signing methodvalue: This is the value of the user's signing method |
| Parameter | Description | Type | Required |
|---|---|---|---|
secretType | Specifies the blockchain on which you wish to create your wallet | String | ✅ |
description | A description of the wallet | String | ❌ |
userId | The ID of the user you want to link to this wallet. | String | ❌ |
pincode (deprecated) | Serves as the password to access your wallet. Please remember it and keep it secure to ensure the protection of your wallet and its contents. | String | ❌ |
Request Body:
{
  "secretType": "MATIC",
  "description": "First Wallet",
  "userId": "8d906163-b4d1-4f71-b5a1-b8b66a352d38"
}
Response Body:
Save the following parameters from the response body. They will be used later in the guide.
| Parameter | Description |
|---|---|
result.id | This ID is utilized to uniquely identify the wallet. |
result.address | This is the public wallet address. You can provide this address to others to receive payments or initiate transfers to this wallet. |
result.secretType | This is the blockchain name on which your wallet is created. |
{
    "success": true,
    "result": {
        "id": "19590dc9-28af-417b-bc66-549e726bf91f",
        "address": "0xEFc208E8224007Da71F39c684bCA6BA98d8A874B",
        "walletType": "API_WALLET",
        "secretType": "MATIC",
        "createdAt": "2023-12-07T10:21:25.114751052",
        "archived": false,
        "description": "Wise Iguana",
        "primary": false,
        "hasCustomPin": false,
        "userId": "ddf04a49-9c38-4326-acc7-02529ba05a78",
        "custodial": false,
        "balance": {
            "available": true,
            "secretType": "MATIC",
            "balance": 0,
            "gasBalance": 0,
            "symbol": "MATIC",
            "gasSymbol": "MATIC",
            "rawBalance": "0",
            "rawGasBalance": "0",
            "decimals": 18
        }
    }
}
You have successfully created your first wallet 🎉.
Creating a second wallet
Next, let's move forward by creating a second wallet on the same blockchain. To do so, use the following endpoint and replicate the previous steps.
Request Endpoint: reference
POST /api/wallets
After creating your second wallet, save the
idandaddress, we will use it later in the guide.
You now have two wallets on the Polygon (MATIC) testnet blockchain. Let's explore how you can add testnet tokens to your wallet using a Faucet.
Learn more about testnet coins and Faucets by clicking here.
3. Topping up Wallet
Now we will add testnet tokens to your first wallet. Testnet tokens are necessary for conducting experiments, testing applications, and simulating transactions on a blockchain network without using real or valuable cryptocurrencies. For this example, we will be using the Polygon Amoy Faucet to top up our wallet.
Click here to read about faucets and how you can top-up other blockchain testnet wallets.
- Copy the address of your first wallet.
- Go to the Polygon Faucet by clicking here.
- Paste the address of your first wallet (e.g :
0x0a28ffdCf076F16B6f30f281517A1a5F1b68755c) - Click Send me MATIC
- Testnet MATIC tokens will be sent to your wallet
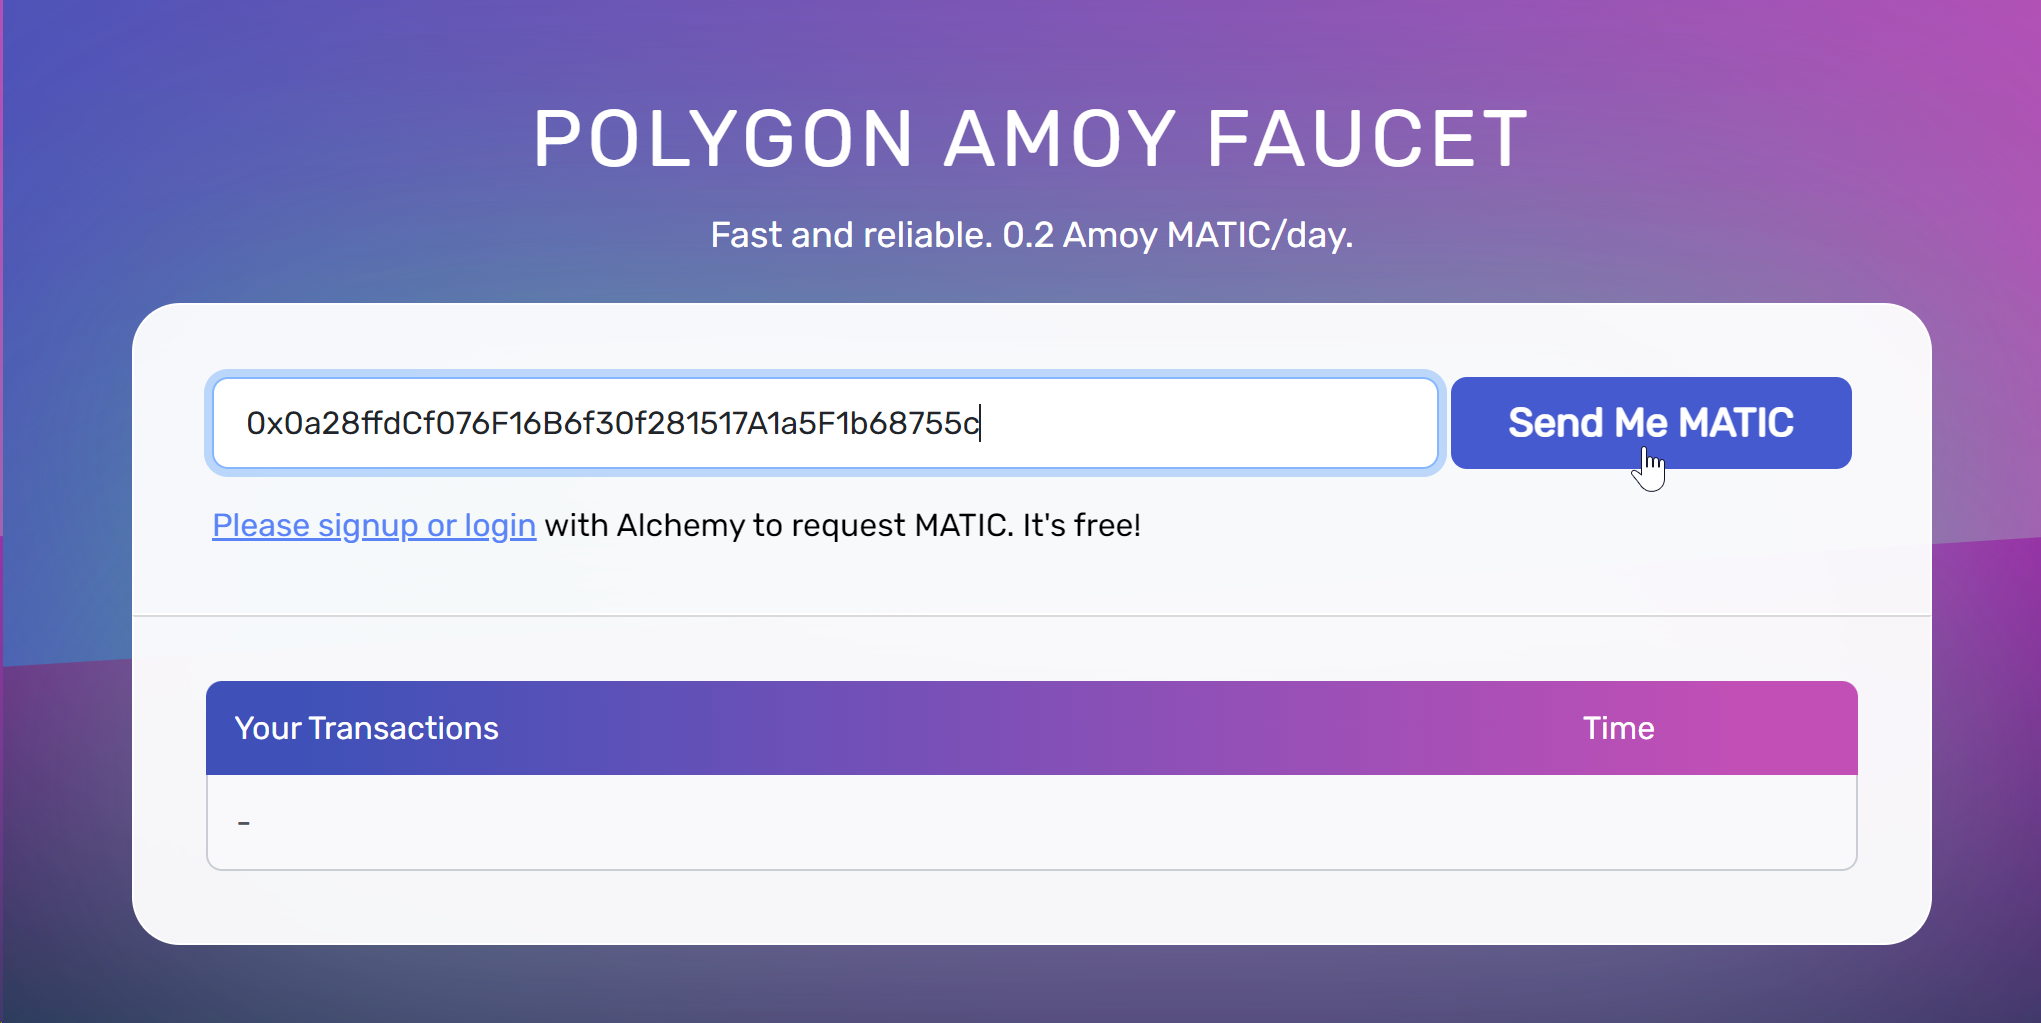
Requesting MATIC testnet tokens using a Faucet
4. Check Wallet Balance
Now let's check the balance of your first wallet.
To check the balance of your first wallet, use the following endpoint. Enter the id (walletId) of your first wallet and execute the request. This will provide you with the current balance information.
Request Endpoint: reference
POST /api/wallets/{walletId}/balance
Response Body:
In the response body, locate the parameter called balance. For this example, the value of balance is 0.2. This indicates the amount of MATIC tokens currently held in your wallet.
{
    "success": true,
    "result": {
        "available": true,
        "secretType": "MATIC",
        "balance": 0.2,
        "gasBalance": 0.2,
        "symbol": "MATIC",
        "gasSymbol": "MATIC",
        "rawBalance": "200000000000000000",
        "rawGasBalance": "200000000000000000",
        "decimals": 18
    }
}
5. Transferring Funds
At this point, you should have the first wallet containing some funds, while the second wallet remains empty.
We will run another endpoint where we will transfer some funds from the first wallet to the second wallet. This will be your very first crypto transaction.
Use the following endpoint to initiate a transfer:
Request Endpoint: reference
POST /api/transactions/execute
| Parameter | Param Type | Value | Description | Example Value |
|---|---|---|---|---|
Signing-Method | Header | id:value | id: This is the ID of the user's signing methodvalue: This is the value of the user's signing method | fa92967a-0b5e-46d1-bcbf-078cc26af0a0:123456 |
Request Body:
| Parameter | Description | Type | Required |
|---|---|---|---|
pincode (Deprecated) | Serves as the password to access your wallet. Please remember it and keep it secure to ensure the protection of your wallet and its contents. | String | ❌ |
transactionRequest | The JSON object for the transaction request data | Object | ✅ |
type | Type of transfer. In the example a normal TRANSFER | String | ✅ |
secretType | Specifies the blockchain of the transaction | String | ✅ |
walletId | The wallet ID of the first wallet (The wallet who is initiating the transfer) | String | ✅ |
to | The address of the destination wallet where the funds will be transferred to. In this case, it refers to the address of the second wallet. | String | ✅ |
value | The amount mentioned here refers to the quantity of coins that you intend to transfer | Integer | ✅ |
{
  "transactionRequest": {
    "type" : "TRANSFER",
    "secretType" : "MATIC",
    "walletId" : "35854424-1286-4567-a390-eff7fdf06196",
    "to" : "0x00460eC33BC38acc27530f2F972C8E29901B78A7",
    "value": 0.1
    }
  }
Response Body:
In the response, you will find a tranasactionHash, which can be used to follow up on the status of that specific transaction.
Save the
transactionHashfor later use in this guide.
{
    "success": true,
    "result": {
        "id": "7c97bb73-6545-4e05-a361-a8f32efa77ff",
        "transactionHash": "0x19be10412836706889c90ab5ad7bfcb3d77b48b948ca6e7ad35c3101f9ba0f75"
    }
}
To verify whether a transfer has been completed, it is necessary to check the transaction status. This status will provide information on whether the transfer was successful or if it encountered any issues.
Mainnet Blockchain transactions are never immediate. They require time for processing, and the duration can vary depending on the specific blockchain network.
6. Check transaction status
To confirm whether a specific transaction was successful or not, you can check its status using the provided endpoint. To obtain the status of the transaction, please provide the required information. Set the secretType as MATIC and enter the transactionHash that you had saved earlier.
Request Endpoint: reference
GET /api/transactions/{secretType}/{transactionHash}/status
Response Body:
From the response body, you can see that the status is "SUCCEEDED", indicating that the transaction was successfully executed and completed.
Funds have been sent from the first wallet to the second.
{
    "success": true,
    "result": {
        "hash": "0x19be10412836706889c90ab5ad7bfcb3d77b48b948ca6e7ad35c3101f9ba0f75",
        "status": "SUCCEEDED",
        "confirmations": 30,
        "blockHash": "0x073e2201c32a69b25375ea0d966070c973242fb951813d9b09061d3799e9275e",
        "blockNumber": 44032028,
        "hasReachedFinality": false,
        "chain": "MATIC",
        "nonce": 0,
        "gas": 21000,
        "gasUsed": 21000,
        "gasPrice": 20000000000,
        "logs": [
            {
                "logIndex": 0,
                "data": "0x000000000000000000000000000000000000000000000000016345785d8a000000000000000000000000000000000000000000000000000002c50cf3dc45c00000000000000000000000000000000000000000000000000000000000000000000000000000000000000000000000000000000000000000000161c77b7ebbc000000000000000000000000000000000000000000000000000016345785d8a0000",
                "topics": [
                    "0xe6497e3ee548a3372136af2fcb0696db31fc6cf20260707645068bd3fe97f3c4",
                    "0x0000000000000000000000000000000000000000000000000000000000001010",
                    "0x0000000000000000000000000a28ffdcf076f16b6f30f281517a1a5f1b68755c",
                    "0x00000000000000000000000000460ec33bc38acc27530f2f972c8e29901b78a7"
                ]
            },
            {
                "logIndex": 1,
                "data": "0x00000000000000000000000000000000000000000000000000017dfcdec91f8000000000000000000000000000000000000000000000000002c68af0bb1400000000000000000000000000000000000000000000000004a13a4e187a21cc6ed100000000000000000000000000000000000000000000000002c50cf3dc4ae0800000000000000000000000000000000000000000000004a13a4f967700958e51",
                "topics": [
                    "0x4dfe1bbbcf077ddc3e01291eea2d5c70c2b422b415d95645b9adcfd678cb1d63",
                    "0x0000000000000000000000000000000000000000000000000000000000001010",
                    "0x0000000000000000000000000a28ffdcf076f16b6f30f281517a1a5f1b68755c",
                    "0x0000000000000000000000005082f249cdb2f2c1ee035e4f423c46ea2dab3ab1"
                ]
            }
        ],
        "from": "0x0a28ffdcf076f16b6f30f281517a1a5f1b68755c",
        "to": "0x00460ec33bc38acc27530f2f972c8e29901b78a7",
        "rawValue": 100000000000000000,
        "value": 0.1,
        "timestamp": "2023-12-26T14:07:37"
    }
}
Congrats! You have completed your very first crypto transaction!
Updated 8 days ago