
Getting started
Covering the basics from authentication to minting your first ERC20 token.
What we cover in this guide
In this guide, we will explain how to authenticate to our API service, as well as mint your first ERC20 token. We will walk you through several endpoints to help you get started. We will cover the following topics:
- Authentication
- Creating a Token Contract
- Checking Token Contract Status
- Minting ERC20 Token
- Checking Token Mint Status
Token API Video Tutorial
Getting Started Flow
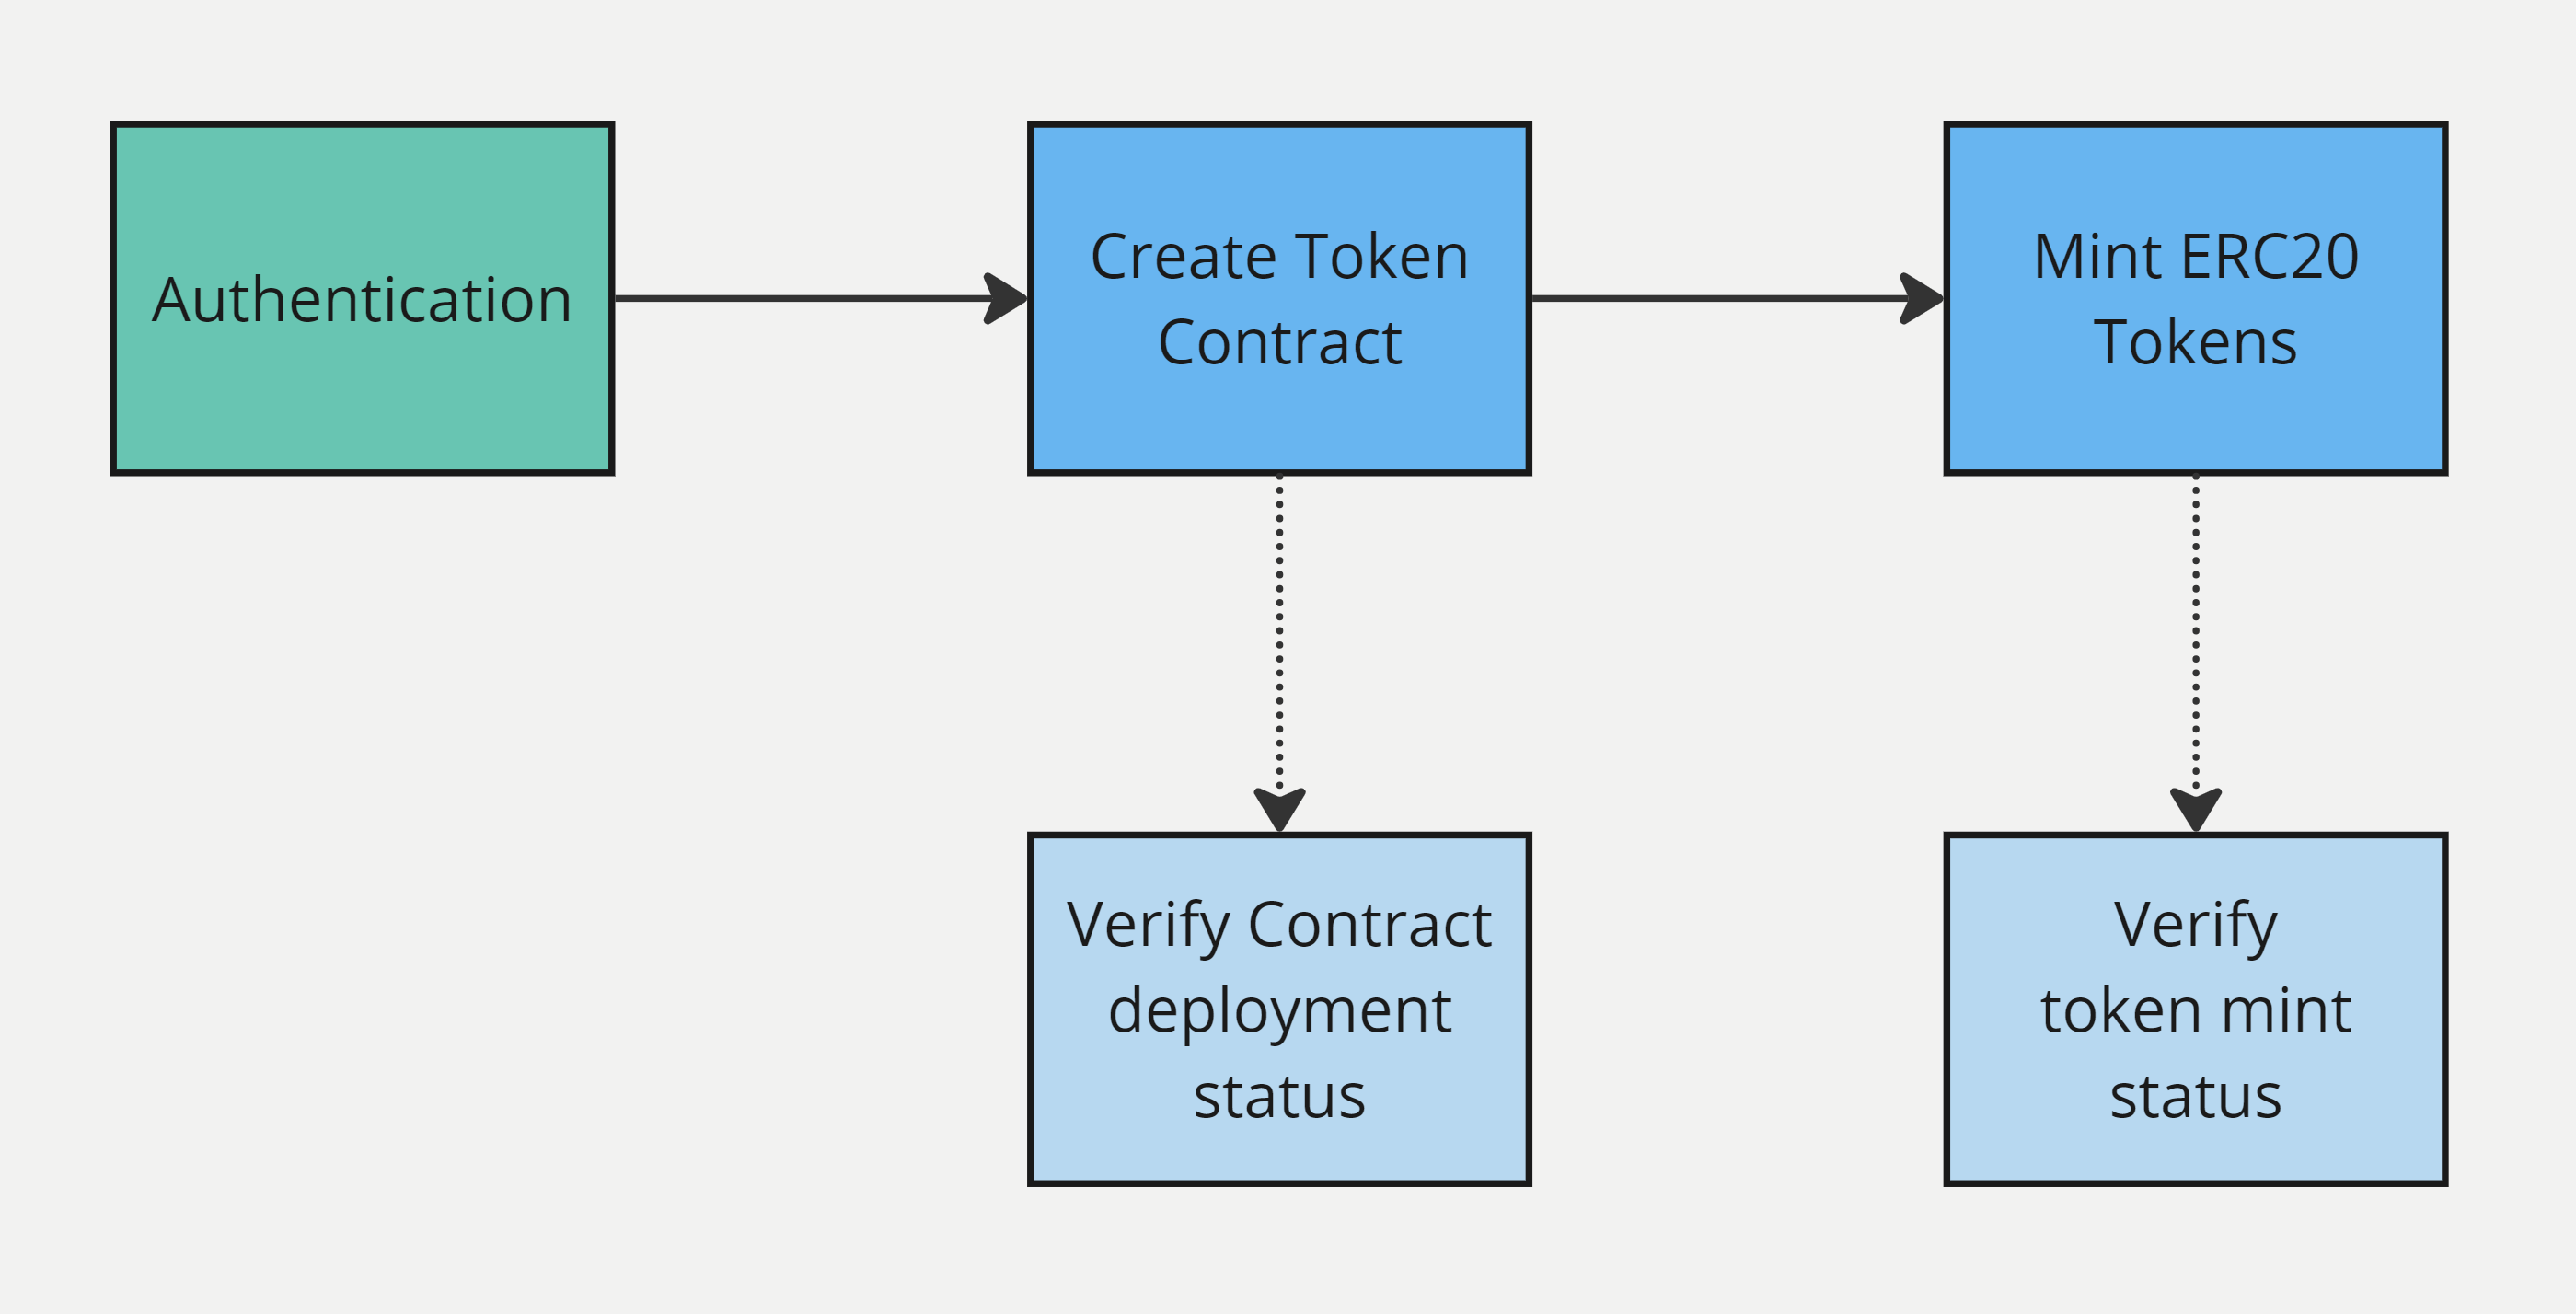
Getting Started Flow for Token API
Prerequisites
- You need a Venly business account. If you don't have one, click here to register in our Developer Portal, or follow our step-by-step guide, Getting Started with Venly.
- You need your Client ID and Client Secret, which can be obtained from the Portal as shown below.

Access Credentials - Developer Portal
All the API calls for this guide run on a sandbox environment. You can test and experiment with API calls without causing any harm to the actual blockchain or data.
There are several ways to run API calls, but for this guide, you can use the API-Reference or Postman to execute the different endpoints.
1. Authenticating
You will need your access credentials (Client ID and Client Secret) to obtain a bearer token and authorize all API calls. These credentials are necessary for authentication purposes.
- Learn how to retrieve a bearer token and authenticate API calls.* Please note that the base path for all Token API endpoints is
https://token-api-sandbox.venly.io
2. Create token contract
Let's start by defining your first contract. We will create a contract on the MATIC testnet chain.
Request Endpoint: reference
POST /api/v3/erc20/contracts/deploymentsRequest Body:
| Parameter | Description | Type | Required |
|---|---|---|---|
chain | This is the blockchain on which you want to create the token contract on | String | ✅ |
name | The name of your token contract | String | ✅ |
symbol | The symbol for your token contract | String | ❌ |
maxSupply | The maximum amount of tokens allowed to be minted | Integer | ❌ |
burnable | Indication whether the tokens will be burnable or not. Burning tokens is the act of sending tokens to a wallet that cannot be accessed | Boolean | ❌ |
owner | The wallet address that will be the owner of this token contract. The owner will have admin rights on the token contract | String | ❌ |
{
    "chain": "MATIC",
    "name": "Venly Test Token",
    "symbol": "VTT",
    "maxSupply": "150",
    "burnable": "true",
    "owner": "0x7312750DF4d2057b758a61C7017729c6Ec9bB3E9"
}
Response Body:
- Save the
result.idfrom the response body. This is the deployment ID and it is used to check the status of the contract creation request. ThetransactionHashthat is returned is the transction that created the contract on-chain. Thestatusattribute indicates if the transaction has been mined yet.
{
    "success": true,
    "result": {
        "id": "22fa9617-4630-49c1-8cd2-a0145980cd21",
        "chain": "MATIC",
        "name": "Venly Test Token",
        "symbol": "VTT",
        "maxSupply": 150,
        "burnable": true,
        "owner": "0x7312750DF4d2057b758a61C7017729c6Ec9bB3E9",
        "transactionHash": "0xdaae9385afe8a9e91d2f771e1bcb3597eb563fe0ab48cd75d381ac4798ad1359",
        "status": "PENDING"
    }
}
3. Check the token contract deployment status
Next, we will check the deployment status of the token contract using the deployment ID.
Request Endpoint: reference
GET /api/v3/erc20/contracts/deployments/{deploymentId}Path Variable
{deploymentId}: This can be found in the response of the create token contract endpoint as the result.id parameter.
Example Request
GET /api/v3/erc20/contracts/deployments/22fa9617-4630-49c1-8cd2-a0145980cd21Response Body
In the response body look for the result.
statusparameter. It can have three possible values:
SUCCEEDEDPENDINGFAILED
{
    "success": true,
    "result": {
        "id": "22fa9617-4630-49c1-8cd2-a0145980cd21",
        "chain": "MATIC",
        "address": "0x44b1dc2b16e315e846e9f00c11282d19265be983",
        "name": "Venly Test Token",
        "symbol": "VTT",
        "maxSupply": 150,
        "burnable": true,
        "owner": "0x7312750DF4d2057b758a61C7017729c6Ec9bB3E9",
        "transactionHash": "0xdaae9385afe8a9e91d2f771e1bcb3597eb563fe0ab48cd75d381ac4798ad1359",
        "status": "SUCCEEDED"
    }
}
4. Mint ERC20 tokens
Now we have successfully deployed the token contract, we can start to mint ERC20 tokens. Use this endpoint to mint ERC20 tokens by supplying the token contract address and destination wallet address.
Request Endpoint: reference
POST /api/v3/erc20/tokens/mintsRequest Body Parameters
| Parameter | Param Type | Description | Type | Required |
|---|---|---|---|---|
chain | Body | The blockchain of the token contract | String | ✅ |
contractAddress | Body | The token contract address | String | ✅ |
destinations | Body | The array includes all the wallet addresses and the number of ERC20 tokens to mint per wallet address | Array of objects | ✅ |
destinations.address | Body | The wallet address to mint and send the ERC20 tokens to | String | ✅ |
destinations.amount | Body | The number of ERC20 tokens you want to mint and send | Number | ✅ |
Example Request
In this example, we will mint and send ERC20 tokens to two wallet addresses. The first wallet will get five ERC20 tokens and the second wallet will get twenty-five tokens. You can add multiple wallet addresses.
POST /api/v3/erc20/tokens/mints{
"chain": "MATIC",
"contractAddress": "0x44b1dc2b16e315e846e9f00c11282d19265be983",
"destinations": [
{
"address": "0xb811Fac088E8E80F56258a5f29D47d0FF1a37BD5",
"amount": "5"
},
{
"address": "0xf2b1cEB69E765469a80E8d4c8635B05269889fa7",
"amount": "25"
}
]
}Response Body
- The
result.mint.idparam is the mint ID.* Theresult.mint.idparam can be used to track the token mint request.
{
    "success": true,
    "result": {
        "mints": [
            {
                "id": "273e6ecb-fb1b-44f0-a9ff-a19bbf92099a",
                "createdOn": "2024-09-23T09:34:21.973064048",
                "status": "PENDING",
                "destination": {
                    "address": "0xf2b1cEB69E765469a80E8d4c8635B05269889fa7",
                    "amount": 25
                }
            },
            {
                "id": "8a4a03ac-e1e8-4468-bdce-1e57e809d89f",
                "createdOn": "2024-09-23T09:34:21.977695915",
                "status": "PENDING",
                "destination": {
                    "address": "0xb811Fac088E8E80F56258a5f29D47d0FF1a37BD5",
                    "amount": 5
                }
            }
        ],
        "contract": {
            "address": "0x44b1dc2b16e315e846e9f00c11282d19265be983",
            "name": "Venly Test Token",
            "symbol": "VTT",
            "maxSupply": 150,
            "burnable": true,
            "owner": "0x7312750DF4d2057b758a61C7017729c6Ec9bB3E9",
            "type": "ERC_20"
        }
    }
}
5. Check the token mint status
Finally, we will check the token mint request using the mint ID.
Request Endpoint: reference
GET /api/v3/erc20/tokens/mints/{mintId}Example Request
GET /api/v3/erc20/tokens/mints/273e6ecb-fb1b-44f0-a9ff-a19bbf92099aResponse Body
In the response body look for the result.
statusparameter. It can have three possible values:
SUCCEEDEDPENDINGFAILED
{
    "success": true,
    "result": {
        "id": "273e6ecb-fb1b-44f0-a9ff-a19bbf92099a",
        "createdOn": "2024-09-23T09:34:21.973064",
        "status": "SUCCEEDED",
        "transactionHash": "0x2196af03642bf02a6ba6f416098ee50d03fba9343edb5938eaa7969e13bef2c2",
        "destination": {
            "address": "0xf2b1cEB69E765469a80E8d4c8635B05269889fa7",
            "amount": 25
        },
        "contract": {
            "address": "0x44b1dc2b16e315e846e9f00c11282d19265be983",
            "name": "Venly Test Token",
            "symbol": "VTT",
            "maxSupply": 150,
            "burnable": true,
            "owner": "0x7312750DF4d2057b758a61C7017729c6Ec9bB3E9",
            "type": "ERC_20"
        }
    }
}The response shows
"status": "SUCCEEDED", indicating the ERC20 token mint was successful on-chain.

Schedule a demo with our team to explore tailored solutions or dive in and start building right away on our portal.